Release 2 (9.0.2)
Part Number A92174-01
Home |
Solution Area |
Contents |
Index |
| Oracle9iAS InterConnect User's Guide Release 2 (9.0.2) Part Number A92174-01 |
|
This appendix provides an integration scenario and model based on a fictitious company, Acme, Inc. using Oracle9iAS InterConnect. This appendix discusses the following topics:
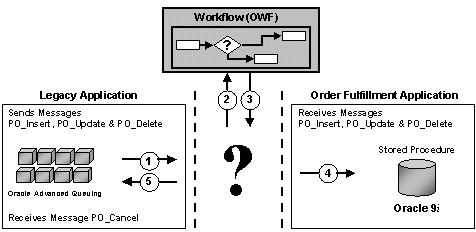
Each division of Acme, Inc. has multiple Order Fulfillment Systems which are a legacy from various mergers and acquisitions. Maintaining the parts of these systems such as platforms, software, training, etc. is costly and time consuming for Acme. In addition, the lack of integration between the systems prevents business analysis on the enterprise level.
Acme has created a new centralized system and the first phase of the integration project is to synchronize one of the legacy systems with the new system. The first test is to synchronize the Purchase Order information, where all purchase orders from the legacy system are to be reflected in the new system.
This new order fulfillment system operates on an Oracle9i database and uses the Oracle9iAS InterConnect Database Adapter to communicate with this system.
The legacy order fulfillment system operates on an Oracle8i database and uses the Oracle9iAS InterConnect Advanced Queueing Adapter to communicate with this system.
On the Purchase Order table in this system a database trigger queues the changed records. Oracle9iAS InterConnect is configured to listen to that queue to accomplish this integration.
Figure A-1 illustrates the integration scenario:
The question mark above is the task at hand:
How can we accomplish this task?
The first step in any integration scenario is to model the integration.
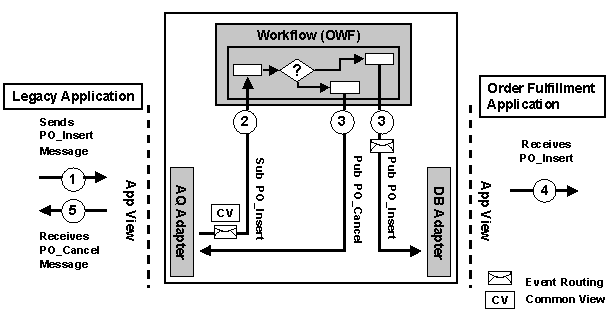
Figure A-2 illustrates how Oracle9iAS InterConnect integrates with the scenario in Figure A-1.
Now that the integration scenario has been defined:
How are we going to accomplish this task?
The Order Fulfillment Application is a standard Oracle database and uses the Oracle9iAS InterConnect Database adapter.
The following list of steps outlines the process to accomplish this integration.
The following sections describe implementing the integration scenario.
The source system uses Oracle8i Advanced Queueing to publish changes to the purchase order table. To be non-intrusive, the user creates a database trigger on the purchase order table. When a record is updated, inserted, or deleted and then committed, the trigger enqueues the appropriate payload. The Oracle9iAS InterConnect Advanced Queueing Adapter is configured to listen on this queue.
The following code is for the database trigger.
CREATE OR REPLACE TRIGGER AQAPP.ENQUEUE_PO
        AFTER INSERT OR DELETE OR UPDATE ON AQAPP.PURCHASE_ORDER FOR EACH ROW
DECLARE
       qname                   VARCHAR2(20)    := 'OUTBOUND_QUEUE';
       enqueue_options         DBMS_AQ.ENQUEUE_OPTIONS_T;
       message_properties      DBMS_AQ.MESSAGE_PROPERTIES_T;
       msgid                   RAW(16);
       recip_agent             SYS.AQ$_AGENT;
       raw_payload             RAW(32767);
       payload                 VARCHAR2(256);
BEGIN
  IF INSERTING THEN
    payload := '<?xml version="1.0" standalone="no"?>'        ||
      '<PO_Insert>' ||
      '<id>'        || :new.id           || '</id>'           ||
      '<action>'    || 'I'               || '</action>'       ||
      '<item>'      || :new.item         || '</item>'         ||
      '<amount>'    || :new.amount       || '</amount>'       ||
      '<quantity>'  || :new.quantity     || '</quantity>'     || '</PO_Insert>';

ELSIF DELETING THEN
    payload := '<?xml version="1.0" standalone="no"?>'        ||
      '<PO_Delete>'   ||
      '<id>'          || :old.id         || '</id>'           ||
      '<action>'      || 'D'             || '</action>'       || '</PO_Delete>';
ELSIF UPDATING THEN
    payload := '<?xml version="1.0" standalone="no"?>'        ||
      '<PO_Update>'   ||
      '<id>'          || :old.id          || '</id>'          ||
      '<action>'      || 'U'              || '</action>'      ||
      '<item>'        || :new.item        || '</item>'        ||
      '<amount>'      || :new.amount      || '</amount>'      ||
      '<quantity>'    || :new.quantity    || '</quantity>'    ||
      '<last_updated>'|| :new.last_updated|| '</last_updated>'|| '</PO_Update>';
END IF;

raw_payload := UTL_RAW.CAST_TO_RAW( payload );

DBMS_AQ.ENQUEUE(  queue_name            => qname
                 ,enqueue_options       => enqueue_options
                 ,message_properties    => message_properties
                 ,payload               => raw_payload
                 ,msgid                 => msgid );
EXCEPTION
      WHEN OTHERS THEN NULL;
END;
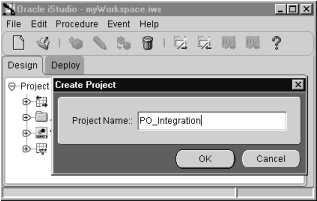
A project is a container for the integration logic pertaining to an integration scenario. The following steps describe creating the PO_Integration project using iStudio.
PO_Integration in the Project Name field and click OK. The Repository Information dialog displays.
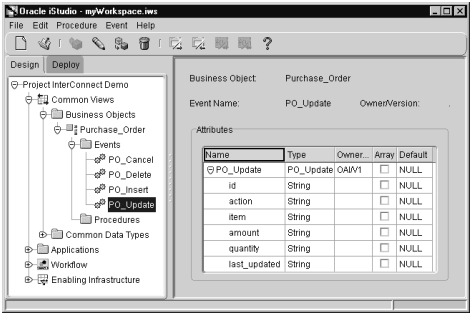
Each application has its own semantics and syntax. In order to integrate the data from multiple sources, a common view that is semantically compatible is required. The common views are either events or procedures and are grouped in a business object, located under the Common Views node in iStudio. In this scenario, all events are grouped under the Purchase_Order business object.
The following steps describe creating the Purchase_Order business object.
Purchase_Order in the Business Object Name field and click OK.
In order to integrate data between two or more systems, a semantically compatible view, or common view, is required. In this scenario, the insert, updated, delete, and cancel events are grouped under the Purchase_Order business object. The following four events must be created:
The following steps describe creating the PO_Insert event using an XML DTD (eXtensible Markup Language Data Type Definition). The user can also use the database or other common data type to describe the structure of the event.
Purchase_Order as the Business Object.
PO_Insert in the Event Name field.
PO_Insert_CV.dtd in the Open dialog and click Open.
PO_Insert in the Choose Root Dialog and click OK to return to the Create Event dialog.
Use the same steps for the PO_Update, PO_Delete, and PO_Cancel events, substituting the following correct XML DTD for each event. The PO_Cancel, PO_Delete, PO_Insert, and PO_Update events appear in the Design Object Navigator under the Events node as shown in Figure A-4.
Each event has its own XML DTD. The following code is listed for each event.
PO_Cancel
<!ELEMENT PO_Cancel (id, action, item, amount, quantity)>
<!ELEMENT id                  (#PCDATA)>
<!ELEMENT action              (#PCDATA)>
<!ELEMENT item                (#PCDATA)>
<!ELEMENT amount              (#PCDATA)>
<!ELEMENT quantity            (#PCDATA)>
PO_Update
<!ELEMENT PO_Update (id, action, item, amount, quantity, last_updated)>
<!ELEMENT id                  (#PCDATA)>
<!ELEMENT action              (#PCDATA)>
<!ELEMENT item                (#PCDATA)>
<!ELEMENT amount              (#PCDATA)>
<!ELEMENT quantity            (#PCDATA)>
<!ELEMENT last_updated        (#PCDATA)>
PO_Delete
<!ELEMENT PO_Delete (id, action)>
<!ELEMENT id                  (#PCDATA)>
<!ELEMENT action              (#PCDATA)>
PO_Insert
<!ELEMENT PO_Insert (id, action, item, amount, quantity)>
<!ELEMENT id (#PCDATA)>
<!ELEMENT action (#PCDATA)>
<!ELEMENT item (#PCDATA)>
<!ELEMENT amount (#PCDATA)>
<!ELEMENT quantity (#PCDATA)>
|
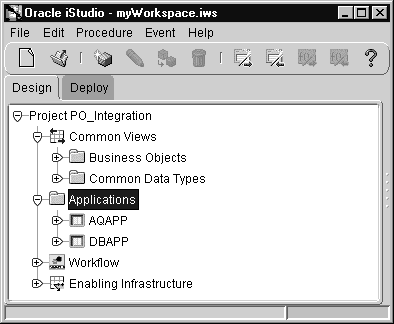
Note: The Business Object and Events display in the Object Navigator under node Common Views as shown in Figure A-4. |
An application in iStudio represents an instance of an adapter communicating with an application. When the user installs an adapter, a unique name is supplied and, in iStudio, this name is used as the name of the application. This scenario demonstrates creating the AQAPP and DBAPP applications.
The following steps describe creating the AQAPP application using iStudio.
AQAPP in the Application Name field and click OK.
Complete the same steps to create the DBAPP application. The AQAPP and DBAPP applications appear in the Design Object Navigator under the Applications node as shown in Figure A-5.
Each system has its own unique identifier or primary key. In most cases, an administrator does not allow any changes to the structure of their systems. Therefore, using a cross reference table, the keys of both systems can be maintained and cross referenced for subsequent updates and deletes.
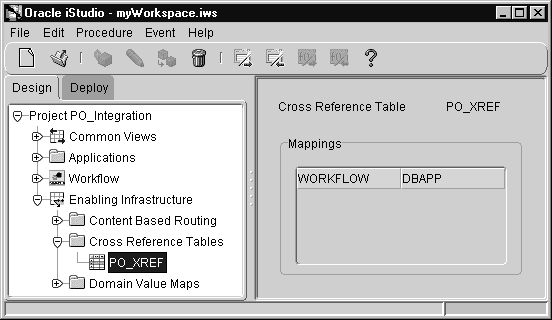
The following steps describe creating the PO_XREF cross reference table using iStudio. The table is automatically created in the repository schema and is referenced by the subscribing application. The WORKFLOW and DBAPP applications are added to the table, as the publisher and subscriber respectively.
PO_XREF in the Table Name field and click OK.
PO_XREF in the Navigator and add the WORKFLOW and DBAPP applications. The PO_XREF cross reference table appears in the Design Object Navigator under the Cross Reference Tables node as shown in Figure A-6.
The database trigger in the Legacy Application, AQAPP, publishes messages when records are inserted, updated, or deleted on the purchase order table. This process happens outside the Oracle9iAS InterConnect environment. The Oracle9iAS InterConnect Advanced Queueing adapter is configured to read these messages. The publish events under the iStudio application will:
The following steps describe how the message received from the Legacy Application queue is processed.
To start the Publish Wizard:
AQAPP application.
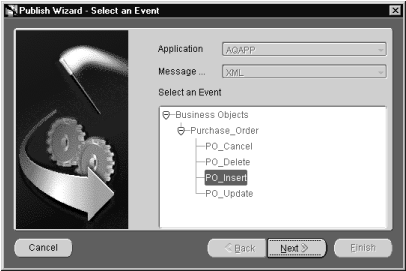
When the Publish Wizard starts the following pages display.
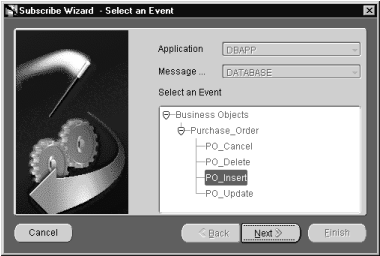
PO_Insert.
PO_Insert and click Next.
Import attributes from the common view by clicking Import and select Common View. The structure of the PO_Insert common view event displays. If the application view is different from the common view, use the database or an XML DTD to define the structure.
An event is received and converted into a common view to which any application can map. If the structure of one or more events is identical, then routing becomes an issue. An event map is used to distinguish the routing in this situation. The Action field in the application view contains an I for insert, a U for update, or a D for delete. Complete the following steps to create an event map:
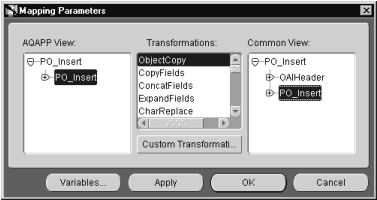
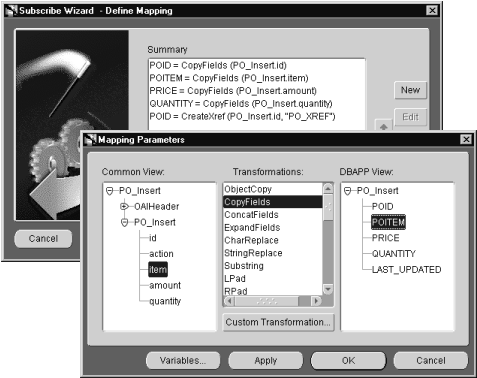
Use the Define Mapping page to map fields from the AQAPP View to the common view using transformations. In this scenario the structure is identical, therefore, the ObjectCopy transformation is used to map all the fields at once. To define new mappings:
PO_Insert tree and select the PO_Insert node in the AQAPP View box.
ObjectCopy in the Transformations box.
PO_Insert tree and select the PO_Insert node in the Common View box.
To create the PO_Update and PO_Delete publish events, repeat the same steps, using the following values for steps 2 and 3.
The DBAPP application subscribes to the following three events:
The AQAPP application subscribes only to the PO_Cancel event.
PO_Insert.
PO_Insert and click Next.
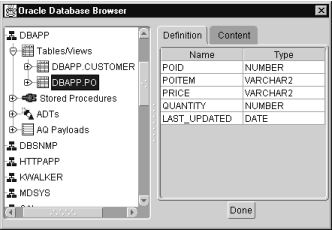
DBAPP.PO.
In "Create a Cross Reference Table", the PO_XREF cross reference table was created. This table synchronizes the primary keys on the source and target systems.
PO_XREF. The XRef dialog displays.
POID in the Application Returned Arguments For XRef box.
id in the Common View box.
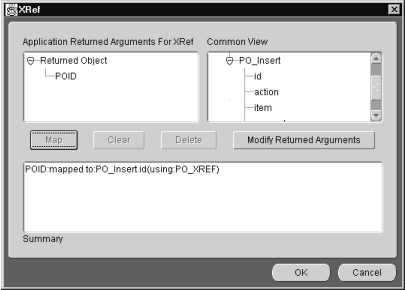
PO_Insert tree and the PO_Insert node in the Common View box. Map the following:
| Common View | Transformation | DBAPP View |
|---|---|---|
|
item |
CopyFields |
POITEM |
|
amount |
CopyFields |
PRICE |
|
quantity |
CopyFields |
QUANTITY |
sub_PO_Insert_OAI_V1 from the SQL code drop down list. The SQL code displays in the box.
PROCEDURE sub_PO_Insert_OAI_V1( POID          IN OUT LONG,
                                POITEM        IN LONG,
                                PRICE         IN LONG,
                                QUANTITY      IN NUMBER,
                                LAST_UPDATED  IN DATE)
AS
 v_poid NUMBER;

 BEGIN
  SELECT PO_SEQ.NEXTVAL INTO v_poid FROM dual;
  POID :=v_POID;

  INSERT INTO PO VALUES
   ( v_POID, POITEM, PRICE, QUANTITY, SYSDATE );
 COMMIT;
END sub_PO_Insert_OAI_V1;
The wizard steps have been abbreviated:
Select the PO_Update event.
Import the Common View.
PO_Insert.
PO_Update tree and node in the Common View box and select id.
LookupXref transformation.
PO_Update tree and select POID in the Application View box.
sub_PO_Update_OAI_V1 for the SQL code for field. The code displays in the box.
PROCEDURE sub_PO_Update_OAI_V1( POID          IN NUMBER,
                                POITEM        IN LONG,
                                PRICE         IN LONG,
                                QUANTITY      IN NUMBER,
                                LAST_UPDATED  IN DATE)
AS
 v_poid       NUMBER :=poid;
 v_poitem     LONG   :=poitem;
 v_price      LONG   :=price;
 v_quantity   NUMBER :=quantity;
BEGIN
  UPDATE PO SET  poitem = v_poitem, price = v_price
                 quantity = v_quantity, last_updated = sysdate
  WHERE poid = v_poid;
  COMMIT;

EXCEPTION
  WHEN OTHER THENS NULL;

END sub_PO_Update_OAI_V1;
The wizard steps have been abbreviated:
Select the PO_Delete event.
Import the Common View.
sub_PO_Delete_OAI_V1 for the SQL code for field. The code displays in the box.
PROCEDURE sub_PO_Delete_OAI_V1( POID          IN NUMBER,
                                POITEM        IN LONG,
                                PRICE         IN LONG,
                                QUANTITY      IN NUMBER,
                                LAST_UPDATED  IN DATE)
AS
 v_poid       NUMBER :=poid;
BEGIN
  DELETE FROM WHERE PO v_poid = poid;
  COMMIT;
EXCEPTION
  WHEN OTHERS THEN NULL;

END sub_PO_Update_OAI_V1;
The AQAPP subscribes to the PO_Cancel event.
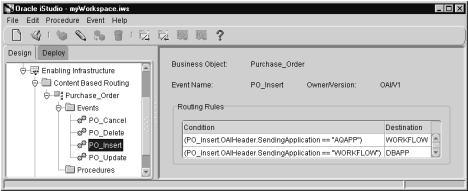
When an event is published, it is automatically routed to any subscriber to that event by default. If the routing of an event needs to be based on a value in the payload (message or message header) then Content Based Routing is required. in this scenario all changes to the purchased orders must be approved and therefore must be routed to Oracle Workflow to apply our business logic.
The logic to be applied for the Events PO_Insert, PO_Update & PO_Delete is:
If the source application is AQAPP then route to destination application WORKFLOW. The Wizard steps are:
If the source application is WORKFLOW, then route to destination application DBAPP. The Wizard steps are:
Repeat for events: PO_Update and PO_Delete
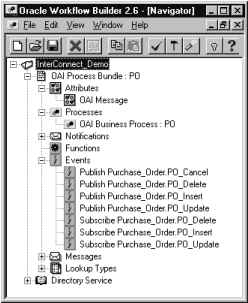
A process bundle enables related business processes to be grouped and transferred to the Oracle Workflow environment where user-defined business logic is applied.
Each business process enables related publish, subscribe, invoke, and implement activities to be grouped and placed in the Oracle Workflow Business Event System.
The following steps describe creating the PO process bundle using iStudio:
PO in the Process Bundle Name field and click OK.
The following steps describe creating the PO business process using iStudio:
PO in the Business Process Name field and click OK.
The Oracle Workflow business process uses the common view therefore, transformation and mapping is not required. The following lists the types of activities:
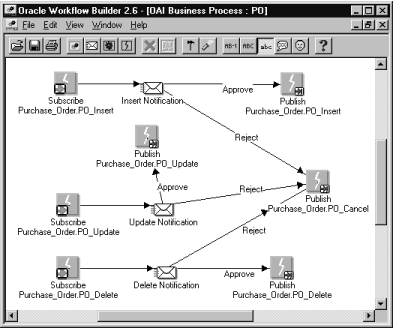
In this scenario, the PO_Insert, PO_Update, and PO_Delete messages are routed to Oracle Workflow to apply business logic. Based on this logic, messages are either sent to the Order Fulfillment Application or the PO_Cancel message is sent to the Legacy Application. Oracle Workflow must:
PO_Insert and publish PO_Insert.
PO_Update and publish PO_Update.
PO_Delete and publish PO_Delete.
PO_Cancel.
The following steps describe creating the subscribe activity using iStudio:
PO_Insert and click OK.
Repeat these steps for the PO_Update and PO_Delete events, substituting the correct values where necessary.
The following steps describe creating the publish activity using iStudio:
PO_Insert and click OK.
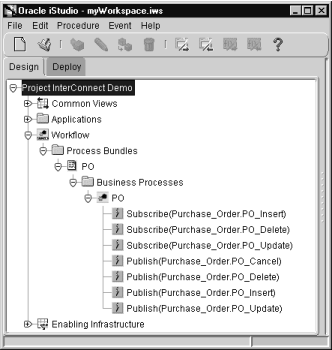
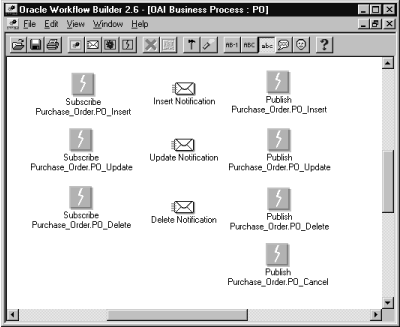
Repeat these steps for the PO_Update, PO_Delete, and PO_Cancel events, substituting the correct values where necessary. The subscribe and publish events appear in the Design Object Navigator under the PO node as shown in Figure A-14.
Deploying the Oracle Workflow process bundle accomplishes the following:
The following steps describe deploying the process bundle to Oracle Workflow:
InterConnect_Demo.wft in the File Name field and click Open. Oracle Workflow is started with InterConnect_Demo.
Lets' review the original requirement.
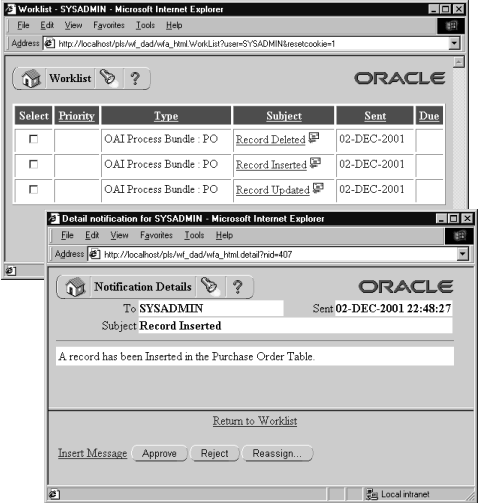
"An administrator must approve all changes such as insert, update, & delete before they are applied to the Order Fulfillment System. If a change is approved, it is sent to the Order Fulfillment System. If a change is rejected, then a cancellation notification is sent back the Legacy system."
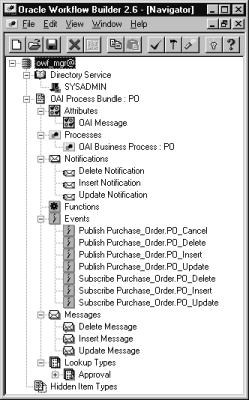
This Business Logic can be implemented in Oracle Workflow. The Oracle Workflow components require are:
Components transferred from iStudio.
Oracle Workflow components are required to create a Notification.
The message a notification activity will send.
A static list of values that can be referenced various object. For example a message attribute can reference a lookup type as a means of providing a list of possible responses to the performer of a notification.
When the workflow engine reaches a notification activity, it issues a Send() API call to the Notification System to send the message to an assigned performer. When a performer responds to a notification activity, the Notification System processes the response and informs the workflow engine that the notification activity is complete.
Oracle Workflow has a set of pre-defined item types with standard functionality The Standard item type contains generic activities that can be copied in a users item type. In this scenario we will be using the Lookup Type Approval.
As described, the user must create a Oracle Workflow Notification. The notification has two dependent objects, A lookup Type and a Message. The Lookup Type (Approval) can be copied from the standard item type.
The following steps describe creating a new Oracle Workflow message called Insert_Message
Using the default Copy and Paste functionality create the following messages using message Insert_Message as the template:
The following steps describe creating a new Oracle Workflow Notification.
Using the default Copy and Paste functionality create the following notifications using notification Insert_Notification as the template:
Now that all of the required objects have been created, the business logic can be modeled. The following steps describe this process.
Another way to display the process details is to double-click on OAI Business Process: PO.
The Oracle Workflow item type OAI Process Bundle:PO is validated when saved to the database. The next step is to deploy the Oracle9iAS InterConnect objects.
The AQAPP application in iStudio corresponds to the Advanced Queuing adapter that communicates with the legacy application. The legacy application, through a database trigger, places inserted, updated, and deleted records onto a queue using Oracle Advanced Queuing. To communicate to and from the Oracle9iAS InterConnect environment, the adapter must be configured to send and receive on those external queues.
The following steps describe this task.
AQAPP.
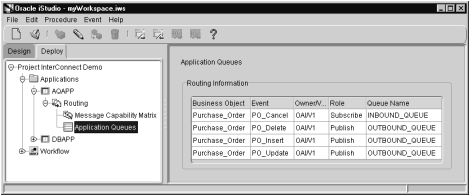
AQAPP node and drill down to the Routing node.
| Queue Name | Event |
|---|---|
|
INBOUND_QUEUE |
PO_Cancel |
|
OUTBOUND_QUEUE |
PO_Insert, PO_Update, and PO_Delete |
Each adapter has different cache settings to minimize communication to the repository and to improve performance. Pushing metadata synchronizes the adapter and repository metadata. The following steps describe this task:
Depending on the adapter type, there is code that must be exported to a file and installed in the target application database. The following steps describe exporting the code using the Export Application dialog in iStudio.
The resulting text files are a SQL*Plus script that is executed on the target schema.
The following example helps to explain the exporting and installing code task. This example is based on the following:
DBAPP
PO_Delete
PROCEDURE sub_PO_Delete_OAI_V1 (   POID         IN NUMBER,
                                   POITEM       IN LONG,
                                   PRICE        IN LONG,
                                   QUANTITY     IN NUMBER,
                                   LAST_UPDATED IN DATE,)
AS
          v_poid NUMBER :=poid;
BEGIN     DELETE FROM PO WHERE v_poid = poid;
          COMMIT;
EXCEPTION
          WHEN OTHERS THEN NULL;

END sub_PO_Delete_OAI_V1;
The final step in this scenario is to test the integration.
This process should be repeated for Update & Delete.
|
|
 Copyright © 2002 Oracle Corporation. All Rights Reserved. |
|