Skip Headers

Oracle9iAS InterConnect User's Guide
Release 2 (9.0.2)

Part Number A92174-01
Go To Documentation Library
Home
Go To Product List
Solution Area
Go To Table Of Contents
Contents
Go To Index
Index

Go to previous page Go to next page

3
Creating Applications, Common Views, and Business Objects

This chapter describes how to create and manage applications, common views, and business objects using iStudio. This chapter discusses the following topics:

Applications: An Overview

Each component integrated with Oracle9iAS InterConnect is referred to as an application. Each application expresses interest in specific messages, what its internal data type is, and how the message should be mapped to or from that internal type to the external world.

Application View

Each application has its own application view of data that allows it to participate in the integration. The application view of data uses transformations to insert into the common view.

After creating an application in iStudio, events and procedures can be created and used with the application.

See Also:


Application Data Types

Application data types have the same function as Common Data Types but relate to a particular application.

Creating an Application

To create an application:

  1. From the File menu, select New, then select Application. The Create Application dialog displays.

  2. Enter a name for the application in the Application Name field.

  3. Click OK.

    The application created displays in the Design Navigation Tree under the Applications node.

Common Views and Business Objects: An Overview

The common view is the hub view of the integration where each spoke is an application wanting to participate in the integration. After defining a common view by creating a business object and common data types, existing events can be published or subscribed to, and procedures can be invoked or implemented.

See Also:

Chapter 2, "Using iStudio" 

Defining Common Views

When defining a common view, business objects and common data types must be created.

Creating Business Objects

To create a new business object:

  1. From the File menu select New, then select Business Object. The Create Business Object dialog displays.

  2. Enter a name for the business object in the Business Object Name field.

  3. Click OK. The business object displays in the Design Navigation Tree under the Common View node.

Creating Common Data Types

When creating the data associated with an event or a procedure, it is possible to define the data once and reuse it for different integration points. Common data types are used to define such data for reuse and is especially useful for defining complex hierarchical data.

For example, a purchase order contains a header object and an array of line item objects. In addition, the header object contains two address objects: Bill_To and Ship_To. Therefore, the purchase order can be defined once and used for other purchase order-related integration points such as Create_Purchase_Order, Update_Purchase_Order, and Get_Purchase_Order. Moreover, Address can be defined once and used in the Bill_To and Ship_To addresses.

To create a common data type:

  1. From the File menu select New, then select Common Data Type. The Create Data Type window displays:


    Text description of is20.gif follows.
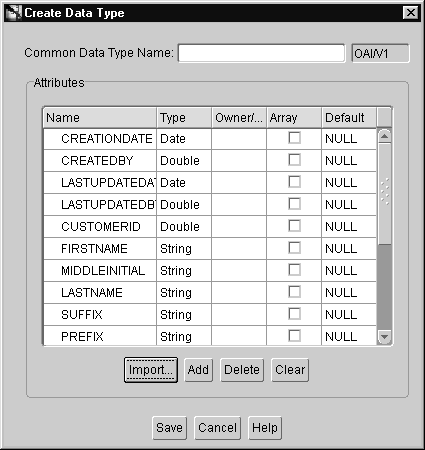
    Text description of the illustration is20.gif

    Enter a name for the common data type in the Common Data Type Name field.

    The owner and version number of the common data type display next to the common data type name. This field cannot be edited.

  2. Specify the attributes for this common data type using one of the following methods:

    • Add attributes one by one.

    • Import attributes from already existing application native data types or APIs.

Adding Attributes

To add attributes:

  1. On the Create Data Type dialog, click Add. A new entry displays in the attribute list:


    Text description of sc28.gif follows.
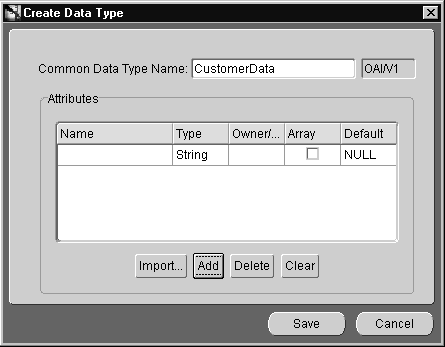
    Text description of the illustration sc28.gif

    Specify the following by editing the information directly in the attribute list entry.

    • Name--The name of the attribute.

    • Type--The type of the attribute. Select the type by clicking on the Type column in the attribute entry. A dropdown list displays. The attribute can be of primitive type (string, integer, float, double, date) or another common data type used to build hierarchical data types.

    • Array--Check this box if it the attribute is a collection instead of a single attribute.

    • Default--The default value of the field in case it is not populated at runtime.

  2. Click Save. Repeat the above steps for adding other attributes.

Importing Attributes

To import attributes:

  1. On the Create Data Type dialog, click Import. Attributes can be imported from the following sources:

    • Common Data Types

    • Database

    • XML

    • D3L

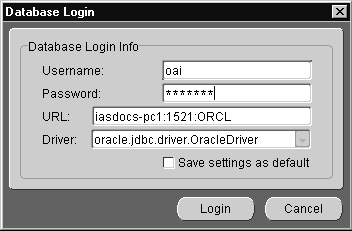
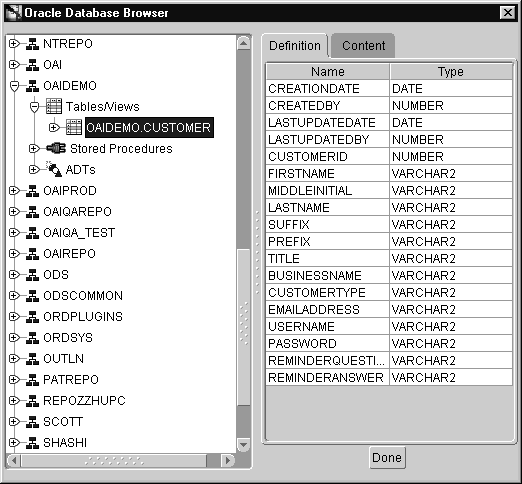
    The following example utilizes the Database import facility.

    See Also:

    Appendix B, "Using the Data Definition Description Language" 

  2. Click Database. The Database Login dialog displays:


    Text description of dblogin.gif follows.
    Text description of the illustration dblogin.gif

  3. Enter information in the following fields:

    • User Name--The database log in name.

    • Password--The database log in password.

    • URL--The machine name: port number: database SID.

    • Driver--The JDBC driver used to connect to the database.

    • Save settings as default--Check this box to save the settings for the workspace.

  4. Click Login.

    After logging in, the database tables and arguments display in the Database Browser Window.

    Select the fields to add. To select a range of fields, press Shift when clicking the mouse button. To select multiple items, press Control while clicking the mouse button.


    Text description of is21.gif follows.
    Text description of the illustration is21.gif

  5. Click Done to import the attributes into the common data type. The selected attributes display on the Create Data Type dialog:


    Text description of is20a.gif follows.
    Text description of the illustration is20a.gif

Deleting and Clearing Attributes

To delete a selected attribute:

To clear all attributes:


Go to previous page Go to next page
Oracle
Copyright © 2002 Oracle Corporation.

All Rights Reserved.
Go To Documentation Library
Home
Go To Product List
Solution Area
Go To Table Of Contents
Contents
Go To Index
Index