Version 9.0.2
Part Number A95458-02
Home | Solution Area | Contents |
Index |
| Oracle9iAS Discoverer Configuration Guide Version 9.0.2 Part Number A95458-02 |
|
This chapter explains how to maintain Oracle9iAS Discoverer, and includes the following topics:
If you are running Discoverer on Windows, a Windows service is created for Discoverer. To maintain Discoverer on Windows, you need to know how to start and stop the Discoverer Windows service as described in the following sections:
The Discoverer Windows service is the Oracle9iAS Discoverer process that Windows starts automatically when the machine is started. Other typical Windows services start networking and remote access procedures, server operations, and telephony processes.
When you install Discoverer, the Discoverer Windows service is created as an automatic service called 'Oracle<Oracle_Install_Name>Discoverer902'.
For example, if your Oracle Installation directory is called OraHome1, the Discoverer Windows service is 'OracleOraHome1Discoverer902'.
The Discoverer Windows service automatically starts the Discoverer CORBA components whenever the Windows machine is started. Using the Discoverer Windows service, you can also stop all of these components by simply stopping the service from running.
A key benefit of having the Discoverer CORBA components started as a single Windows service is that you do not need to remain logged onto a machine for the service (and therefore the CORBA components) to stay running. If you launched each component individually, you would need to stay logged onto the machine(s) as the administrator. Logging off would automatically stop the components.
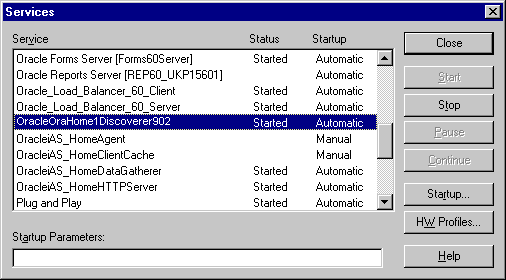
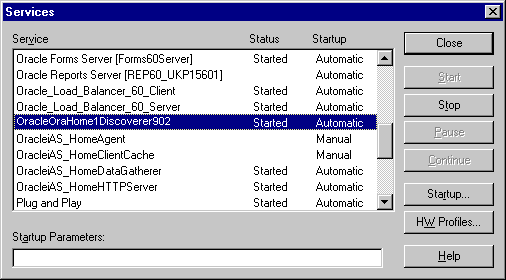
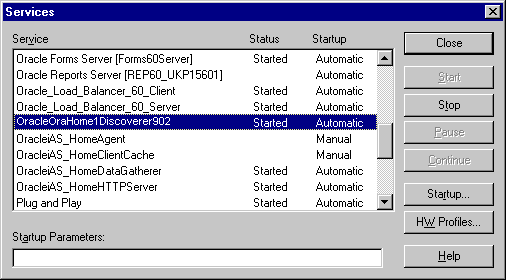
You can view the status of the Oracle Discoverer Windows service on the Services dialog.

The Status column indicates whether the service is started and running. If the service has not been started, the Status column is blank.
The Startup column indicates how the service is started, either manually or automatically.
When you install Discoverer, the Discoverer Windows service's Startup property is set to Automatic. In other words, the service starts automatically whenever the machine is started. However, once the service has started automatically you can subsequently stop it and restart it manually.
If you do not want the Discoverer Windows service to start automatically when the computer is started, set the service's Startup property to Manual. For example, you might do this if your network requires special services that have to start and stop in a particular sequence.
If the Startup property of the Discoverer Windows is set to 'Manual', this service will not start automatically when the machine is started. Therefore, you might want to start this service manually.
To start the Discoverer Windows service manually:
The Services dialog box contains Oracle9iASDiscoverer.

If the Discoverer Windows service is running, you stop the service to stop Discoverer running. For example, you might want to restart the machine in a controlled way.
To stop the Discoverer Windows service manually:
The Services dialog box contains Oracle9iASDiscoverer.

To change the Discoverer Windows service to manual startup:
The Services dialog box appears.
If errors occur during the startup of the Discoverer Windows service, these errors are written to a log file.
To view the log file:
This section explains why you might want to shut down Discoverer and when you might do this.
There will probably be occasions when you need to take a server machine off line (e.g. to perform maintenance or to change hardware settings). This prevents users from starting sessions on that server while you work. You can shut down Discoverer in two ways:
Note: You do not need to shut down the Discoverer system to edit the Discoverer user preferences. However, if the machine you want to shut down for maintenance is the machine that runs the Preferences component, you will need to shut down the Discoverer system. Shutting down the machine running the Preferences component affects the entire Discoverer system because the Preferences component is used when creating a session.
If you are running Discoverer on Windows, you can shut down individual Discoverer servers in two ways:
If you are running Discoverer on Windows, you can shut down an individual Discoverer server gradually.
Shutting down a server gradually enables you to prevent new sessions from starting but allow current users to complete their sessions.
Stopping the Oracle Discoverer Windows service stops the Discoverer CORBA components, which prevents any new sessions from being started on this machine. Sessions in progress are not affected by shutting down the Oracle Discoverer Windows service. Thus, users will not be interrupted while working.
After all the current users have disconnected from their sessions, you can perform your maintenance tasks. If you want to register or unregister components, the Oracle Discoverer Windows service must first be restarted.
To check that all users have disconnected, open the Windows NT Task Manager and make sure that no instances of the Session executable (dis51ws.exe) are running.
If you are running Discoverer on Windows, you can shut down an individual Discoverer server immediately.
An immediate shut down stops new user sessions from starting and stops the current sessions. To do this, you stop the Oracle Discoverer Windows service on the machine (to prevent new sessions from being started) and then you stop the sessions currently running.
To shut down the entire Discoverer system, you shut down individual machines in a specific order.
You can shut down the entire Discoverer system in two ways:
Regardless of whether you are running Discoverer on Windows or on UNIX, you can shut down the Discoverer system gradually.
Shutting down the Discoverer system gradually enables you to prevent new sessions from starting but allow current users to complete their sessions.
To shut down the Discoverer system gradually, you stop the CORBA components in turn.
On Windows:
Stopping the Oracle Discoverer Windows service stops the Discoverer CORBA components, which prevents any new sessions from being started on this machine. Sessions in progress are not affected by shutting down the Oracle Discoverer Windows service. Thus, users will not be interrupted while working.
You now shut down the Preferences component.
Note: Do not shut down the Preferences component until all sessions are stopped. Shutting down the Preferences component while sessions are active can cause problems with active sessions.
On UNIX:
Note: You can also use OEM to start and stop Discoverer on Unix (for more information, see Section 4.4, "How to stop standalone Oracle9iAS Discoverer components in Unix")
For more information about the location of configuration files, see Section A.2, "List of Discoverer file locations").
> stopoad.sh
> stoposagent.sh
> stoppreference.sh
> ps -A|grep dis51pr
For example, the output might be:
18064 pts/3 0:01 dis51pr
18072 pts/4 0:08 dis51pr
> kill -9 <process id>
where <process id> is the numeric identifier of the first dis51pr process.
For example, you might type the following:
> kill -9 18064
When all of the current users have completed their sessions, the Discoverer server is shut down.
To make sure that no Discoverer sessions are active, type the following at the command prompt to list the numeric identifier of every dis5ws Discoverer process that is currently running:
> ps -A|grep dis5ws
To stop any Discoverer dis5ws processes that are still active, type the following at the command prompt:
> kill -9 <process id>
where <process id> is the numeric identifier of the dis5ws process.
An immediate shut down stops new user sessions from starting and stops the current sessions. To perform an immediate shut down, you:
On Windows:
On UNIX:
> stopall.sh
Note: You can also use OEM to start and stop Discoverer on Unix (for more information, see Section 4.4, "How to stop standalone Oracle9iAS Discoverer components in Unix")
Using Oracle Enterprise Manager, you stop Oracle9iAS Discoverer running on a standalone machine in a component farm from any machine in the component farm. For example, you might want to perform maintenance tasks on a machine and need to stop Oracle9iAS Discoverer.
To stop standalone Oracle9iAS Discoverer components:
Note: Alternatively, select the OC4J_BI_Forms link to display the OC4J_BI_Forms page and click Start.
Note: If you want to stop and start the component, you can also use the Restart button.
|
|
 Copyright © 2002 Oracle Corporation. All Rights Reserved. |
|