Version 9.0.2
Part Number A95458-02
Home | Solution Area | Contents |
Index |
| Oracle9iAS Discoverer Configuration Guide Version 9.0.2 Part Number A95458-02 |
|
This chapter describes the different security mechanisms that protect data accessed by Discoverer users, and contains the following topics:
Discoverer supports a number of security mechanisms to prevent unauthorized access to data.
The diagram below describes the different levels of security protecting data accessed by Discoverer users:
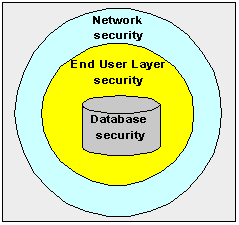
Security is applied at three separate levels:
At the most basic level, a user must log on to a database using a database username and password. Beyond that, access to information is regulated by the database privileges granted to the database user. The database privileges might be granted explicitly to the database user or indirectly by a database role. Discoverer users never see information to which they do not have database access.
Typically, you will set up database security using SQL*Plus or a DBA tool.
This section explains the Discoverer's End User Layer (EUL) security mechanisms.
Discoverer managers can control access to information by creating and managing business areas. Discoverer users can only access information to which they have been granted access through a business area. Discoverer users can share information amongst themselves using shared workbooks, but they never see information to which they do not have database access.
Discoverer managers use Discoverer Administrator to set up EUL security. For more information about creating and maintaining business areas, see Oracle9i Discoverer Administrator Administration Guide.
Discoverer managers can further control users' access to information by defining Discoverer connections, which contain Discoverer login information. Each connection specifies an End User Layer containing one or more business areas. Discoverer users can be restricted to using public connections or can be given permission to create their own private connections (see Oracle9i Discoverer Administrator Administration Guide).
Discoverer managers use Oracle9iAS Enterprise Manager to create public connections and give end users permission to create their own private connections. For more information about creating and maintaining Discoverer connections, see Oracle9i Discoverer Administrator Administration Guide.
This section describes the relationship between Oracle9iAS Discoverer and Oracle9iAS Single Sign-On.
Oracle9iAS Single Sign-On is a component of Oracle9i Application Server that enables users to log in to all features of the Oracle9iAS product complement, as well as to other Web applications, using a single user name and password that is entered once.
Note: Oracle9iAS Single Sign-On is implemented using Oracle Sign-On Server.
When you install Oracle9i Application Server, the Oracle9iAS Single Sign-On service is installed automatically, but it is not enabled by default.
Discoverer connections work in both Single Sign-On and non-Single Sign-On environments. In an Oracle9iAS Single Sign-On environment, if a Discoverer end user starts Discoverer without having been authenticated by Oracle9iAS Single Sign-On, the user is challenged for Single Sign-On details (username and password). Having provided Single Sign-On details, the user can display the Discoverer connections page and start Discoverer without having to enter a username or password again.
Note: To enable Single Sign-On, open the mod_osso.conf file and enable SSO for discoverer/viewer and /discoverer/plus. Because Discoverer relies on Oracle9iAS Portal to protect the /discoverer/portlet provider URL, do not enable SSO for /discoverer/portlet provider.
If you are not deploying Discoverer with Single Sign-On, when a Discoverer end user chooses a private connection for the first time in a browser session, they are prompted to confirm the database password. They are not prompted for SSO login details.
If the end user closes their browser and then starts it again (i.e. creates a new browser session), they will be prompted to confirm their database password. End users must confirm the database password each time a private connection is used. End users do not have to confirm passwords for public connections (for more information, see Oracle9i Discoverer Administrator Administration Guide).
When you publish Discoverer content in a portlet produced using Oracle9iAS Portal, you give portal users access to the workbooks. However, portal users accessing Discoverer workbooks only see data to which they have database access. In other words, two different users accessing the same workbook might see different data, depending on their database privileges. For more information, see Section 11.1, "Using Discoverer with Oracle9iAS Portal".
You can use Discoverer in different network environments that might or might not include firewalls using different communication protocols (i.e. JRMP, HTTP, HTTPS).
The most appropriate network environment depends on both existing network strategies in your organization as well as your requirements for:
Discoverer Viewer and Discoverer Plus require different security configuration:
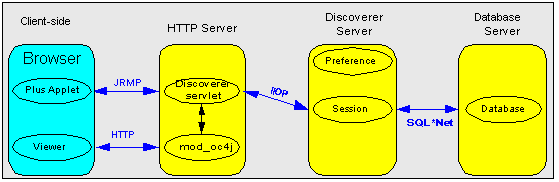
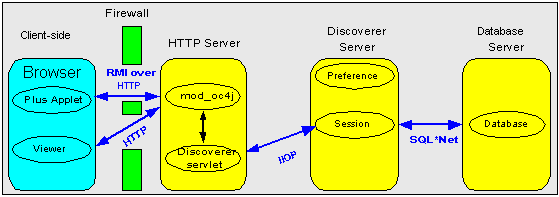
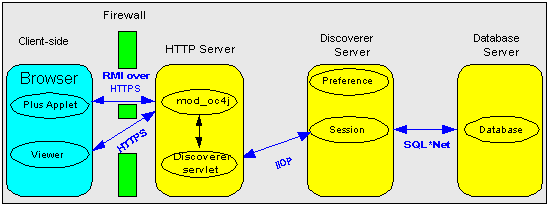
Discoverer Viewer uses standard HTTP or HTTPS protocols to connect Discoverer clients to the Discoverer servlet.
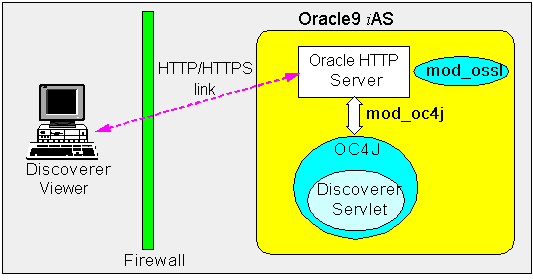
Note: Discoverer Viewer client machines require only a standard Web browser to run Discoverer Viewer.
In an out-of-the-box Oracle9iAS install, Discoverer Viewer is configured as follows, depending on the environment:
Discoverer Plus uses standard Java Remote Method Protocol (JRMP), HTTP or HTTPS protocols to connect clients to the Discoverer servlet.
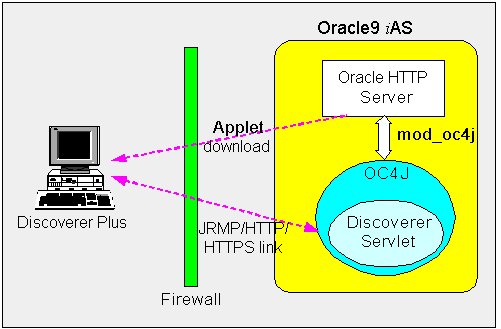
Discoverer Plus uses two communication channels:
In an out-of-the-box Oracle9iAS install, Discoverer Plus is configured as follows, depending on the environment:
Make sure that the default Discoverer Plus communication protocol (i.e. Default) is selected (for more information, Section 13.5.2.4, "How to set up Discoverer Plus to use the default communication protocol").
Although a HTTP connection will work with the Discoverer Plus communication protocol option set to Default (i.e. JRMP), you can improve performance by specifying the Tunneling option on the Discoverer Plus communication protocol page (for more information, Section 13.5.2.5, "How to set up Discoverer Plus to use the Tunneling communication protocol").
Although a HTTPS connection will still work with Discoverer Plus communication protocol option set to Default (i.e. JRMP), you can improve performance by specifying the Tunneling option or Secure Tunneling option on the Discoverer Plus communication protocol page (for more information, Section 13.5.2.2, "About specifying a Discoverer Plus communication protocol").
If you are deploying Discoverer Plus using a non-standard or private SSL signing authority, you need to make sure that the certificate information is in the \lib\security\certdb.txt file on each client machine. This additional configuration is required because Discoverer ignores the browser's signing authority and uses Oracle JInititator's SSL technology.
Using Oracle Enterprise Manager, you can specify which communication protocol the Discoverer Plus applet (i.e. the Discoverer client) and the Discoverer servlet (i.e. on the Discoverer server) use to communicate. The three communication protocol options are:
Specify this option if you want the Discoverer Plus applet to attempt to use JRMP and if this fails, to use HTTP or HTTPS (depending on the URL) to communicate with the Discoverer servlet. This option works regardless of whether the applet is running inside or outside a firewall. However, it will be slower outside the firewall because JRMP will be tried first.
For more information about specifying this Discoverer Services Configuration option, see Section 13.5.2.4, "How to set up Discoverer Plus to use the default communication protocol".
Specify this option if you want the Discoverer Plus client to connect using the same method to communicate with the Discoverer servlet as was originally used to download the applet itself (i.e. either HTTP or HTTPS depending on the URL). This option works regardless of whether a firewall is being used.
For more information about specifying this Discoverer Services Configuration option, see Section 13.5.2.5, "How to set up Discoverer Plus to use the Tunneling communication protocol".
Specify this option if you want the Discoverer Plus client to always use HTTPS to communicate with the Discoverer servlet.
For more information about specifying this Discoverer Services Configuration option, see Section 13.5.2.6, "How to set up Discoverer Plus to use the Secure Tunneling communication protocol".
You use the Discoverer Plus Configuration page in Oracle Enterprise Manager to specify a Discoverer Plus communication protocol. For example, if you want to encrypt Discoverer Plus data, you might want to configure Discoverer Plus to use the HTTPS communication protocol.
How to display the Oracle9iAS Discoverer Plus Configuration page in OEM:
If you are connected to the Oracle HTTP Server locally, the URL will be in the form:
http://hostname:1810
If you are connecting to the Oracle HTTP server remotely, contact the contact the Oracle9iAS system manager for information about which URL to use.
Note: For more information about starting OEM, see Oracle Enterprise Manager Configuration Guide.
Note: If you need an OEM user name and password, contact the Oracle9iAS system manager.
The Oracle Enterprise Manager main page is displayed.

A list of Oracle9iAS components on that machine is displayed (e.g. HTTP Server, OC4J_BI_Forms, Web Cache, OC4J_Portal).
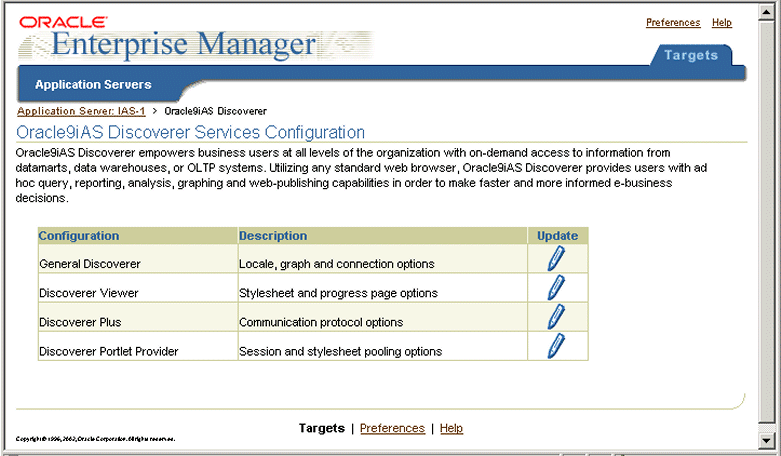
The Oracle9iAS Discoverer Services Configuration table contains a row for each part of Discoverer that you can configure.
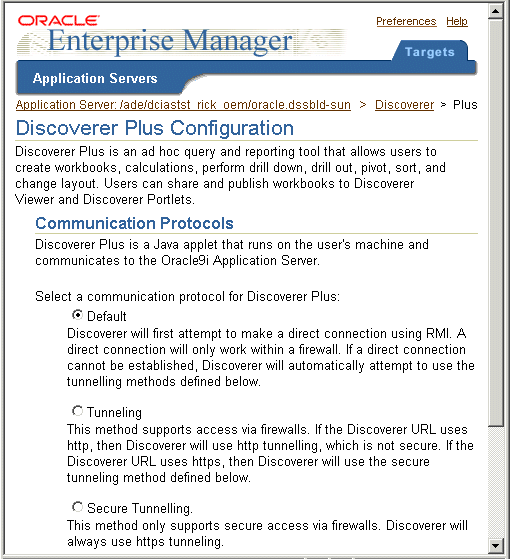
Text description of the illustration oem3.gif
The Discoverer Plus configuration page enables you to change the Discoverer Plus communication protocol (for more information, Section 13.5.2.2, "About specifying a Discoverer Plus communication protocol").
To set up Discoverer Plus to use the default communication protocol:
The Discoverer Plus applet will attempt to use JRMP. If JRMP is not available, the Discoverer Plus applet will use HTTP or HTTPS (depending on the URL) to communicate with the Discoverer servlet.
Note: This option works regardless of whether the applet is running inside or outside a firewall. However, it will be slower outside the firewall because JRMP will be tried first. For more information about the other options on this page, refer to "About specifying a Discoverer Plus communication protocol"
For example, http://machinename.myorganization.com:7777/discoverer/plus
To set up Discoverer Plus to use the tunneling communication protocol:
The Discoverer Plus applet will use the same protocol to communicate with the Discoverer servlet as was originally used to download the applet itself (i.e. either HTTP or HTTPS). This option works regardless of whether a firewall is being used.
For example, http://machinename.myorganization.com:7777/discoverer/plus
To set up Discoverer Plus to use the secure tunneling communication protocol:
The Discoverer Plus applet will use the HTTPS protocol to communicate with the Discoverer servlet.
For example, https://machinename.myorganization.com:7777/discoverer/plus
Oracle9iAS Discoverer Plus does not require Visibroker Gatekeeper.
If you are deploying Oracle9iAS Discoverer with Oracle9iAS Web Cache, there are security implications for some restricted user environments.
For more information, see:
A firewall is one system or a group of several systems put in place to enforce a security policy between the Internet and an organization's network.
In other words, a firewall is an electronic `fence' around a network to protect it from unauthorized access.
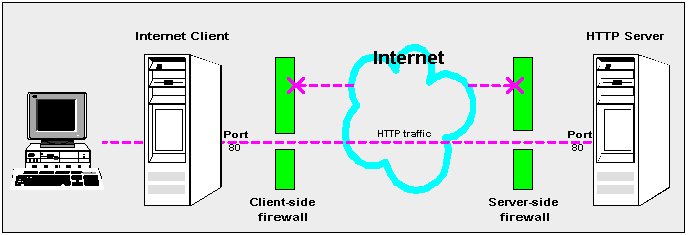
Typically, an organization using a Web Server machine that communicates across the Internet has a firewall between its Oracle HTTP Server machine and the Internet. This is known as a Server-side firewall. Other organizations (or remote parts of the same organization) connecting to this Web Server machine typically have their own firewall, known as a Client-side firewall. Information that conforms to the organization's firewall policy is allowed to pass through the firewalls enabling server machines and client machines to communicate.
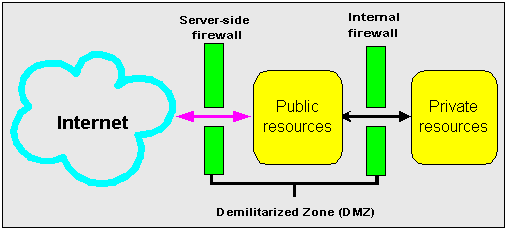
A demilitarized zone (DMZ) is a firewall configuration that provides an additional level of security. In this configuration, the DMZ is an extra network placed between a protected network and the Internet. Resources residing within the DMZ are visible on the public Internet, but are secure. DMZs typically hold servers that host a company's public web site, File Transfer Protocol (FTP) site, and Simple Mail Transfer Protocol (SMTP) server.
Firewall policies vary across organization and there are a wide variety of bespoke and off-the-shelf firewall packages in use.
A good firewall configuration assumes that resources in the DMZ will be breached, and should minimize damage to the internal network and any sensitive data residing on the network when this happens. This involves two steps:
The HTTPS protocol uses an industry standard protocol called Secure Sockets Layer (SSL) to establish secure connections between clients and servers.
The SSL protocol enables sensitive data to be transmitted over an insecure network, such as the Internet, by providing the following security features:
You can tell when SSL is enabled in Discoverer as follows:
You configure Discoverer to work in an intranet as follows:
Deploying Discoverer Viewer in an intranet (i.e. inside a firewall) requires no additional configuration after an Oracle9iAS installation. Discoverer Viewer uses a HTTP connection.
Deploying Discoverer Plus in an intranet (i.e. inside a firewall) requires no additional configuration after an Oracle9iAS installation. Discoverer Plus uses a direct connection using JRMP (i.e. the Discoverer default communication protocol).
You configure Discoverer to work through firewalls as follows:
Discoverer Viewer with no encryption (i.e. HTTP) requires no additional security configuration as long as the firewall allows HTTP traffic to pass through (e.g. on the default port 80).
Discoverer Plus with no encryption (i.e. HTTP) requires no additional security configuration. To improve performance, you might want to change the Discoverer Plus communication protocol to tunneling to prevent the Discoverer client from first trying to connect using JRMP, then by HTTP (for more information, see Section 13.5.2.5, "How to set up Discoverer Plus to use the Tunneling communication protocol").
Yes, if you are using HTTP or HTTPS Discoverer will work through multiple firewalls (for more information, see Section 13.6.5, "How do I configure Discoverer to work through a firewall?").
You configure Discoverer to use encryption as follows:
Configure mod_ossl to use HTTPS (for more information, see Oracle9iAS Security Guide) and deploy Discoverer Viewer on a HTTPS URL.
Deploy Discoverer Viewer on a HTTPS URL. To improve performance, you might want to change the Discoverer Plus communication protocol to Secure Tunneling to prevent the Discoverer client from first trying to connect using JRMP, then by HTTP, then by HTTPS (for more information, see Section 13.5.2.6, "How to set up Discoverer Plus to use the Secure Tunneling communication protocol").
You configure Discoverer to use encryption through firewalls as follows:
Configure Discoverer Viewer to work through a firewall (for more information, see Section 13.6.5, "How do I configure Discoverer to work through a firewall?". Then, make sure that your firewall(s) allow HTTPS traffic to pass through (e.g. on the default port 443).
Configure Discoverer Plus to work through a firewall (for more information, see Section 13.6.5, "How do I configure Discoverer to work through a firewall?". Then, make sure that your firewall(s) allow HTTPS traffic to pass through (e.g. on the default port 443).
In Discoverer Viewer, make sure that client browsers displays a closed padlock or key symbol in the bottom left-hand corner of the Discoverer Viewer browser window.
In Discoverer Plus, make sure that the client displays a closed padlock symbol in the bottom left-hand corner of the Discoverer Plus applet window.
Yes, you can configure Discoverer for both SSL and non-SSL communication. For example, you might use the default Discoverer Plus communication protocol that uses a direct JRMP connection inside the firewall, but automatically uses a HTTP or HTTPS for users outside the firewall.
Yes. Discoverer can be configured to first attempt a JRMP connection, then HTTP and HTTP connection. Users inside a firewall will connect using JRMP, but because JRMP is a direct connection that only works inside a firewall, users outside the firewall are connected as HTTP or HTTPS (depending on the URL).
You can deploy Discoverer using any standard Network Address Translation (NAT) device.
|
|
 Copyright © 2002 Oracle Corporation. All Rights Reserved. |
|