Version 9.0.2
Part Number A95458-02
Home | Solution Area | Contents |
Index |
| Oracle9iAS Discoverer Configuration Guide Version 9.0.2 Part Number A95458-02 |
|
This chapter explains how to provide a customized Discoverer Viewer look and feel to end users. For example, you might want to replace Discoverer's Oracle logo with your organization's logo, or change text colors and styles.
Note: Discoverer Viewer end users can also configure the user interface themselves on a per-session basis by setting their own presentation options (for more information, see "About presentation options").
This chapter contains the following topics:
You customize Discoverer Viewer to change the default look and feel that you provide to Discoverer Viewer end users, or to provide end users with pre-defined presentation templates. For example, you might want to:
You customize Discoverer Viewer by changing values stored in the following types of industry standard files that Discoverer uses to configure the user interface.
To customize Discoverer Viewer, you need to edit text files on the Discoverer Web server using one of the following:
Note: Dedicated XML editors are preferable because they make XML files easier to navigate and amend.
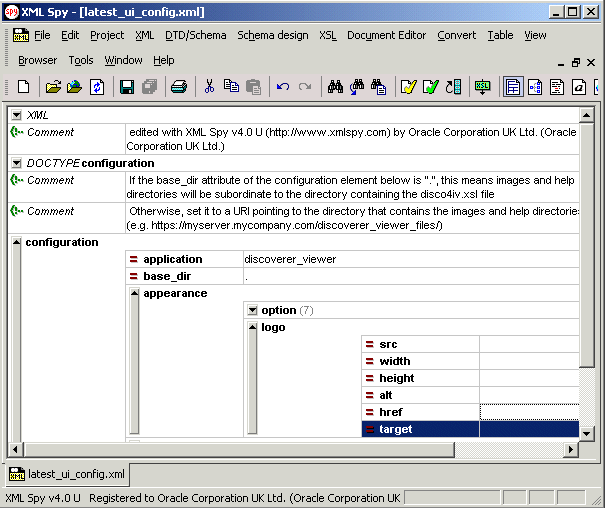
The Discoverer Viewer CSS file contains tags for each component of the Discoverer Viewer user interface that you can customize. The figure below shows an example of a blaf.css file.
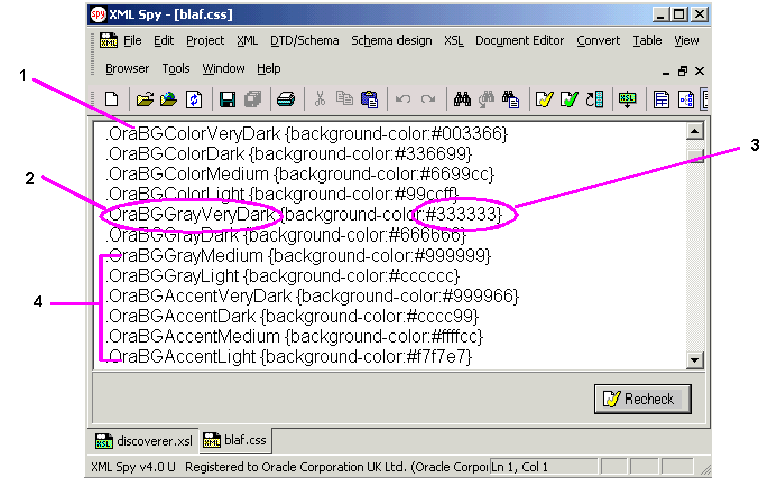
Key to figure:
To customize Discoverer Viewer, you change the value of the tags.
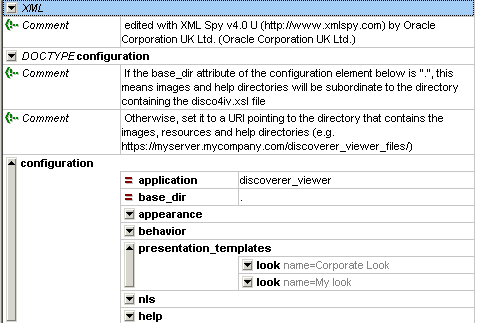
The Discoverer Viewer XML files contain tags for each component of the Discoverer Viewer user interface that you can customize (for more information, see "About presentation options"). The figure below shows an example of a ui_config.xml file.
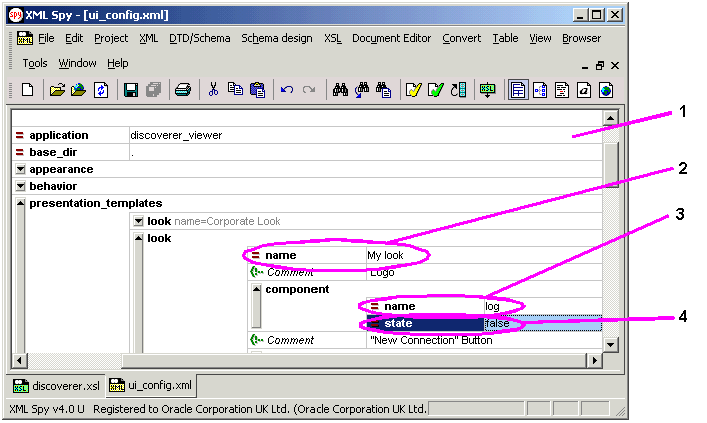
Key to figure:
If you use a dedicated XML editor, the XML tags are displayed in a structured way that you can expand or contract, and you can choose values using drop-down lists.
If you use a simple text editor to edit an XML file, tags are displayed in plain text format, without additional formatting.
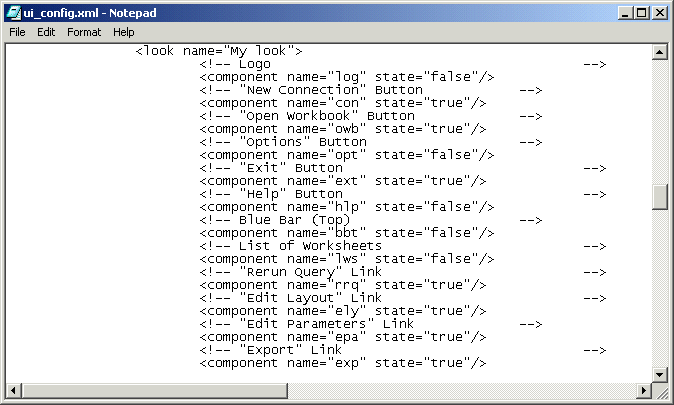
To update a tag value, simply replace the tag value with a new value. For example, to hide a user interface component, change its tag value from to 'true' to 'false'.
Note: The ui_config.xml file contains additional comments and tag labels to help you when making amendments. Comments are enclosed in the following tags: <!-- Comments -->
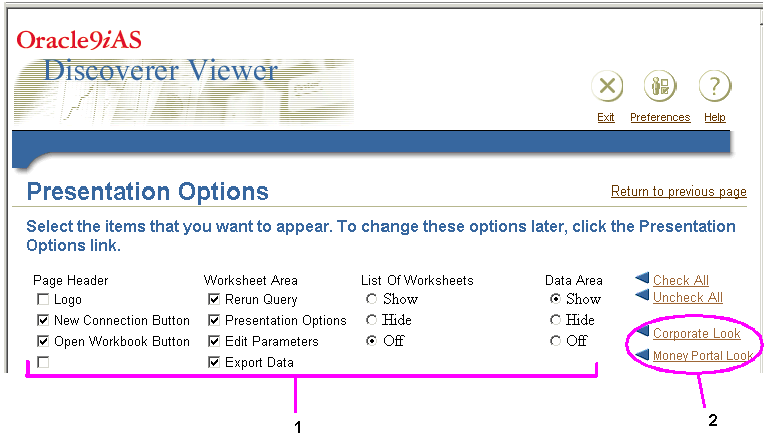
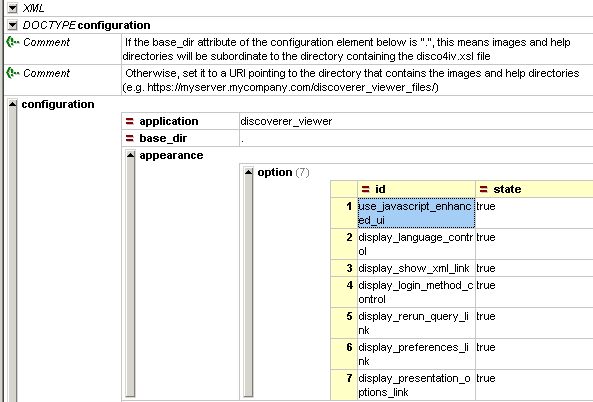
Presentation options define areas of the Discoverer Viewer user interface, such as headers, page areas, and footers. For example, in the worksheet area, you might not want to display worksheet headings or drill icons to Discoverer Viewer end users.
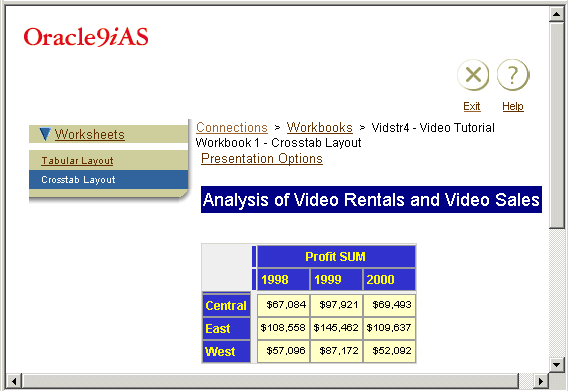
In the figure above, Discoverer Viewer has been customized by removing the Discoverer logo, New Connection button, Open Workbook button, page footer, and export option.
You can also store presentation options in presentation templates and make them available to Discoverer end users (for more information, see Section 10.7, "About presentation templates").
Note: You can also remove Discoverer UI components by editing the ui_config.xml file (for more information, see Section 10.11, "How to remove Discoverer Viewer user interface options").
Presentation templates are sets of pre-defined presentation options, and are used to enable Discoverer Viewer end users to customize the Discoverer Viewer UI with a single click.
Note: Discoverer Viewer end users can also set their own presentation options on a per-session basis using the Presentation Options page in Discoverer Viewer.
Key to figure:
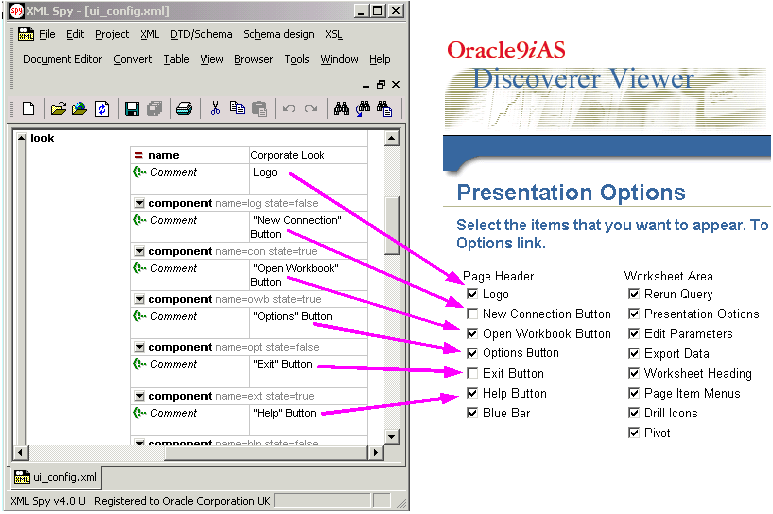
In the figure above, the state of the presentation options (i.e. true or false) is used to determine whether user interface components are displayed. These options are represented by check boxes on the Presentation Options page. For information about how to create presentation templates, see "How to create a presentation template".
Note: You can also remove Discoverer UI components globally by editing the ui_config.xml file (for more information, see Section 10.11, "How to remove Discoverer Viewer user interface options").
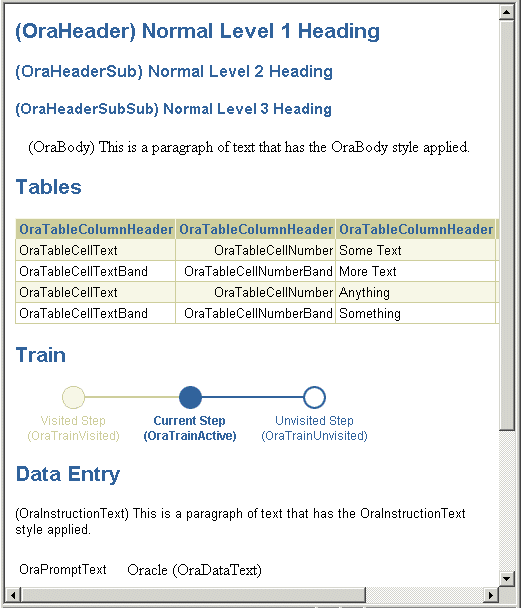
To help you customize Discoverer Viewer's look-and-feel, Discoverer is installed with a sample browser look-and-feel file (blaf.htm). The blaf.htm file displays the current look-and-feel settings for each display tag defined in the Discoverer Viewer cascading stylesheet (blaf.css).
Note: For more information about the location of configuration files, see Section A.2, "List of Discoverer file locations".
If you update the display tags in blaf.css, you can see changes reflected immediately in blaf.htm. You can use blaf.htm to find out which browser look-and-feel tags you need to change.
In the example below, the tag names in brackets or in the Tables section (e.g. OraHeader) are the display tags that you change in blaf.css.
You change the default Discoverer Viewer look and feel when you want to provide a customized Discoverer Viewer look and feel to end users. For example, you might want to change the background UI color or UI fonts.
To change the default Discoverer Viewer look and feel:
You can update any of the tag values in the blaf.css file.
For example, to change the paragraph style from black to blue, change the .OraBody{background-color:#000000} tag to .OraBody{background-color:#0000FF}
Tip: Use the blaf.htm file to find out which tags to change in blaf.css (for more information, see "About the sample browser look-and-feel file (blaf.htm)".
Tip: Use the blaf.htm file to preview changes that you make in the blaf.css file (for more information, see "About the sample browser look-and-feel file (blaf.htm)".
Hint: If you have an existing Discoverer Viewer session running, refresh the browser to update Discoverer Viewer with changes that you have made.
The look and feel changes that you made will be applied.
You change the default Discoverer Viewer logo when you want to replace it with a logo or graphic of your choice. For example, you might want to change the logo displayed by Discoverer Viewer.
To change the default Discoverer Viewer logo:
To insert a logo, insert the URL of the graphic into the src attribute value field. For example, to replace the default Oracle logo with a logo stored in <ORACLE_HOME>/j2ee/OC4J_BI_Forms/applications/discoverer/web/common/xsl/my_logo.gif, the URL of the logo file can be either be 'common/xsl/my_logo.gif' (i.e. using a relative path), or 'http://www.server.com:777/discoverer/common/xsl/clock.gif' (i.e. an absolute path).
Note: If you have an existing Discoverer Viewer session running, refresh the browser to update Discoverer Viewer with changes that you have made.
The logo or graphic that you specified will appear in Discoverer Viewer.
If you want to deploy a basic Discoverer Viewer interface without particular user interface (UI) options (e.g. Rerun Query or Presentation Options), you might change which options are displayed. For example, you may want to remove the Presentation Options link so that end users cannot change the Discoverer Viewer UI options displayed.
To remove Discoverer Viewer options:
For example:
Note: If you have an existing Discoverer Viewer session running, refresh the browser to update Discoverer Viewer with changes that you have made.
The logo or graphic that you specified will appear in Discoverer Viewer.
Note: Discoverer Viewer end users can also remove Discoverer UI components on a per-session basis using presentation options (for more information, see Section 10.6, "About presentation options").
You create a presentation template when you want to enable end users to configure the Discoverer Viewer user interface themselves using pre-defined presentation options. For more information about presentation options and presentation templates, see "About presentation options" and "About presentation templates".
The easiest way to create a presentation template is to cut and paste the Corporate Look template that is included in the ui_config.xml file, then edit the copy to suit your needs.
To create a presentation template:
You should now have two presentation templates, both called Corporate Look.
Note: If you are using a simple text editor, copy all of the text between the tags <look name="Corporate Look"> and the first </look> tag that follows. For example:
<look name="Corporate Look">
<!-- Logo-->
<component name="log" state="false"/>
etc.
.
.
</look>
For example:
Note: To help you identify tags in the ui_config.xml file, each tag has a comment label that tells you which part of the Discoverer Viewer user interface the tag relates to.
Re-starting the Web server ensures that the latest version of the customization file is stored in the cache.
Note: If the stylesheet_pool 'maximum' value is set to zero in your configuration.xml file, omit this step. When the 'maximum' value is set to zero, pages are not cached, which means that changes are applied immediately.
Discoverer Viewer is updated with the presentation options that you have selected.
The available Presentation templates are displayed at the right hand side of the page below the Uncheck All option (see Figure 10-5, "Discoverer Viewer Presentation Options page").
In order to increase Web security, some organizations only run Discoverer Viewer in pure HTML mode with Javascript disabled. This means that Javascript code cannot be used to change the HTML being displayed, or interfere with data. For more information about the Javascript enhanced user interface, see Section 4.4, "How to stop standalone Oracle9iAS Discoverer components in Unix".
To run Discoverer Viewer with Javascript disabled:
Re-starting the Web server ensures that the latest version of the customization file is stored in the cache.
Note: If the stylesheet_pool 'maximum' value is set to zero in your configuration.xml file, omit this step. When the 'maximum' value is set to zero, pages are not cached, which means that changes are applied immediately.
|
|
 Copyright © 2002 Oracle Corporation. All Rights Reserved. |
|
