11
Managing Content
The Content Manager enables you to create and organize repository objects. Each section of this document presents a different topic. These sections include:
11.1 Overview of the Content Manager
The Content Manager enables you to publish the master services and master alerts to user groups created by the Service Designer by implementing them as services and alerts. To help you build these repository objects, the Content Manager provides you with screens and wizards that guide you through each step of creating a folder, service, bookmark, or alert. In addition, the Content Manager enables you to distribute these repository objects to user groups, organizing them in a business context appropriate to each user group.
Using the Content Manger Tool, you can create, edit, and distribute the following objects:
Folders
Folders enable you to organize such objects as services and bookmarks. When you assign a folder to a user group, you make its subfolders, services and bookmarks within it accessible to users.
Services
A service inherits a master service or a moduable master service, enabling you to distribute service access to multiple users or groups. Services also enable you to specialize master services, as you can set default parameter values that override values initially set for the master service in the Service Designer. This function provides such benefits as enabling you to localize services. For example, in order for a master service to deliver restaurant information for an entire city, its adapter takes a single parameter (a location), and returns a list of restaurants throughout the city. While the master service can specify a broad location, such as the city, you can create services based on a specific parameter, such as a district within that city. You can then distribute the services, as appropriate, to user groups that you assemble based on the users' locations.
Modules
Modules are reusable services that can be invoked as a normal service, or by another service to return a result to that service. Wireless provides several modules that are ready for deployment, including those for such Personal Information Management (PIM) tools as calendar, address book, fax, and mail.
Bookmarks
A bookmark gives the user quick access to an external resource, typically a Web page that delivers content in a format supported by the target device. End users can set bookmarks to external URLs at the Wireless Customization. The bookmark appears as a menu selection in the device-based customization tool. Wireless does not process the content of the URL target. The format of the target content must be supported by the user's device.
Alerts and Topics
An alert is a notification service delivered to users based on the trigger conditions they set when subscribing to an alert service. An alert inherits a master alert. Content managers create alerts from master alerts constructed using the Service Designer. Content Managers organize alerts by topics, containers that group alerts.
11.2 Logging Into the Content Manager
Before using the Content Manager, you must first log into the Webtool as follows:
- Access the login page through the following URL:
http://hostname:7777/webtool/login.uix
Note:
7777 is the default port number for Oracle9iAS Wireless. The port number range is 7777 to 7877. To ensure that you are using the correct port number, check the port number for Oracle9iAS Wireless stored in [Oracle home]/install/portlist.ini. For more information on port usage, see Oracle9i Application Server Installation Guide and the Oracle9i Application Server Administrator's Guide.
|
- Enter your user name and then enter your password. If you are an administrator, enter orcladmin as your user name. (The password is set during installation, but can be changed with the User Manager.)
Note:
You must be granted either the Administrator or Organizer roles to access the Content Manager.
|
11.3 Managing Services
The Services tab of the Content Manager enables you to manage services, async services, modules, bookmarks and folders.
Clicking the Services tab displays the Service Browse screen. When you first access the service tab after logging into the tool the Service Browse screen displays the folder and services at the root level.
Using this screen, you can search for folders, services, modules, bookmarks, and async services. The screen also enables you to create a service based on an existing master service, as well as add folders and bookmarks. In addition, you use the Service Browse screen to delete, debug, move, and edit these objects.
Figure 11-1 The Service Browse Screen
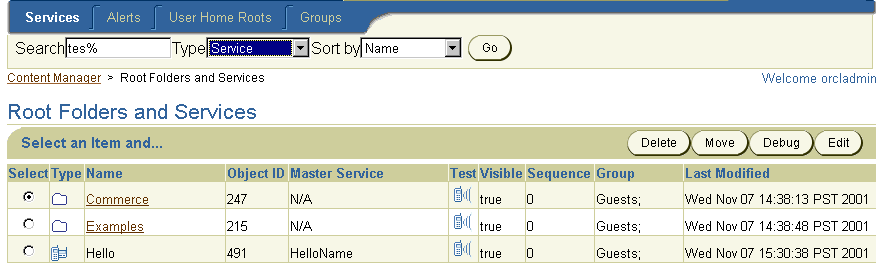
Text description of the illustration con_rfsc.gif
11.3.1 Searching for Repository Objects
The Service Browse screen's search function enables you to search for and display the following repository objects:
- Service
- Module
- Async Service
- Bookmark
- Folder
The search field, when used in conjunction with drop-down lists of search options, enables you to either narrow or broaden your searches. The results display as follows in the Search Result screen.
Table 11-1 Elements of the Search Result Section of the Services Screen
To find a repository object:
- Enter the name of the object. Enter the full name of the object, or use a SQL
Like clause pattern to return a partial match.
- From the drop-down list box, select one of the following options to narrow or broaden your search:
- Service
- Module
- Async Service
- Bookmark
- Folder
- Select from among the following options to sort your search results by:
- Click Search. The Search Result screen appears, displaying the matches for your query.
Note:
In the Search field, you can find an object by entering a SQL LIKE clause pattern matching test (* or %). For example, entering Per% in the Search field returns all objects beginning with 'per'.
|
Figure 11-2 The Search Result Screen of the Content Manager Tool
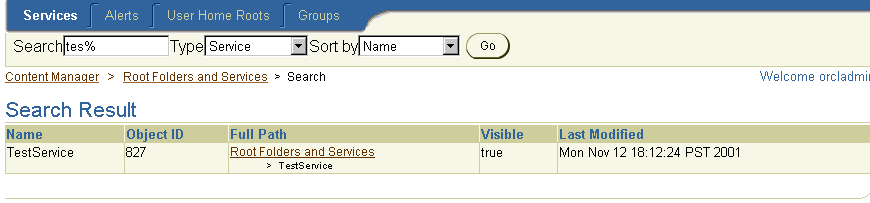
Text description of the illustration con_ssrv.gif
11.3.2 Creating a Folder
You can organize your repository objects into a hierarchy by creating subfolders. These subfolders, which can represent topic areas, can be nested into other subfolders. When you create a subfolder, the Content Manager displays it as a hyperlink in the screen, allowing you to "drill down" or traverse deeper into the hierarchy with each successive click. Wireless displays the structure of the hierarchy as a navigation path, enabling you to see the level you currently access and move to back to any parent folder in the hierarchy.
Figure 11-3 The Navigation Path

Text description of the illustration con_path.gif
Creating a subfolder is a two-step process; you first define the basic parameters for a folder, such as its name, and then you assign the rendering options that dictate the display style for the folder and its contents.
11.3.2.1 Step 1: Defining the Basic Parameters for a Folder
- From the Service Browse screen, click Add Folder. The General screen appears, displaying the basic parameters of the folder. These parameters include:
Table 11-2 Parameters of the Content Manager Create Folder Screen
- Complete the basic parameters as follows:
- Enter a name for the folder in the Name field. This is a required field.
- Enter a brief description of the folder in the Description field.
- Enter a sequence number for the folder.
- Select a display language for the folder. This is a required field.
- From the drop-down list, select a rendering type for the folder.
- Enter the URI of an image used as the icon that appears on top of the screen when this folder becomes the current folder.
- Enter the URI of an image used as the icon that appears next to the folder in a menu listing.
- Enter the URI of the audio file read aloud by voice-reader software when users access a folder.
- Enter the URI of the audio file read aloud by voice-reader software along with the folder name in the menu listing.
- Click the flashlight icon to search for and select a region for the folder.
- Select the Visible check box to make the subfolder visible on the end users' devices.
- Select the Personalizable check box to enable the end user to reorder, hide, or show this folder.
- Click Continue. The Rendering screen appears.
Figure 11-4 The Create Folder Screen (General Parameters)
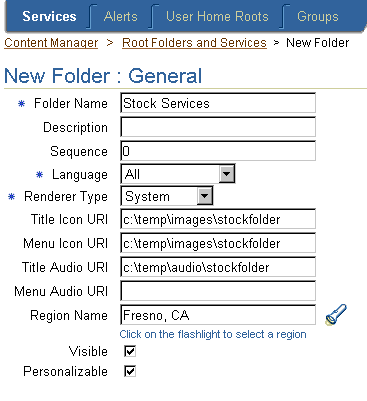
Text description of the illustration con_gfld.gif
11.3.2.2 Step 2: Assigning the Rendering Options
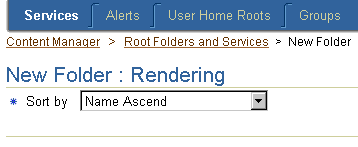
The Rendering screen displays options specific to the rendering type you selected when setting the basic parameters for the folder.
Setting the System Default Rendering Options
To set the System Default rendering options:
- Select a sorting option from the drop-down list. These options include ascending and descending sorting style for folders by:
- ID
- Name
- Last Modified Date
- Sequence Number
- Access Count
By default, folders appear by sequence number, then by name.
- Click Finish.
Setting the Customized Rendering Options
To set the Custom rendering options:
- From the Rendering screen, select a folder or service with the appropriate rendering style.
- Click Finish.
Setting the Inherited Rendering Options
To set the Inherited rendering style:
- Click Finish in the Rendering screen. If the folder is not a child of another folder (or if none of its ancestor folders have a customized renderer), then Wireless notes the inherited renderer as N/A until the folder is moved under a parent folder with a customized renderer.
- Use the Move function to place the folder within a folder configured with the appropriate rendering style. See Section 11.3.12 for information on the Move option.
Figure 11-5 The Folder Rendering Screen
Text description of the illustration con_rfld.gif
11.3.3 Editing A Folder
To edit a subfolder:
- From the Service Browse screen, click the folder you wish to edit. The browse screen for the folder appears.
- Click Edit. The Edit Folder screen appears displaying the values for the selected subfolder.
- From the left menu, select the parameters you want to edit.
- Edit the appropriate values and then click Apply to commit your changes. Clicking Cancel sets the parameters back to their original values and returns you to the browse screen. See Section 11.3.2.1 for information on the basic folder parameters. See Section 11.3.2.2 for information on the folder rendering options.
11.3.4 Deleting a Folder
When you delete a folder, you also delete that folder's contents.
To delete a folder:
- From the Service Browse screen, click the folder you wish to delete.
- Click Delete.
Note:
You can also access functions to add, create, and delete folders by selecting a hyperlink in the Full Path column of the Search Result screen.
|
11.3.5 Creating a Service
The Content Manager enables you to create a service based on a master service using the Service Creation Wizard, which steps you through the creation of a service. To successfully create a service, you must complete all the required steps of the Service Creation Wizard. Clicking Cancel at any point in the sequence clears all the values you have entered.
To create a service,
- From the Service Browse screen, click the Add Service button. The General screen of the Service Creation Wizard appears, displaying the following parameters:
Table 11-3 The General Parameters of the Service Creation Wizard
11.3.5.1 Step 1: Entering General Parameters for the Service
In the General screen, perform the following:
- Enter the name of the service in the Service Name field. This is a required field.
- Enter a description of the service that is meaningful to you in the Description field.
- Enter the sequence number for the service's menu position within its parent folder on the user's device.
- Enter the invocation cost to the user for accessing the service in the Cost field. If the service cost is not 0 (zero), then Wireless logs the service invocation in the tx_panama.log file.
- Enter the URI of an image used as the icon that appears next to a service when this service becomes the current service.
- Enter the URI of an image used as the icon that appears next to the service in a menu listing.
- Enter the URI of the audio file read aloud by voice-reader software when users select the service from a menu.
- Enter the URI of the audio file read aloud by voice-reader software along with the service in a menu listing.
- Click the flashlight icon to search for and select a region for the service.
- Click the Visible check box to make the service visible (and accessible) to the end user.
- Click the Personlalizable check box if you want to make a service that users can customize.
- Select Module if you want to create a service that can be deployed as module. Select Normal to create a service that is not a module.
- Click Next. The Master Service screen appears. Clicking Cancel closes the Service Creation Wizard, clears all the values you have entered, and returns you to the Service Browse screen.
Figure 11-6 The New Service Screen of the Service Creation Wizard
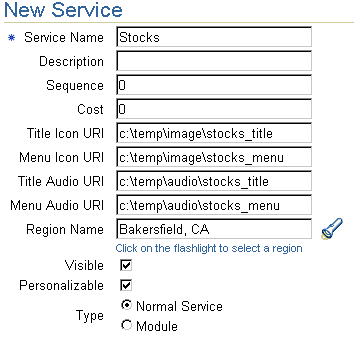
Text description of the illustration con_nsrv.gif
11.3.5.2 Step 2: Basing the New Service on an Existing Master Service
You use the Master Service screen to select an existing master service or module service on which to base your service. In the Master Services screen, perform the following:
- Select the master service or module on which you want to base your service. (Since the Master Service screen displays master services and folders at the root, you may have to expand folders to access the appropriate master services. You can also click on any link of the service path on top of the table to go back to any parent level.)
- Click Next. The Input Parameters screen displays. If you wish to return to the General screen to change the data you entered, click the Back button.
Figure 11-7 The Master Service Screen of the Service Creation Wizard
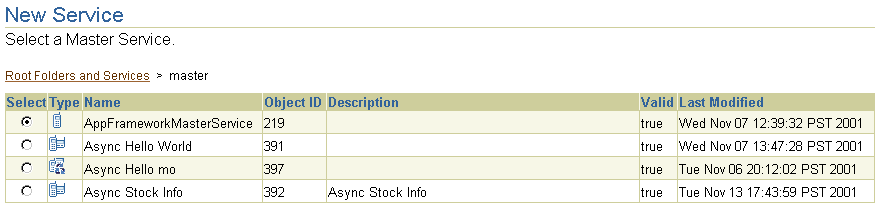
Text description of the illustration con_msrv.gif
11.3.5.2.1 Configuring the OMP URLs for Module Services
If you opted to create a modular service, you must enter the OMP URL address of the module service being called in the Master Service screen (Step 2 in the service creation sequence). All module services are identified by the OracleMobile protocol (OMP). You can also enter the URL for the configuration page of the module service.
11.3.5.3 Step 3: Entering New Input Parameters for the Service
You use the Input parameters to set the input parameters for your service. The input parameters for the service are those set for the master service on which you based your service. The Input parameters screen includes the following fields:
Table 11-4 The Input Parameters Screen of the Service Creation Wizard
- Enter a new value, if needed, for the service in the Value field.
- Click Next. The Async Agent screen appears.
Figure 11-8 The Input Parameters Screen of the Service Creation Wizard

Text description of the illustration con_isrv.gif
11.3.5.4 Step 4: Assigning the Async Agent to the Service.
Perform the following if you selected a master service with Async Agent capability:
- In the Short Name field, enter a short, easily referenced name for the service. This is a required field. End users use this name to invoke services through such means as email or SMS. Wireless checks to ensure that this name is unique.
- Enter a text delimiter in the Delimiter field. This delimiter separates the input arguments that users enter when invoking async services using such means as email or SMS. The space (" ") is the default delimiter.
- In the Help field, enter the command syntax or usage text. This text is returned to the user when the user issues an application help command to the Async Server.
- In the Delivery Address List section, enter the service address to which users send the service invocation messages. Enter this address in the format appropriate to the following device types. For example, enter stock@oraclemobile.com as the service address for email. This is an optional parameter.
- In the Async Agent Argument List section, set the default value for each argument. Use the Move Up and Move Down to map the async agent arguments to the service input arguments.
- Click Submit. The browse screen reappears, displaying the new service.
Figure 11-9 The Async Services Screen of the Service Creation Wizard
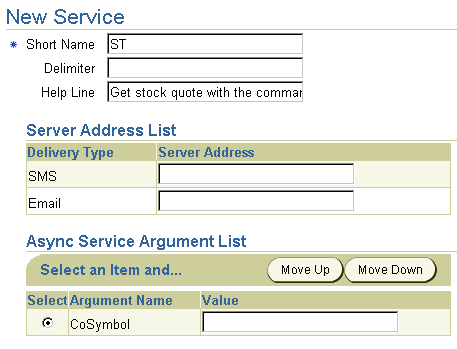
Text description of the illustration con_asrv.gif
11.3.6 Editing a Service
To edit a service:
- From the Service Browse screen, select the service you wish to edit.
- Click Edit. The Service Editing screen appears.
Figure 11-10 The Edit Services Screen
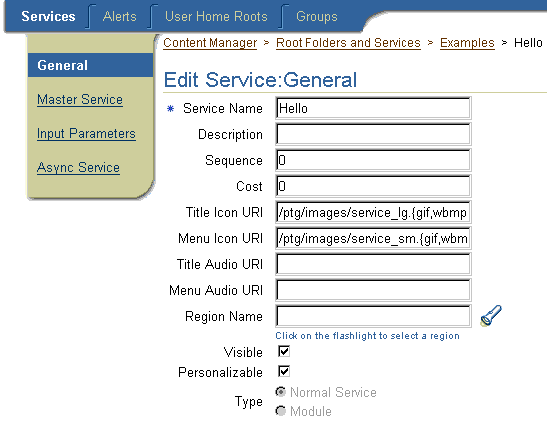
Text description of the illustration con_esrv.gif
- From the left menu, select the values that you wish to edit. For information on entering values for basic parameters of a service, see Section 11.3.5.1. For information on master services, see Section 11.3.5.2. See Section 11.3.5.3 for information on input parameters, and Section 11.3.5.4 for Async Services. See for information on configuring the
- Click Apply to save your changes. Clicking cancel clears any changes and returns the values to their original state.
11.3.6.1 Configuring a Module Service
You can configure a module service by entering the URL of its configuration page in the Module Configure URL field of the Service Creation Wizard's Master Service screen (Step 2 in the service creation sequence). After you complete the creation of the service, you can access the configuration URL through the service editing screen.
To access a module service's configuration page:
- Select the service.
- Click Edit. The Service Editing screen appears.
- From the left panel, select Master Service.
- In the Master Service screen, click Configure. The configuration page appears.
11.3.6.2 Deleting a Service
To delete a service:
- From the browse screen, select the service you wish to delete.
- Click Delete.
Note:
You can access the functions for creating, editing, and deleting services by selecting a hyperlink in the Full Path column of the Search Result screen.
|
11.3.7 Testing a Service
The Content Manager enables you to test a service and display it on a phone simulator.
To test a service:
- From the Service Browse screen, select the service you wish to test.
- Click the telephone icon in the Run Services column that is located in the same row as the selected service. The phone simulator appears, displaying the service.
Note:
To test or debug an OC4J adapter service, you must copy the .jsp into the web-application/modules directory. For example, if the input parameter URL is apps/myservice.jsp, then myservice.jsp must be copied to .../wireless/j2ee/applications/webtool/webtool-web/modules/apps/
|
11.3.8 Debugging Services
The Content Manager enables you to simultaneously view a service on a phone simulator and in Wireless XML or device markup languages.
Transformers, in the form of XSLT stylesheets or Java classes, convert the content returned by Wireless adapters into the format best suited to a particular platform.
To test a service:
- On the Browse Service screen, select a service.
- Click Debug. The Debug Service screen appears.
- Select from among the following output formats:
- Adapter XML Result
Selecting this result type enables you to see Wireless source content in the AdapterResult format, the intermediary format between the source and the target output device. Source content in the AdapterResult format must be converted into SimpleResult format before it can be delivered to a target device. If no text displays in the The Result panel, then no AdapterResult has been produced.
- Wireless XML Result
Selecting Wireless XML Result displays the source content in Wireless' SimpleResult format of the output that is returned by an adapter.
- Device Result
The DeviceTransformer drop-down menu lists the logical devices in the repository. Selecting a logical device enables you to see the final markup language for that device.
- Click Set Parameters.
- Click Run Service. The service appears on a phone simulator. The selected result appears in the Service Result window.
Setting the Display Length of the Logging File
The System Log section enables you to set the number of lines from the end of the server's system log file that you want to see.
To set the number of lines from the server: displays from the end of the system log.
- Enter the number of lines from the end of the system log that you want to review:
- Click Refresh Log. The specified number of lines from the end of the system log appear.
11.3.9 Creating User Bookmarks
Using the Content Manager, you can create a bookmark, a link which gives users quick access to a URL.
To create a bookmark:
- The Service Browse screen, click Create Bookmark. The New Bookmark screen appears displaying the following parameters:
Table 11-5 The Bookmark Parameters
- In the New Bookmark screen, enter the name of the bookmark in the Bookmark Name field. This is a required field.
- Enter a description of the bookmark which is meaningful to end users in the Description field.
- Enter an integer to assign the bookmark's ranking in a display listing.
- Enter the URL for the bookmark. This is a required field.
- Enter the cost to the end users for bookmark access in the Cost field.
- From the drop-down list, select a display language.
- Enter the MIME type.
- Click the flashlight icon to select a region for the bookmark.
- Click the Personlalizable check box if you want to make a service that users can customize.
- Click Finish to complete the bookmark. The browse screen reappears displaying the new bookmark. If you do not wish to complete the bookmark, click Cancel.
11.3.10 Editing a Bookmark
The Content Manager enables you to edit an existing bookmark. To edit a bookmark:
- In the Service Browse screen, select the bookmark you wish to edit.
- Click the Edit button. The Edit Bookmark screen appears.
- Edit the desired fields. For information on entering information, see Section 11.3.9.
- Click Finish to commit your changes. The browse screen reappears displaying the edited bookmark in the list of services. If you do not wish to continue editing a bookmark, click Cancel.
11.3.11 Deleting a Bookmark
To delete a bookmark:
- From the Service Browse screen, select the bookmark you wish to delete.
- Click Delete.
Note:
You can access the functions to create, edit, and delete a bookmark by selecting a hyperlink in the Full Path column of the Search Result screen.
|
11.3.12 Moving Folders, Services, and Bookmarks
You can organize services, folders, and bookmarks in a business context appropriate to a user group by using the Content Manager's Move function.
To move services, folders, or bookmarks:
- From the Service Browse screen, select the folder, service, or bookmark you want to move.
- Click Move.
- Select the new folder for the object. If necessary, click the folder to drill down to the appropriate subfolder. Wireless tracks your position in the hierarchy through the navigation path. For more information on the navigation path, see Section 11.3.2.
- Click Move Here. The Content Manager displays the selected object in its new folder.
11.4 Creating User Home Root Folders
The User Home Root tab enables you to group user home folders by user community or by provider. Users are assigned to these home roots in the User Manager. When a user is assigned to a user home root folder, that user's home folder becomes the child of the user home root folder by being placed within it. In addition, user home folders inherit the folder rendering style of their user home root folder.
Selecting the User Home Roots tab displays the current root folders by name, description, object ID in the database, and by the date the folder was last modified. From this screen you can create, edit, and delete user home root folders.
To create a user home root folder:
11.4.1 Step 1: Setting the Basic Parameters
- From the User Home Roots screen, click Create. The General screen appears, displaying the following parameters:
Table 11-6 Parameters of the Content Manager Create Folder Screen
- Enter the User Home Root Name the Create New User Home Root section. This is a required field.
- Enter a description.
- From the drop-down list, select a rendering type for the folder.
- Enter the URI of an image used as the icon that appears on top of the screen when this folder becomes the current folder.
- Enter the URI of an image used as the icon that appears next to the folder in a menu listing.
- Enter the URI of the audio file read aloud by voice-reader software when users access a folder.
- Enter the URI of the audio file read aloud by voice-reader software along with the folder name in the menu listing.
- Click Continue. The Rendering screen appears.
11.4.2 Step 2: Assigning the Rendering Options
The Rendering screen displays options specific to the rendering type you selected when setting the basic parameters for the folder. Because user home folders are the children of the user home root folders, each user home folder inherits the rendering style of its parent, the user home root folder.
Setting the System Default Rendering Options
To set the System Default rendering options:
- Select a sorting option from the drop-down list. These options include ascending and descending sorting style for folders by:
- ID
- Name
- Last Modified Date
- Sequence Number
- Access Count
By default, folders appear by sequence number, then by name.
- Click Finish.
Setting the Customized Rendering Options
To set the Custom rendering options:
- From the Rendering screen, select a folder or service with the appropriate rendering style.
- Click Finish.
Setting the Inherited Rendering Options
To set the Inherited rendering style:
Click Finish in the Rendering screen. The inherited rendering for a user home root folder is the system default rendering.
11.4.3 Editing a User Home Root Folder
To edit a user home root:
- From the User Home Root screen, select a user home root folder.
- Click Edit. The Edit Folder screen appears displaying the values for the selected subfolder.
- From the left menu, select the parameters you want to edit.
- Edit the appropriate values and then click Apply to commit your changes. Clicking Cancel sets the parameters back to their original values and returns you to the browse screen. For information on the basic values of a user home root folder, see Section 11.4.1. For information on the rendering options, see Section 11.4.2.
11.4.4 Deleting a User Home Root Folder
To delete a user home root:
- From the User Home Root screen, select a user home root.
- Select a user home root.
- Click Delete.
11.5 Managing Alerts
Selecting the Alerts tab of the Content Manager displays the topics and alerts browsing screen. This screen enables you to search for, create, edit, move, delete, and share alerts, services that notify users of important information or events. In addition you can add topics, which group topics and alerts.
11.5.1 Searching for Topics and Alerts
Using the topics and alerts browsing screen, you can search for a topic or an alert using a search field in conjunction with drop-down lists of search options, which enable you to either narrow or broaden your searches. The search results appear as a list on the Root Topics and Services screen.
Figure 11-11 The Topics and Alerts Browsing Screen
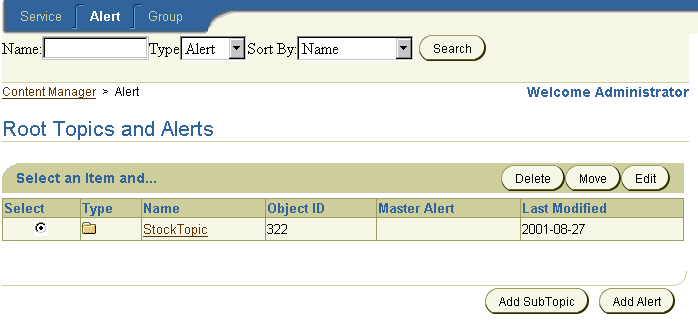
Text description of the illustration con_alrt.gif
The topics and alerts browsing screen displays search results as follows:
Table 11-7 Elements of the Topics and Alerts Browsing Screen
To find a topic or an alert:
- Perform one or more of the following:
- Enter the name of the alert or topic.
- From the drop-down list box, select the type of object:
- Select from among the following options for to sorting options for your search results:
- Name (Sorts search results by name.)
- Last Modified (Sorts search results by the last time the alert, or the topic, was modified.)
- Click Search. The Search Result screen appears.
Figure 11-12 The Search Result Screen

Text description of the illustration con_srat.gif
The Search Result screen includes the following columns.
Table 11-8 Elements of the Search Result Screen
11.5.2 Creating an Alert
To create an Alert:
11.5.2.1 Step 1: Entering General Alert Information
- From the topics and alerts browsing screen, click the Add Alert button. The General screen of the Create Alert wizard appears. The screen includes the following fields:
Table 11-9 Fields of the General Screen of the Create Alert Wizard
- Enter the name of the Alert in the Name field.
- Enter a description of the alert in the description field.
- Click Next. The Master Alert screen of the Alert Creation Wizard appears, where you create an alert based on a master alert created by a service designer.
11.5.2.2 Step 2: Basing the Alert on an Existing Master Alert
In the Master Alert screen of the Alert Creation Wizard, you select a master alert as the base object for your alert. To select a master alert:
- Use the radio buttons to select the master alert.
- Click Next. The Input Parameter screen appears.
11.5.2.3 Step 3: Entering Alert Input Parameters
The Input Parameters screen displays the input parameters for the master alert selected in Step 2.
The screen contains the following master alert input parameters:
Table 11-10 The Master Alert Input Parameters
If needed, complete the Input Screen as follows:
- Enter the caption for the alert in the Caption field.
- Enter the default value for the parameter in the Value field. Leaving this field blank instructs Wireless to prompt the user to enter a value.
- Click Next. The Trigger Condition screen appears displaying the conditions set to trigger the alert as specified in the selected master alert.
11.5.2.4 Step 4: Setting the Trigger Conditions for the Alert
You use the Trigger Condition screen to enable the end user to set the conditions that invoke an alert on the Wireless Customization. For example, if you create an alert notifying users of a stock price, you can set the alert conditions that allow an end user to request a notification when the stock has risen above, or fallen below a certain price. The Trigger Condition contains the following fields:
Table 11-11 Parameters of the Trigger Condition Screen
To set the trigger conditions for an alert:
- Enter a caption describing the trigger in the Caption field.
- Enter a value that relates to the predetermined condition type in the Value field.
- Click Submit to complete the alert. Click Back to return to edit data entered in Steps 1 - 4. Clicking Cancel at any point terminates the wizard and clears all entries.
11.5.3 Editing an Alert
The Content Manager enables you to edit an alert.
To edit an alert:
- In the Topic-Alert browsing screen, locate the topic containing the alert you wish to edit.
- Select the alert.
- Click Edit. The Edit Alert screen appears.
- From the left menu, select from among the following alert components that you wish to edit.
- Edit the alert as needed. See Section 11.5.2.1 for information on entering the basic information for an Alert. See Section 11.5.2.2 for selecting a master alert. For information on the input parameters, see Section 11.5.2.3. See Section 11.5.2.4 for information on trigger conditions for an alert.
- Click Apply to commit your changes.
11.5.4 Deleting Topics and Alerts
To delete a topic or an alert:
- From the Topic-Alert browsing screen, select the topic or alert.
- Click Delete.
11.5.5 Moving Alerts
The Content Manager enables you to move alerts and topics, allowing you to organize the wireless portal in a business context.
To move alerts:
- From the Top-Alert browsing screen, select the alert you wish to move.
- In the Move Alerts screen, drill down to a destination topic for the alert.
- Click Move Here.
- The Alert-Topic browse screen reappears, showing the new destination topic as the current context topic. The alert displays in the table. Clicking the destination topic reveals the alert in its new location. Clicking Cancel while you are in the Move Alerts screen terminates the operation and returns you to the Topic-Alert browsing screen.
11.5.6 Creating a Topic
You can further organize your alerts by creating Topics.
To create a subtopic:
- From the Topic-Alert browsing screen, click Add Subtopic. The New Subtopic screen appears.
- Enter a topic name.
- Select the Visible to make the subtopic visible (and accessible) to the end user.
- Click Add.
11.5.7 Editing a Topic
To edit a Topic:
- From the Topic-Alert browsing screen, select a subtopic.
- Click Edit. The Edit Subtopic screen appears.
- Edit the subtopic as needed. See Section 11.5.6 for information on subtopic parameters.
- Click Apply.
11.5.8 Assigning Folders, Services, Bookmarks, and Alerts to User Groups
The Group tab enables you to assign folders, services, and bookmarks to user groups.
To make an object available to a group:
- From the Groups screen, select the group to which you want to assign the object.
- Click Assign Services. The Service Content screen appears.
- From the Available Services section, select the objects that you want to assign.
- Click Add To Group.
11.5.9 Removing Folders, Services, and Bookmarks from User Groups
The Content Manager enables you to remove services and folders from user groups.
To remove an object from a user group:
- From the Group Accessible Service section of the Service Content screen, select the object that you want to remove.
- Click Remove From Group.
11.5.10 Assigning Alerts and Topics to a User Group
The Group tab enables you to assign alerts and topics to user groups, making them available to several users.
To make an alert or topic available to a group:
- From the Groups screen, select the group to which you want to assign the object.
- Click Assign Alerts.
- From the Available Alerts section, select the objects that you want to assign.
- Click AddToGroup.
11.5.11 Removing Alerts and Topics from User Groups
The Content Manager enables you to remove alerts and topics from user groups.
To remove an alert or topic from a user group:
- From the Group Accessible Alerts section, select the object that you want to remove.
- Click RemoveFromGroup.
