Release 2 (9.0.3)
Part Number B10067-01
Home |
Solution Area |
Contents |
Index |
| Oracle9iAS TopLink CMP for Users of IBM WebSphere Guide Release 2 (9.0.3) Part Number B10067-01 |
|
TopLink Container-Managed Persistence provides container-managed persistence (CMP) for 1.1 Enterprise JavaBeans (EJBs). The deployment process generates CMP code that allows TopLink to handle persistence aspects of EJBs. To install entity beans within the IBM WebSphere ApplicationServer and make them available for client applications, entity beans must be deployed within the server.
The goal of deployment is to make entity beans available to client applications. The early stages of the process involves writing entity beans, and mapping the beans to create a TopLink project. The deployment process involves several stages that start with configuring the deployment descriptor and generating deployed code in TopLink. The final stages of deployment process include deploying beans to the server and starting the beans. For much of the deployment process, WebSphere tools for Java, and TopLink Deployment Tool programs are used.
The term "deployment" can sometimes cause confusion since there are actually a number of stages that occur between creating the bean classes and installing them in a running server.
Generally speaking the deployment process is three distinct steps:
EJBHome and EJBObject implementations, and the stubs and skeletons required for RMI-IIOP.
The following tasks must be completed prior to the deployment of TopLink persisted entity beans:
toplink-ejb-jar.xml file to associate the TopLink project with the JAR and put it in the same directory as ejb-jar.xml.
ejb-jar.xml file (i.e META-INF/).
The deployment descriptor and other WebSphere configuration settings can be edited by opening the EJB Jar or EAR file in the WebSphere Application Assembly Tool (WAAT; see the documentation accompanying WAAT for more information). The deployment descriptor can also be edited manually by opening it in a text editor.
<?xml version = "1.0" encoding = "US-ASCII"?>
<!DOCTYPE toplink-ejb-jar PUBLIC "-//Oracle Corp.
//DTD TopLink 4.5 CMP for WebSphere//EN"
"toplink-was-ejb-jar_903.dtd">
<toplink-configuration>
   <session>
      <name>ejb_cmp11_singlebean</name>
      <project-class>
         examples.ejb.cmp11.singlebean.AccountProject
      </project-class>
      <session-type>
         <server-session>
      </session-type>
      <login>
         <platform-class>
         oracle.toplink.internal.databaseaccess.HSQLPlatform
         </platform-class>
         <uses-external-connection-pool>true</uses-external-connection-pool>
         <uses-external-transaction-controller>true
         </uses-external-transaction-controller>
      </login>
      <external-transaction-controller-class>
         oracle.toplink.jts.was.JTSExternalTransactionController_4_0
      </external-transaction-controller-class>
      <enable-logging>true</enable-logging>
      <logging-options>
         <log-debug>true</log-debug>
         <log-exceptions>true</log-exceptions>
         <log-exception-stacktrace>true</log-exception-stacktrace>
         <print-thread>true</print-thread>
         <print-session>true</print-session>
         <print-connection>true</print-connection>
         <print-date>true</print-date>
      </logging-options>
   </session>
</toplink-configuration>
After the bean has been mapped to the appropriate tables using the TopLink Mapping Workbench, some additional configuration is required. This includes creating and editing the deployment descriptor information, and generating the classes that the WebSphere server will use at runtime.
This section describes the steps involved in preparing for deployment. Consult WebSphere Application Server documentation for the most up-to-date information on the reference tools.
The steps are:
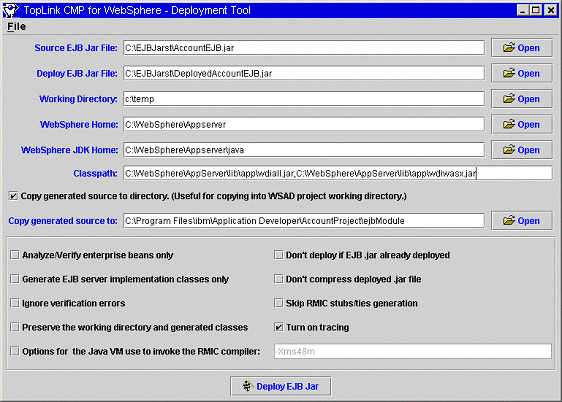
The Deployment Tool is used to create the Deployed JAR from the EJB JAR or the VisualAge Deployed JAR. There are two ways to run the deployment tool: as a command line tool, or as a graphic interface.
The command line deploy tool requires that the CLASSPATH is setup correctly. The Installation section in Oracle9iAS TopLink Getting Started contains a list of CLASSPATH items that the Deploy Tool requires. In addition, the dependent classes referred to by your entity beans must be in the CLASSPATH. The command-line deploy tool can be invoked using the following command:
java oracle.toplink.ejb.cmp.was.deploy.Deploy
To run the graphic user interface deployment tool from Windows, click Start > Programs > Oracle9iAS TopLink > Tools > Deploy Tool for WebSphere Server.
You can also manually start the script files that preconfigure the CLASSPATH to start this graphic interface deploy tool. The files are
<INSTALL_DIR>\was_cmp\deployTool.cmd (for Windows)
<INSTALL_DIR>/was_cmp/deployTool.sh (for Unix)
The Deployment Tool is used to create the Deployed JAR from the EJB JAR. Fill in the necessary fields in the Deploy Tool. The File menu allows settings of fields to be saved to a file and the settings are retrieved when the file is loaded.

The EJB JAR created in WebSphere AAT or WSAD.
The path and name of the JAR file which will be generated by the tool.
The temporary directory in which generating classes will be stored. The directory will not be deleted if the "Preserve the working directory and generated classes" option is selected.
The directory where WebSphere Application Server is installed, e.g. C:\WebSphere\AppServer.
The directory where the Java VM of WebSphere Application Server is installed, e.g. C:\WebSphere\AppServer\java
Set the Classpath field to include the toplink.jar and the tl_wasx.jar files and other required resources such as the dependent Java classes.
The Deploy tool is completely compatible with the WebSphere Studio Application Developer (WSAD).
toplink-ejb-jar.xml file are included in the EJB JAR.

The most common error is NoClassDefFoundError exception which can be corrected by adding the required resources to the "Classpath" input field. Also "Turn on tracing" option helps to debug error during the generation of deployment code. When an obscure error is shown during the generating stub phase, copy the Java command and run it at the command prompt. This gives a more detailed error message.
It is not necessary to deploy the EJB JAR in WSAD, because deployment is carried using the Deploy Tool (see "Using Deploy Tool with WebSphere Studio Application Developer (WSAD)").
You can start the bean in either the WebSphere Application Server or in WSAD.
A message dialog will be displayed if the bean started successfully. If an error occurs, consult the Troubleshooting section.
After the beans have been deployed, an EJB client can be run to access them. The client can either be a SessionBean or a Java program running outside the server.
The EJB client requires the following bean classes in its CLASSPATH: remote interface, home interface, and primary key classes for all the beans accessed. In addition, if the client is a session bean running on the same server as the entity beans and you want to access the local interfaces of the entity beans, you must also include their local and home interfaces on the CLASSPATH.
To lookup a bean's home interface a JNDI InitialContext must be setup. Setting up the initial context requires that the server's URL be supplied.
|
|
 Copyright © 2002 Oracle Corporation. All Rights Reserved. |
|