Skip Headers

Oracle9iAS Wireless Getting Started and System Guide
Release 2 (9.0.2)

Part Number A90486-02
Go To Documentation Library
Home
Go To Product List
Solution Area
Go To Table Of Contents
Contents
Go To Index
Index

Go to previous page Go to next page

12
Managing Users

This document describes how you can create and modify Oracle9iAS Wireless users and user groups using the User Manager. Each section of this document presents a different topic. These sections include:

12.1 Overview of the User Manager

The User Manager is accessible to users granted the Administrator or Helpdesk roles. This tool enables you to perform such Helpdesk functions as creating and modifying users and groups and assigning services to users and groups.

User groups help you manage service access for multiple users. You can create user groups based on such considerations as subscription level, geographic location, or interests. Each user object represents a Oracle9iAS Wireless end user.

The name for the user object must be unique within Wireless. Users have an external identifier attribute. Using this ID, Wireless associates the user with an external provisioning system account. The value of the external ID, for example, may be a telephone number or user account number with an ID to an external repository.

12.1.1 Assigning User Roles

Wireless users can be assigned the following roles:

Table 12-1 Wireless User Roles

User Role  Description  Available Tools 

Designers 

Users assigned the Designer role perform the following functions:

  • Create, modify, and delete and test master services and adapters.

  • Create, modify, delete, and test data feeders and master alerts.

  • Create, modify, and delete transformers for logical devices.

  • Develop location-based services.

  • Develop preset definitions.


Service Designer 

Organizers 

Users assigned the Organizer role perform the following functions:

  • Manage service folders.

  • Create services based on master services.

  • Create alerts based on master alerts.

  • Deploy applications to users and user groups.

  • Assign regions to location-based services.


Content Manager 

System  

Users assigned the System role manage the system using the System Management Tool. 

Wireless system management functions (through the OEM console) 

Helpdesk


Users assigned the Help Desk role perform the following functions:

  • Manage users and groups.

  • Check user profiles and services.

  • Create new groups and users.

  • Manage user access privileges.

  • Assign different roles to a user.

  • View the services, alert, and async logs.


User Manager 

End User 

Users assigned the end user role are the consumers of Wireless services. End-users create their own accounts when they register with Wireless using the Wireless Customization. End users can also customize their own services either from a desktop or from a device. Customization for end-users includes:

  • Subscribe to alerts.

  • Create presets.

  • Manage user profiles.

Every Wireless user is granted the Mobile Customer Role by default. This role is implicit to all users. 

Wireless Customization 

Wireless also allows anonymous users, those who do not register with Wireless but would like to try out the services as a guest. You can create an anonymous user account for each group. All unregistered users share the guest account to invoke services owned by the group. A guest user cannot personalize services.

12.1.1.1 Enabling Users to Access the Wireless Webtools

You must assign roles to users with the User Manager rather than with other general-purpose user management tools, such as DAS. Users created using DAS or other OID tools are provisioned in Wireless only when the created user accesses the Wireless portal, device portal, or any of the PC-based tools for the first time. These provisioned users do not have the assigned roles needed to access the Wireless webtools. For example, a user must have the Designer role to access the Service Designer. If a user with no assigned roles tries to log into a Wireless webtool, then Wireless displays the following Single Sign-On error:

Your session has timed out. Please log on again.

The user can successfully log into the Wireless webtool (or other components) only after you assign the user a role. See Section 12.3.4 for information on creating a user and assigning user roles.

12.2 Logging into the User Manager

Before using the User Manager, you must first log in as follows:

  1. Access the login page through the following URL:

    http://hostname:7777/webtool/login.uix


Note:

7777 is the default port number for Oracle9iAS Wireless. The port number range is 7777 to 7877. To ensure that you are using the correct port number, check the port number for Oracle9iAS Wireless stored in [Oracle home]/install/portlist.ini. For more information on port usage, see Oracle9i Application Server Installation Guide and the Oracle9i Application Server Administrator's Guide


  1. Enter your user name and then enter your password. If you are an administrator, enter orcladmin as your user name. (The password is set during installation, but can be changed with the User Manager.)

12.3 Using the User Manager

After you have successfully logged into the User Manager, the tool defaults to the User tab, displaying the Users screen.

Figure 12-1 The Search User Result Screen


Text description of usr_busr.gif follows.
Text description of the illustration usr_busr.gif

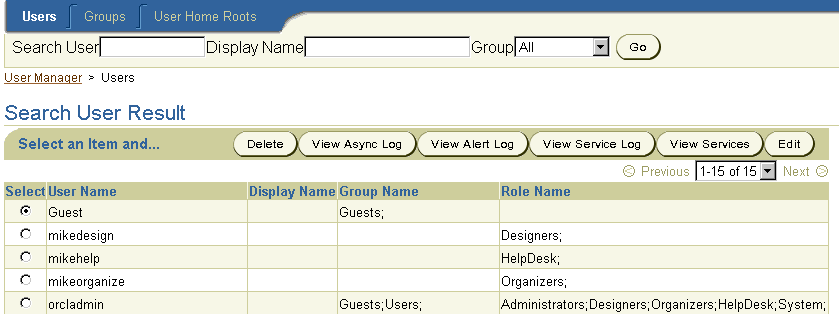
The Search User Result screen enables you to search for users and as well as create and edit user profiles, and delete users.

12.3.1 Searching for Users

The Users subtab contains User Name, Display Name, and Group fields that enable you to find current Wireless users. The Search User Result's screen displays search results as follows:

Table 12-2 Elements Search User Result Screen

Label  Definition 

User Name 

The name of the user.  

Display Name 

The display name of the user. 

Group Name  

The group to which the user has been assigned.  

Role Name 

The role (or roles) assigned to the user. For information on user roles, see Section 12.1.1

To find users:

  1. Enter the user's name in the User Name field.

  2. Enter the user's display name, if known, in the Display field.

  3. From the drop-down list, select the group to which the user belongs.

  4. Click the Search button. The list of users corresponding to the search criteria appear. To find all users belonging to a specific group, select the name of the group in the Group field and the click Search.

12.3.1.1 Refining Searches

You can narrow your searches by adding the display name of the user in the Display Name field and then by clicking Go.

You can broaden your search to display all current users by entering a wildcard (* or %) in the User Name field and then by clicking Go.

You can insert wildcards in place of characters. Wildcards can replace all of the characters from the current position to the end of the string. Use the question mark (?) to replace a single character.

The user administrator can display all users belonging to a group by selecting the group name.

12.3.2 Viewing User Information

The View Services button enables you to view and test the services belonging to a selected user. Using this button, you can browse the services, bookmarks, folders, and alerts created by a single user.

Selecting a user and then clicking the View Services button displays the following:

Table 12-3 User Information

Element   Description 

Type 

The type of objects created by the selected user.  

Name 

The display name of the folder, service, or bookmark. 

Object ID 

The Object ID (OID) of the service or module in the database. 

Master Service 

The master service on which the invoked the user's services are based. 

Test 

Clicking the phone icon enables you to view the service on a phone simulator. 

Visible 

If the column displays "true", the object is visible and therefore accessible to an end user. If "false", then the object is not visible. 

Sequence  

The customized order in which services and folders appear on output devices. By default, these appear in order by name. 

Last Modified 

The last time an object was modified. 

12.3.3 Viewing Activity Logs

The User Manager enables you to view a user's activity within a specific time frame through activity logs that display the accessed async services, alerts, and services. In addition, these activity logs tell you if Wireless dispatched services successfully.

Figure 12-2 The Activity Log Buttons


Text description of usr_vlog.gif follows.
Text description of the illustration usr_vlog.gif

To view an activity log:

  1. Select a user.

  2. Select an activity log.

  3. Click Go. The activity statistics display.

The User Manager displays the following for async service statistics for a selected user:

Table 12-4 Async Log

Element  Description 

Short Name 

The name of the async service (for example, ST for a stock quote service). 

ID 

The OID of the async agent service in the database. 

Device Address 

The address of the user's device receiving the alert. 

Server Address 

The address of the async service.  

Delivery Type 

The delivery type for the async service (for example, SMS). 

Receiving Time 

The time the async agent engine received the request. 

Error Description 

A message describing how Wireless failed to respond to the async service. 

The User Manager displays the following for alert statistics for a selected user:

Table 12-5 Alert Log Statistics

Element  Description 

Alert Name 

The name of the alert. 

Alert ID 

The OID of the alert in the database. 

Device Address 

The address of the user device receiving the alert. 

Device Type 

The type of logical device receiving the alert (for example, WAP-Push, SMS, or Email). 

Dispatch Time 

The time Wireless sent the message. 

Message Status 

Whether Wireless successfully sent the message. 0 indicates that Wireless successfully sent the message; 1 indicates that Wireless failed to send the message. 

The User Manager displays the following for service statistics for a selected user:

Table 12-6 Service Log Statistics

Element  Description 

Service Name 

The name of the service 

Service ID 

The OID of the service in the database. 

Service Type 

The type of object (folder, bookmark, service, or local module) accessed by the user.. 

Invocation Time 

The time the user accessed the service. 

Invocation Status 

Whether Wireless successfully executed the service. 0 indicates that Wireless successfully launched the service; 1 indicates that Wireless failed to launch the service. 

12.3.3.1 Selecting a Time Frame

You can view the activity log for a specific period using the From Date and To Date fields. You can set starting and ending dates either by entering them in the fields in the mm/dd/ yyyy format, or by picking them from the calendars. Click Go after you have completed entering the date range.


Note:

The default From date is midnight of the previous day. Both the From and To dates assume midnight of the selected day. 


12.3.3.2 Printing an Activity Log

You can print an activity log by clicking Printable Page. This printed page contains text and has no headers or footers. Use the browser's Back button to navigate from the printed page.

12.3.4 Creating Users

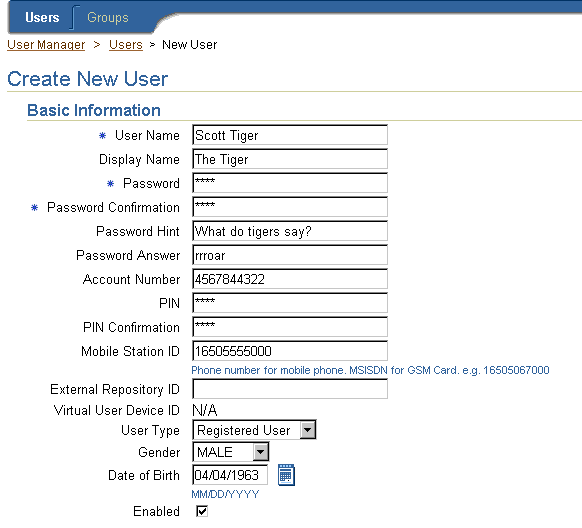
The New User screen contains a set of parameters that administrators set to create and configure new users.


Note:

Most end users create their own user accounts through the self-registration in Wireless Customization. 


The New User screen contains the following parameters.

Table 12-7 Parameters for the New User Screen

Parameter  Value 

User Name 

The name of the user. Note: this is case-sensitive. 

Display Name 

The display name of the user. 

New Password 

The user's password. Note: the password is case-sensitive. 

Password Confirmation 

The user's password entered again. 

Password Hint 

A prompt for the user's password, such as "Mother's maiden name".  

Password Answer 

The response to the password hint, such as "Smith". Correctly answering the Password Hint logs users into the system.  

Account Number 

A user-provided account number. A user can enter this number for login rather than enter a user name.  

PIN 

The user's personal identification number requested when the user logs in using an account number.  

PIN Confirmation 

The confirmation for the user's personal identification number. 

Mobile Station ID 

The user's mobile phone number, or the MSISDN (mobile subscriber ISDN) for GSM services. Wireless uses this ID to track the position of the user. 

External Repository ID 

A mapping of a user from the the Oracle9iAS Wireless schema to a unique ID of that user in another user database.  

Virtual User Device ID 

An ID generated for unregistered users who access a Wireless site. When an unregistered user accesses a Wireless site, Wireless detects the user and creates a virtual user account for that user. Wireless traces this user by phone number or by another identification number sent from the user's device. This number is the Virtual Device ID number. You cannot create a virtual user; Wireless creates virtual users dynamically. This parameter does not apply to registered users.  

User Type 

Select "Registered" for registered Wireless users. Select "Anonymous" when creating an anonymous user, an entity that Wireless automatically assigns to an unknown user. An unknown user is a user whose device does not send any identifiable numbers through the HTTP header when accessing a Wireless site. Creating an anonymous user enables unknown users to access public applications and explore the site before registering. 

Gender 

The user's gender (select either male or female). 

Date of Birth 

The user's date of birth. You can select this from the calendar or enter it in the field using the mm/dd/yyyy format. 

Enabled 

Selecting this check box enables users to log in. Leaving this check box clear prevents a user from logging in. 

Language 

A drop-down list of display languages. This is a required field. See Section 12.3.5.1 for configuring Netscape 4.7 (and lower versions) to display UTF-8 pages in a localized language. 

Time Zone 

A drop-down of time zones for the user's locale. Wireless generates and delivers alerts to the time zone selected by the user rather than by the time zone of the Wireless server itself. This is a required field. 

User Home Root 

A drop-down list of root folders, which can represent user communities or providers. The Content Manager creates these folders, which provision user home folders. This is a required field. 

Default Profile 

A drop-down list of the user view profiles. You can choose a default profile created by users from the Wireless Customization portal. There are no view profiles for newly-created users.  

Default Device Address 

A drop-down list of the user's device addresses. You can choose a default device address from the device addresses created by users in the Wireless Customization. There are no device addresses available for newly-created users. 

Default Alert Address 

A drop-down list of the user's alert addresses. This pertains to the deprecated alerts of the Wireless Edition, version 1.1. 

Default Location Mark 

A drop-down list of the user's location marks. (You can choose a default location mark from the alert addresses created by users in the Wireless Customization.) There are no location marks available for newly-created users. 

Location 

Select from among options for location-based content:

  • Location Mark: Wireless sends location-based content particular to the location mark selected from the Default Location Mark drop-down list.

  • Auto-Detect: Wireless ascertains the user's current location using the signal from the user's mobile device and sends the user content specific to the current location.

  • Auto-Detect and Remember: Wireless ascertains the user's current location using the signal from the user's mobile device, and then caches the user's current location. Wireless sends the user content specific to the current location. Caching the location can improve server performance.


Disclose Identity to External Application. 

This check box enables the user identity to be disclosed to a third-party application. 

Disclose Location to External Application. 

This check box enables the user's location be reported to a third-party application. 

Group 

The groups to which you can assign the user. Using the arrow keys, you can select ( > or >>) or remove (< or <<) a user from a group.  

Roles 

The roles to which you can assign a user. Using the arrow keys, you can select ( > or >>) or remove (< or <<) a user from a role. If you do not select a role, then the user has end-user privileges and cannot access any Wireless tool. A Helpdesk user can only create other Helpdesk users or end users. 

To create a user:

  1. From the User screen, select Create. The Create a New User screen appears.

  2. Define basic information for the user as follows:

    1. Enter the user name in the User Name field. This is a required field.

    2. Enter the display name for the user in the Display Name field.

    3. Enter a password for the user in the Password field. This is a required field.

    4. Enter the password again in the Password Confirmation field. This is a required field.

    5. Enter a password hint to prompt the user to remember the password.

    6. Enter an answer to the password hint.

    7. Enter the user's account number.

    8. Enter the users PIN (Personal Identification Number).

    9. Enter the PIN again in the PIN Confirmation field.

    10. In order for Wireless to trace the position of a user, enter the user's mobile phone number, or the MSISDN (mobile subscriber ISDN) for GSM services in the Mobile Station ID field.

    11. Enter the external repository ID.

    12. From the drop-down list, select from the following user types:

      • Registered User

      • Anonymous User (Select to create a user entity for users whose device does not send numbers through the HTTP header.)

    13. From the drop-down list, select the user's gender.

    14. Enter the user's date of birth

    15. Select the Enabled check box to allow the end user to log into Wireless Customization and the device portal.

  3. Complete the User Preference section as follows:

    1. Select a display language from the Language list box. This is a required field.


Note:

Users can view the Wireless Webtool in 11 languages and the Wireless Customization in 29 languages. (The languages available for Wireless Customization include the 11 languages available to the Wireless Webtool in addition to 17 more.)  


    1. From the drop-down list, select the time zone in which the user sends or receives content. This is a required field.

    2. Select a user home root from the list box. This is a required field.

    3. Select a default device address. This option does not apply to newly-created users.

    4. Select a default alert address. This option does not apply to newly-created users.

    5. Select a default location mark. This option does not apply to newly-created users.

    6. From the Location drop-down list, select from among the following:

      • Default Location Mark (Select for Wireless to send content specific to the location mark selected in the previous step.)

      • Auto Detect (Select for Wireless to ascertain the user's location and send content specific to that location.)

      • Auto Detect and Remember (Select for Wireless to ascertain and store the user's current location to improve server performance.)

    7. Select Disclose Identity to External Application to allow the user to be recognized by a third-party application.

    8. Select Disclose Location to External Application to allow the user to be recognized by a third-party server.

  1. Enter the group, and role information for the user as follows:

    1. From the Group list box, select the user's group membership by using the arrow keys to select (> or >>) or remove (< or <<) a group (or groups) . See Section 12.3.6 for information on groups.

    2. Using the arrow keys, select (> or >>) or remove (< or <<) user roles. If you do not assign a user role, then the user has end-user privileges. The user roles include:

      • System

      • Administrator

      • Help Desk

      • Designer

      • Organizer


    Note:

    Help Desk users can only assign the Help Desk role. 


  2. Click Finish to complete the creation of the user. The new user appears in the user list in the Browse User screen.

    Figure 12-3 The Create Users Screen (Partial View)


    Text description of usr_cusr.gif follows.
    Text description of the illustration usr_cusr.gif

12.3.5 Editing User Profiles

To edit a user's profile:

  1. From the Users screen, select the user whose profile you wish to change.

  2. Click Edit. The edit screen appears, displaying the current user profile information for the selected user.

  3. Edit the values as needed. See Section 12.3.4 for information on creating a user profile.

  4. Click Edit. The Users browse screen appears, displaying any changes pertinent to the labels in the Users screen (for example, the user name) visible.

12.3.5.1 Viewing UTF-8 Pages in Localized Languages with Netscape 4.7 or Lower

Some languages may not display properly if you use Netscape 4.7 or a lower version. In some cases, characters may display as boxes. To fix this problem, configure the Netscape preferences as follows:

  1. From the Netscape tool bar, select Edit.

  2. Select Prefences from the drop-down menu. The Prefences dialog appears.

  3. From the Category tree, select Fonts to display the Fonts dialog.

  4. In the Fonts dialog, select Unicode from the For the Encoding drop-down list.

  5. From the Variable Width Font and Fixed Width Font drop-down lists, select the font that supports the preferred language. For example, if you select Chinese as your preferred language, you can select MS Song to view the page in Chinese.

12.3.6 Managing Groups

The User Manager enables you to create user groups that organize the user community. Once created, the Content Manager assigns services appropriate to these user groups. Groups (and the users who belong to them) do not own the objects assigned to them; they view them.

Selecting the Group tab displays the Group screen, which you use to create , edit and delete Wireless user groups. You can assign these groups to users. See Section 12.3.4 for more information on assigning users to groups.

12.3.6.1 Creating a Group

To create a new user group:

  1. In the Create New Group section, enter the name of the group you want to create in the Group Name field.

  2. Enter, if needed, a description of the group.

  3. Click Create. The new group appears in the Group Name section.

12.3.6.2 Editing a Group Name

To edit a group name:

  1. In the Create New Group section, select the group whose name or description you want to change.

  2. Edit the group name or description as needed.

  3. Click Apply.

12.3.6.3 Deleting a Group

To delete a group:

  1. Select the radio box next to the group that you want to remove from the Wireless repository.

  2. Click Delete.


Go to previous page Go to next page
Oracle
Copyright © 2002 Oracle Corporation.

All Rights Reserved.
Go To Documentation Library
Home
Go To Product List
Solution Area
Go To Table Of Contents
Contents
Go To Index
Index