14
Customizing Services from a Device
This document describes customization from a device interface for customizing and assigning Wireless mobile services. Each section of this document presents a different topic. These sections include:
- Section 14.1, "Overview of Device-Based Customization"
- Section 14.2, "Accessing the Device-Based Customization Tool"
- Section 14.3, "Registering with the Device-Based Customization Tool"
- Section 14.4, "Managing Folders"
- Section 14.5, "Managing Bookmarks"
- Section 14.6, "Managing Quicklinks"
- Section 14.7, "Managing Presets"
- Section 14.8, "Managing Devices"
- Section 14.9, "Managing User Views"
- Section 14.10, "Changing User Preferences"
14.1 Overview of Device-Based Customization
Wireless enables you customize your portal from a wireless device. The device-based provides a subset of the current browser-based functionality that you use to perform such user administration functions as creating quicklinks, presets, alerts, and devices.
Note:
The user's group must have access to the Customization and UserAdmin adapters, or their equivalent, in order to utilize the capabilities.
|
14.2 Accessing the Device-Based Customization Tool
You can access the device-based customization tool using a phone number or URL provided by your administrator.
14.2.1 Logging into the Device-Based Customization Tool
Before using the Device-Based Customization Tool, you must first log in as follows:
- Access the login page through the following URL:
http://hostname:7777/ptg/rm
Note:
7777 is the default port number for Oracle9iAS Wireless. The port number range is 7777 to 7877. To ensure that you are using the correct port number, check the port number for Oracle9iAS Wireless stored in [Oracle home]/install/portlist.ini. For more information on port usage, see Oracle9i Application Server Installation Guide and the Oracle9i Application Server Administrator's Guide.
|
- Enter your user name and then enter your password. If you are an administrator, enter orcladmin as your user name. (The password is set during installation, but can be changed with the User Manager.)
The tool displays services available to both registered and guest users, those who have not yet registered with the Wireless service.
14.3 Registering with the Device-Based Customization Tool
If you have already registered with the portal, then complete the login page by entering your user name and password. If have not registered, then you can do so by clicking Register in the Welcome Page.
To register with the device-based customization tool:
- Enter your user name.
- Enter your password.
- Confirm your password by entering it once more.
Note:
Your user name and password are case-sensitive; incorrect capitalization can prevent you from logging in.
|
- Enter a hint that prompts you to remember your password.
- Enter a display name. This name appears on your home page. If you do not enter a display name, then your user name appears on your home page.
- Click Submit.
After you complete your registration, the Welcome page reappears. You can login by selecting Login from the Setup options. You log in by entering your user name and password.
14.3.1 Accessing Services from a Device
After you submit your user information, your device displays the home page of your account. Your home page, which bears your user name or display name, displays a set of default services and folders. From your home page, you can customize your services by using the following options from the setup menu:
Table 14-1 Customization Options
14.3.2 Navigation and Data Entry
You use the device's up-arrow keys and down-arrow keys to scroll through the lists. The current selection is indicated with the '>>' symbol, or by using the number key which appears next to the item you wish to select. Navigation keys vary from device to device. This document refers to the OK key for the select function. Selecting functions may be represented as a single key, or one of two keys which correspond to an "OK" and "Home" text that displays in your device's screen.
14.4 Managing Folders
Folders enable you to organize your account. You can only add a folder under a folder you own.
14.4.1 Creating a Folder
You cannot add subfolders to folders created by your administrator.
To create a folder:
- Select Services.
- Click Go.
- Click a current folder. For example, select MyFolder[.]. The Edit screen appears.
- Click Add Folder.
- Enter a name for the folder.
- Click Submit. The new folder appears in your current folder.
Note:
Wireless returns a error if you select a folder from your home page that has no contents.
|
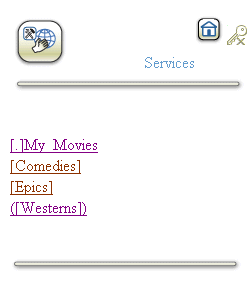
The portal designates a folder by using braces (for example, [Stockquotes_Folder]). The portal also designates the current folder by displaying [.] before the folder name ([.]Stockquotes_Folder).
By selecting a current folder, you the Edit screen, which includes functions to manage objects you create, such as folders, quicklinks, and bookmarks.
Figure 14-1 The Edit Screen
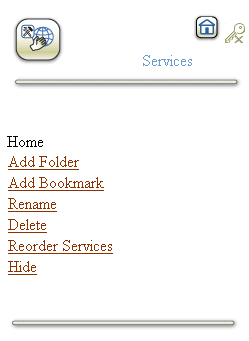
Text description of the illustration pal_cfld.gif
14.4.2 Editing a Folder
You can modify a folder by renaming it, adding a subfolder or a bookmark to it, or by changing its visibility status (show or hide). You can only modify the folders that you create or the folders that are nested under a folder you own.
14.4.2.1 Renaming a Folder
To rename a folder:
- Select Services. Click Go.
- Select the folder you want to edit.
- Select the current folder. For example, select MyFolder[.]. The Edit screen appears.
- Select Rename. Enter the new name for the folder.
- Click Submit.
14.4.2.2 Adding a Subfolder
To add a subfolder:
- Select Services.
- Click Go.
- Select the folder you to which you want to add a subfolder.
- Select the current folder. For example, select MyFolder[.]. The Edit screen appears.
- Select Add Folder.
- Enter the name of the subfolder.
- Click Submit.
14.4.2.3 Showing or Hiding a Folder
You use the hide or show option when you create a user view profile. Using these options, you can hide a folder in one user view profile, but display it in another. You can only hide or show the folders you create.
To show or hide a folder:
- Select Services.
- Click Go.
- Select the folder you want to hide or show (or a folder that contains objects you want to hide or show).
- Select the current folder. For example, select MyFolder[.]. The Edit screen appears.
Figure 14-2 Designating Hide or Show Status to Folders from a Device
Text description of the illustration pal_hdfl.gif
- Drill down to the current folder that you want to hide or show.
- From the Edit screen, click Hide or Show.
- Click Home. When you hide a folder, the Show option appears in the Edit screen. When you show a folder, the Hide option replaces the Show option.
Figure 14-3 Hiding a Folder
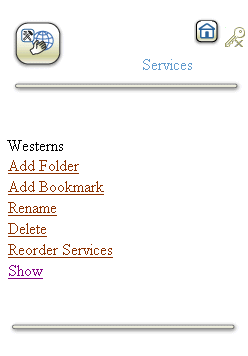
Text description of the illustration pal_hfld.gif
Portal denotes all hidden folders, bookmarks, and quicklinks by enclosing with parenthesis. For example, a hidden folder called [Addresses] displays as ([Addresses]).
14.4.3 Reordering Folders, Quicklinks, and Bookmarks
In addition to hiding or showing objects, you can customize your user view profiles by changing the order of folders, quicklinks, and bookmarks that you create.
To reorder services:
- Select Services.
- Click Go.
- Select the folder containing the objects you want to reorder.
- Click the current folder. For example, select MyFolder[.]. The Edit screen appears.
- Select Reorder Services
- Move the folder, service, or bookmark by clicking it. You move objects one level up with each click.
14.5 Managing Bookmarks
A bookmark gives you quick access to a URL. You can create a bookmark for any URL that you access frequently.
14.5.1 Creating a Bookmark
To create a bookmark:
- Select Services.
- Click Go.
- Click the appropriate folder for the bookmark.
- Click the current folder. For example, select MyFolder[.]. The Edit screen appears.
- Click Add Bookmark.
- Enter the name for the bookmark.
- Enter the URL for the bookmark, such as http://www.oracle.com.
- Click Submit.
Note:
The device-based customization tool uses the @ symbol to designate a bookmark.
|
14.5.2 Editing a Bookmark
You can change a bookmark by selecting a different URL, by renaming it, or changing its visibility status (show or hide).
14.5.2.1 Changing the URL for a Bookmark
To change the URL for the bookmark:
- Select Services.
- Click Go.
- Select the folder containing the bookmark with the URL you want to change.
- Select the bookmark.
- Select Change URL.
- Enter the new URL.
- Click Submit.
14.5.2.2 Renaming a bookmark
To rename a bookmark:
- Select Services.
- Click Go. The Edit screen appears.
- Select the folder containing the bookmark with the URL you want to change.
- Select the bookmark.
- Select Rename.
- Enter a new name for the bookmark.
- Click Submit.
14.5.2.3 Showing or Hiding a Bookmark
You can display a bookmark on your device, or you can hide it. You can only hide or show bookmarks you create.
- Select Services.
- Click Go. The Edit screen appears.
- Select the folder containing the bookmark with the URL you want to change.
- Select the bookmark.
- Select Hide. The Hide option changes to Show, designating the selected bookmark as hidden in the current display. In the editing screen, Portal notes hidden bookmarks with parentheses, such as (@bookmark).
- Click Cancel to return to your home menu.
14.6 Managing Quicklinks
Quicklinks enable you to access a service from your account.
14.6.1 Creating a Quicklink
To create a quicklink:
- From the home menu, select a service.
- Click Services.
- Click Go. The Edit screen appears.
- Select a service. The Edit screen for that service appears.
Figure 14-4 The Editing Screen for a Service
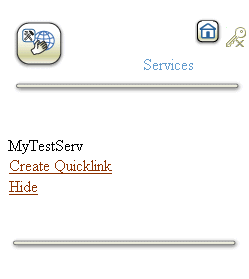
Text description of the illustration pal_crqk.gif
- Select Create Quicklink.
- If needed, enter a new name for the quicklink.
- From the folder list, select an appropriate folder. This is an optional step.
- Click Submit. The quicklink of the service appears. By default, a quicklink has the same name as the service, but is preceded by an asterisk (*).
Figure 14-5 Creating a Quicklink
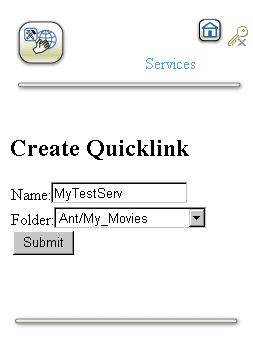
Text description of the illustration pal_nmqk.gif
14.6.2 Editing a Quicklink
You can change a quicklink by changing its name or its visibility status (hide or show).
To rename a quicklink:
- From the home menu, select a service.
- Click Services.
- Click Go. The Edit screen appears.
- Select the quicklink you want to rename.
- Select Rename. The Rename screen appears.
- Enter the new name.
- Click Submit.
14.6.2.1 Showing or Hiding a Quicklink
You can display a quicklink on your device, or you can hide it.
- Select Services.
- Click Go. The Edit screen appears.
- Select the quicklink. The Edit screen for the quicklink appears.
- Select Hide. The Hide option changes to Show, designating the selected quicklink as hidden in the current display.
- Click Cancel to return to your home menu.
14.6.3 Deleting a Quicklink
To delete a quicklink:
- From MyHome, select Setup.
- From the Setup screen, select Services.
- Click Edit. The Edit Services screen appears.
- Select the quicklink you want to delete. The edit screen for that quicklink appears.
- Select delete.
14.7 Managing Presets
Presets enable users to customize services by defining their own input parameters for an application. The executed application then uses the presets as the input parameters.
14.7.1 Adding Presets
To add a preset:
- Select Presets.
- Click Go. The Presets Definition screen appears.
- Select a preset definition.
- Click Add.
- Enter values for the preset definitions.
- Click Submit. The new preset appears.
Note:
The presets you create are organized under the preset definition.
|
14.7.2 Editing a Preset
To change the values for a preset:
- Select Presets.
- Click Go. The Presets Definition screen appears.
- Select a preset definition. The presets created from that definition appear.
- Select the preset that you want to modify.
- Click Edit.
- Edit the values as needed.
- Click Submit.
14.7.3 Deleting a Preset
To delete a preset:
- Select Presets.
- Click Go. The Presets Definition screen appears.
- Select a preset definition. The presets created from that definition appear.
- Select the preset that you want to delete.
- Click Delete.
- Click the message confirming the deletion. Clicking Cancel returns you to your home folder and leaves the preset intact.
14.8 Managing Devices
You can create a new device, allowing Wireless to deliver content appropriate to the display capacities of the device.
14.8.1 Adding Devices
To add a device:
- Select User Info.
- Click Go. The User Info screen appears.
- Click Devices. The Devices screen appears.
- Click Add.
- Complete the form as follows:
- Enter a name for the device, such as MyEmail or MyPager.
- Enter the address for the device as appropriate to the device type. For example, enter an email address for email accounts, or the provider-supplied number for WAP-enabled phones.
- From the Select Delivery Type drop-down menu, select from among the following device types:
- WAP Push
- SMS
- Voice
- Email
- Fax
- Two-Way Pager
- One-Way Pager
- Click Submit
- Select Done. When you create a device, you must validate it using a code sent by Wireless. For information on validating your device, see Section 14.8.2.
14.8.2 Validating Devices
To validate a device:
- Select User Info.
- Click Go. The User Info screen appears.
- Click Devices. The Devices screen appears.
- Select a device.
- Select Validate.
- Enter the control number.
- Click Submit.
14.8.3 Sending a Test Page
After you receive the validation number, you send a test page.
To send a test page:
- Select User Info.
- Click Go. The User Info screen appears.
- Click Devices. The Devices screen appears.
- Select a device.
- Select Send Test Page.
- Enter a short test message in the Test Message field.
- Click Submit.
14.8.4 Setting a Default Device
To designate a device as the default:
- Select User Info.
- Click Go. The User Info screen appears.
- Click Devices. The Devices screen appears.
- Select a device.
- Select Set Default. The Devices screen reappears, denoting the default device with an asterisk (*).
14.9 Managing User Views
From the device-based customization tool, you can customize views of folders, quicklinks, and bookmarks for different uses, such as a view containing the services you access from work and a view of services you access from home. You can also create views for your different devices, depending on their display capabilities.
Switching views enables you to quickly access the services appropriate to your current locale, situation, area of interest, or device.
Note:
Folders, quicklinks, and bookmarks created in one user view are not automatically visible to another user view. For example, the objects you create in a Work user view cannot be seen from the Home user view.
|
14.9.1 Creating a User View
To create a user view:
- Select User Profile.
- Click Go. The User View Profiles screen appears.
- Click Add.
- Enter a name for the profile.
- Click Submit.
14.9.2 Organizing Services for a User View
You organize folders, services, and bookmarks for a view by first designating a default view and then by hiding or showing the folders, services, and bookmarks appropriate to that view.
14.9.2.1 Selecting a Default User View
To select a default user view:
- From the Home page, select User Profiles.
- Select User Profiles.
- Click Go. The User View Profiles screen appears.
- Select the view profile that you want to set as the default.
- Click Set Default. When you return to the home page, only the services selected for that view profile appear.
14.9.2.2 Organizing Folders and Services for a User View
To organize folders and services for a user view:
- From the Home page, select Services.
- Click Go. The Edit screen appears, displaying all the services, bookmarks, and folders in your account.
- Rename, reorder, hide or show the services, folder, or bookmarks appropriate to this user view. See Section 14.4.3 for information on reordering objects. See both Section 14.6.2.1 and Section 14.5.2.3 for information on showing or hiding quicklinks and bookmarks.
14.10 Changing User Preferences
You can change your user preferences.
- From the Home menu, select User Info.
- Click Go. The User Info screen appears.
- Select Change Password.
- Complete the form as follows:
- Enter your old password.
- Enter your new password.
- Enter your new password once more to confirm it.
- Enter, if needed, a password hint.
- Click Submit.
14.10.0.3 Changing Your User Name and Display Name:
- From the Home menu, select User Info.
- Click Go. The User Info screen appears.
- Select Change Name.
- Enter a new user name.
- If needed, enter a new display name.
- Click Submit. Your new display name appears when you return to Home.
14.10.0.4 Changing Your Privacy Options
Using the Change Privacy screen, you can switch on or off the Show Identity, Show Location, and Detect Location options you set when you registered with the portal.
To change your privacy options:
- From the Home menu, select User Info.
- Click Go. The User Info screen appears.
- Select Change Privacy. The Change Privacy screen appears.
- Turn on, or off any of the following privacy options:
- Show Identity: This option enables your identity to be reported to a third-party. Some services may not work if you do not select this option.
- Show Location: This option enables your current location to be reported to a third party application. Some services may not work if you do not select this option.
- Detect Location: This option enables you receive content specific to your current location using the signal from your mobile device.
- Click Cancel.
Note:
See Section 14.3 for more information on the Show Identity, Show Location, and Detect Location options.
|
