Release 2 (9.0.2)
Part Number A90485-02
Home |
Solution Area |
Contents |
Index |
| Oracle9iAS Wireless Developer's Guide Release 2 (9.0.2) Part Number A90485-02 |
|
This document describes reusable Services that are included in Oracle9iAS Wireless.
Each section of this document presents a different topic. These sections include:

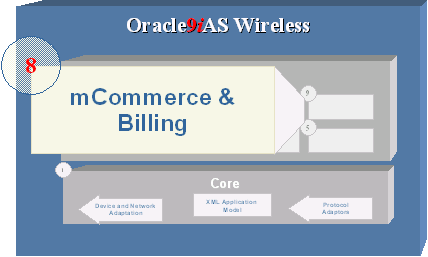
Oracle m-Commerce Service is a set of Oracle9iAS Wireless modules that securely store user profiles, supply information authorized by users of third party applications, and interface with on-line payment mechanisms to complete transactions. The m-Commerce Service also translates existing WML applications into Mobile-XML, and uses FormFiller to map forms, which spares users from entering information from a mobile device. Oracle m-Commerce Service is automatically installed along with Oracle9i Application Server.
The extendible modules architecture on the m-Commerce Service enables the development of drivers to integrate m-Commerce services to third-party applications.
You can build an m-Commerce application using Oracle9i Application Server Mobile XML. You can incorporate any m-Commerce component to this application by adding URL links to the modules complying with their APIs.
If you have already developed an m-Commerce application in WML, you can run it through the Translator Module by calling its API, and providing your application's URL. This action will add links from your application to all m-Commerce modules.
Before you configure the modules, you must do the following:
The mobile Wallet (m-wallet) enables users to manage their profile from mobile devices as well as participate in commerce transactions and track their activity.
The m-Wallet Module securely stores user's payment instrument information, such as credit cards, bank accounts, and shipping addresses. Upon user approval, other m-Commerce applications can retrieve this information to process payments.
The Oracle9iAS Wireless administrator can configure the Credit Cards, Bank Accounts and Extended Information compartments at any time, even if they contain values that users have previously entered. The fixed compartments are profile, shipping addresses and internet accounts.
The m-Wallet is divided into compartments that can hold one or more instruments. For example the Credit Cards compartment holds as many credit cards as a user sees fit to enter. The Extended Information compartment, however, holds only one information set.
Mobile Wallet module (m-Wallet) provides a convenient single-click commerce payment mechanism. It is a server side, encrypted entity that contains payment instrument, identification and address information for registered users. m-Wallet enables users to store all the information required to fill out commerce-related forms from any application. That information is used to complete transactions, and through APIs (built and maintained by authorized third-party service providers), can be made available to authorized partners and e-merchants. It processes requests (via proxies) for personal and payment instrument information issued through HTML or WML forms by third-parties, and presents them to users, who decide explicitly what information gets sent back to the third-party. The wallet stores this information securely for users, providing them an easy, secure shopping experience, and freeing them from repeatedly entering information.
m-Wallet also encrypts and decrypts all of the information stored in the Repository using a three-part key comprised from a combination of the following:
Each portion of the three-layer key can be changed independently, but each of them is required in order to decrypt wallet-stored information. This combination is never stored, only an encrypted alias, assigned to each entry during its creation or modification, is sent over the wireless network.
Because security is central to the m-Wallet you must configure HTTPs for the m-Wallet.
The installation of Oracle9i Application Server includes both installation of a dummy certificate and automatic HTTPS configuration. Use this certificate only for testing and development, as it is not signed by a trusted entity.
|
Note: When setting up a production machine, you must install the actual certificate for HTTPS on the server. |
You do not need to configure the SQL tables; installing Oracle9iAS Wireless installs all of the tables needed by the Formfiller module.
You must install and configure the Secure Key Server before using the Wallet Module. For more information, see Section 19.2.1.
The following security .jar files must be placed under jdk1.3/jre/lib/ext. (The Oracle Installer creates this directory.)
You must insert an encryption key. This encryption key forms the backbone for encryptions and decryptions performed by the system.
To configure security.sh, complete these steps:
To generate and install the security key, follow these steps:
|
Note: Because the script contains sensitive information, you should destroy it after running it or move it to a secure place. |
You must configure the modules.properties file with the correct paths for both the HTTP and HTTPS listeners so that such resources as audio and images are presented properly in HTTPS mode.
The modules.properties is located under ORACLE_HOME/wireless/server/classes/messages/oracle/panama/module/common
An example of the correct values for modules.properties is as follows:
/*
 *
 * $Copyright:
 * Copyright (c) 2001 Oracle Corporation all rights reserved
 */
#------------------------------------------------------------------------
# Please configure here the module server URLs.
# If no value if configured, we'll try to use the request in order to
# get the server name
# example:
# device.resources.host=http://myserver.com
# device.resources.port=9080
# device.resources.secure.host=https://myserver.com
# device.resources.secure.port=9081
#------------------------------------------------------------------------
device.resources.host=http://www.myserver.com
device.resources.port=9080
device.resources.secure.host=https://www.myserver.com
device.resources.secure.port=443
There are two optional service input parameters which do not require configuration.
Whenever a third party application requests user information from the Wallet, the user must agree to share this information. This parameter is set regardless of whether this confirmation card is presented to user.
The valid values for this input parameter include:
Administrators may want to customize these values depending on the site's policy.
Defines whether the m-Wallet module runs in HTTP or HTTPS.
The valid values for this input parameter include the following:
Wallet Module requires the Security Server to be correctly installed and configured prior to its use. There is one required parameter which requires configuration:
ORACLE_SERVICES_COMMERCE_SECURITY_PROPS_PATH
You can link to the m-wallet using the following virtual URL:
omp://oracle/services/commerce/wallet
The m-wallet includes the following input call parameters:
Wallet_Action is used to determine the type of overall action that service requests. This is a mandatory parameter.
Table 19-2 Input Parameters for Wallet_Action
This group contains the following parameters. This is an optional group.
Table 19-3 Parameters of the getWalletInfoRequest Group
The m-Wallet module includes the following output parameters:
Table 19-4 Output Parameters for the m-Wallet Module
The Credit Cards structure held in wallet.properties. The fields are returned as request parameters. The following parameters are the default parameters of the CreditCardData group. This is an optional parameter.
Table 19-5 Parameters of the CreditCardData Group
The Bank Account structure defined in wallet.properties. All the fields are returned as request parameters.
This group contains the following parameters. This is an optional group.
Table 19-6 Parameters of the bankAccountData Group
The Extended Information structure defined in wallet.properties. All fields are returned as request parameters.
The idData group contains the following parameters. This is an optional group:
Table 19-7 Parameters of the idData Group
You can configure the structure of the m-Wallet so that its contents can be personalized according to usage.
The m-Wallet structure is defined in the wallet.properties file located under the directory ORACLE_HOME/wireless/server/classes/messages/oracle/panama/module/commerce/wallet/wallet.properties
This file contains the definitions for credit cards, bank accounts and extended information. In addition, this file contains the definition of the formats to be used for each field. The format definitions are used for internationalization purposes of the dates.
To define a compartment, When defining a compartment, there are few things one needs to do:
compartments=CREDIT_CARD,BANK_ACCOUNT,ID
CREDIT_CARD.fieldnumber=6
The variable is built as follows:
<comparment_name>.fieldNN.itemNN=<value>, where:
compartment_name = current compartment name, i.e. CREDIT_CARD
fieldNN = represents the current field, starting in 1, i.e. CREDIT_
CARD.field1
itemNN = represents each attribute of this field, starting in 0, i.e.
CREDIT_CARD.field1.item0
The attributes are defined as follows:
#0
CREDIT_CARD.field1.item0=<request_variable_name, i.e. CC_HOLDER_NAME>
CREDIT_CARD.field1.item1=<key.in.portal.properties, i.e. modules.commerce.wallet.creditcard.holdername
CREDIT_CARD.field1.item2=<MANDATORY|OPTIONAL>
CREDIT_CARD.field1.item3=<format, i.e. MIXED_FORMAT, NUMBER_FORMAT, DATE_FORMAT>
CREDIT_CARD.field1.item4=<comma-separated list of values, i.e. Visa, Master, AmEx, Discover, Diners>
CREDIT_CARD.field1.item5=<LINK_LOC>
The Translator module enables any site written in WML to be rendered on any device by converting its contents to MobileXML. It also enhances the navigation of sites originally authored in WML by adding links to Oracle9iAS Wireless core services. Currently, only WAP sites are supported. There is no output parameter; the translated result and status code are internally consumed by the translator module.
The Translator has the following service input parameters:
You can link to the Translator module using the following virtual URL:
omp://oracle/services/commerce/translator
The Translator module includes the following input call parameters.
Table 19-8 Input Call Parameters of the Translator Module
This section includes invocation examples for translating a site and removing a preset using the following input parameters:
You use the input parameter XLTORSITE to translate a WML site as follows:
XLTORSITE=http://www.oraclemobile.com
You use the input parameters EXTENSIONACTION and PRESETLABEL to remove a preset as follows:
EXTENSIONACTION=DELPRESET
PRESETLABEL=www.oraclemobile.com
The iPayment module, which integrates with Oracle CRM iPayment module, processes credit card and bank account transactions.
Payment Processing enables integration with payment mechanisms, such as Oracle's CRM iPayment. As a result, credit card processing and bank account transactions are carried out through direct connections to financial networks. You can add other drivers that integrate payment solution providers per customer requests.
Through integration with Oracle CRM's iPayment component, which implements transaction settlement support for credit cards and bank accounts, allows transactions to be processed directly through the platform rather than through a processing infrastructure deployed by merchants.
You must correctly install and configure the Oracle CRM iPayment before you use the iPayment module.
The iPayment Service module includes the following service configuration parameters:
|
Note: ORACLE_SERVICES_COMMERCE_PAYMENT_DBCFILE and ORACLE_SERVICES_COMMERCE_PAYMENT_ECAPPID are required parameters. |
OracleIPaymentHook) provides the driver for Oracle CRM 11i iPayment.
Merchants can use a URL whenever they want to capture previously authorized transactions. This URL can be used in both secure and non-secure modes. The difference between the two modes is the HTTP and HTTPS protocols.
The http URL for the non-secure capture of a previously authorized transaction is as follows:
http://myserver.com:9080/modules/commerce/payment/jsp/IPaymentProcess.jsp?
MERCHANTID=<merchantID>&
MERCHANTPW=<merchantPWD>&
TRXID=<transactionID>&
CURRENCY=<currency>&
AMOUNT=<amount>
For a merchant called BookStore to capture transaction #1234 in the amount of US$100.00, you call the URL and then enter the parameters as follows:
http://myserver.com:9080/modules/commerce/payment/jsp/IPaymentProcess.jsp?
MERCHANTID=bookstore&MERCHANTPW=welcome&TRXID=1234&CURRENCY=USD&AMOUNT=100
In order to use the secure mode for the capture URL, you must first configure the SSL for the OC4J Application Server. For information on configuring the OC4J Application Server, see Section 19.3.1.1.
The HTTPS URL for the secure capture of a previously authorized transaction is as follows:
https://myserver.com:443/modules/commerce/payment/jsp/IPaymentProcess.jsp?
MERCHANTID=<merchantID>& MERCHANTPW=<merchantPWD>& TRXID=<transactionID>& CURRENCY=<currency>& AMOUNT=<amount>
The Formfiller module is a self-teaching form filler, one that maintains mappings between application form fields and wallet elements. The Formfiller accepts a URL and a list of label and variable names as input parameters, and checks if there is a stored mapping from the given labels and variables to wallet fields. If there is no such mapping, it enables users to create a new mapping into wallet fields. Once a mapping is retrieved or created, it calls the wallet, asking it for the given mapped information. Upon successful completion, the module returns a status of Success along with the wallet values corresponding to the label/variable name list. Otherwise, a status code of Failure will be returned
Before you can deploy the Formfiller module, you must install the Formfiller, configure the guessing heuristics, and approve the mappings.
You do not need to configure the SQL tables; installing Oracle9iAS Wireless installs all of the tables needed by the Formfiller module.
When an existing mapping is not available, the Formfiller enables authorized users to select given fields from the m-Wallet to fill in values for a given input field in a wireless form.
When constructing a new mapping, the Formfiller uses name guessing heuristics to automatically suggest default values to the user. As a result, the mapping creation process is minimized, making it a "user-approved" mapping process.
Name-guessing can be done in two ways: you can enter rules for explicit mapping suggestions, (such as 'Credit Card number' to 'CreditCard:Number') or you can implement a dynamic heuristic that determines the similarities between the input field and the fields in the m-Wallet. For example, 'Deluxe user home address' would map automatically to 'Profile:Address'.
The "fixed" mapping suggestions should be placed as service parameters for the Formfiller service. The Input Parameter name should consist of `ORACLE_SERVICES_COMMERCE_FORMFILLER_SUGGESTIONS_' and the suggested key to use. For example, `ORACLE_SERVICES_COMMERCE_FORMFILLER_SUGGESTIONS_Credit Card' would be a suggested key to use. The default value must contain a valid Wallet compartment and field name. The administrator for the Formfiller should know the compartment and the field name in advance. For example:
Input Parameter Name: ORACLE_SERVICES_COMMERCE_FORMFILLER_SUGGESTIONS_Credit Card
Default Value: CREDIT CARD:CC_NUMBER
The "dynamic" mapping suggestions are controlled by a class that implements the GuessingHeuristic interface. The factory method inside the FormFillerManager to retrieve the implementation of the guessing heuristic takes the class name from the Formfiller service parameters. The key of the property is ORACLE_SERVICES_COMMERCE_FORMFILLER_HEURISTIC.
The guessing heuristics uses keys that are defined in the service parameters for Formfiller Master Service. In order to setup, ORACLE_SERVICES_COMMERCE_FORMFILLER_HEURISTIC defines the property that the GuessingHeuristic implementor of the Formfiller module uses. This value must be the fully qualified class name of the class implementing the GuessingHeuristic interface. This is an optional field, as the default dynamic heuristic provider is set to oracle.panama.app.services.modules.formfiller.WalletGuessingHeuristic.
The following are input service parameters are examples of the configuration file:
The default value for this parameter is oracle.panama.app.services.modules.formfiller.WalletGuessingHeuristic
ORACLE_SERVICES_COMMERCE_FORMFILLER_SUGGESTIONS_Credit Card
Default Value: CREDIT CARD:CC_NUMBER
The Formfiller Administration enables you to manage settings, manipulate stored mappings, and approve pending mappings.
To access the Formfiller Administration:
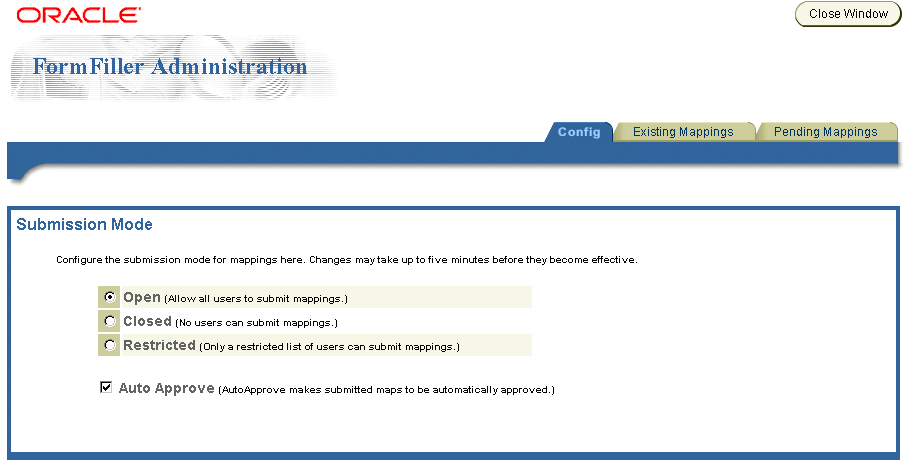
The Config tab enables you to set the submission mode for the Formfiller mappings by selecting between the following options:
The Config tab also includes the Auto-Approve Mode. Selecting this option approves all submitted mappings immediately. (These mappings do not need approval as they become effective immediately.)

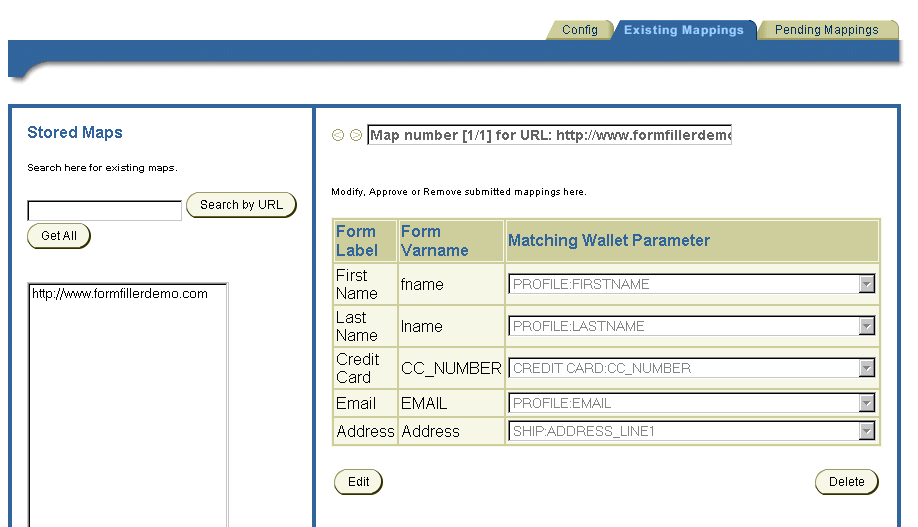
The Existing Mappings tab enables you to search for, edit, and delete existing Formfiller mappings.
To retrieve a stored mapping, either search for the mapping by URL, or select Get All. The mapping appears in the pane in the Stored Maps section of the screen. To edit a mapping, click on the mapping. The mapping's form label, variable name (Varname) and matching wallet parameters appear in the right frame. You can then modify the mapping by using the drop-down lists to select different matching wallet parameters. Click done after you have completed your changes. Clicking Delete removes the mapping.

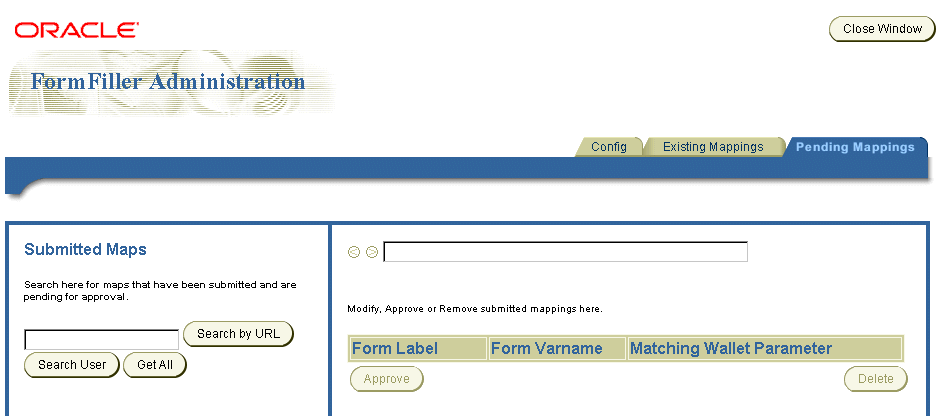
The Pending Mappings tab enables you to search for, edit, delete, and approve any pending (unapproved) mappings.
You can retrieve a pending mapping either by searching by URL, or by user. To retrieve all the pending mappings, select Get All. The mappings appear in the pane in the Stored Maps section of the screen. To select a mapping, click on the mapping. The mapping's form label, variable name (Varname) and matching wallet parameters appear in the right frame. You can then approve the mapping or delete it.

To configure the input parameters for this module:
The Formfiller module includes the following optional input parameters, which do not require configuration.
package.formfiller.myGuessingHeuristic
<label_key> or <variable_key>, it automatically points to the corresponding compartment and field in Wallet. For example: ORACLE_SERVICES_COMMERCE_FORMFILLER_SUGGESTIONS_ccnum=CREDIT_CARD:CC_NUMBER
You link to the Formfiller module using the following virtual URL:
omp://oracle/services/commerce/formfiller
The Formfiller module includes the following input call parameters:
Table 19-9 Input Call Parameters of the Formfiller Module
The Formfiller's output parameters include the following:
This group includes the following parameters, which return the values for the Formfiller.
Table 19-10 Parameters of ReturnGroup
For a the successful data retrieval for the application, FormFiller Demo, configure the parameters as follows:
An example of the unsuccessful retrieval of data for the application, FormFiller Demo, is as follows:
Billing with Oracle9iAS Wireless is based on the service activity logging framework. The Activity Logger provides the logging framework used by the runtime components. Database logging is handled asynchronously because the runtime logging on the database carries a huge overhead. The runtime data is generated as files, which are less expensive. The data thus generated is picked up by the Performance Logger framework and written onto the database. When services are executed, the log tables contains a record with information of the user, timestamp, service name and the related values. Related values are values that can be associated with the service, such as a cost. The framework can be extended to create a custom cost-handling mechanism. For more information on logging activity, system logging tables and how to manage the logging system, refer to the Oracle9iAS Wireless Getting Started and System Guide.
|
|
 Copyright © 2002 Oracle Corporation. All Rights Reserved. |
|