Release 2 (9.0.2)
Part Number A95880-01
Home |
Solution Area |
Contents |
Index |
| Oracle9iAS Containers for J2EE User's Guide Release 2 (9.0.2) Part Number A95880-01 |
|
OC4J security employs a user manager to authenticate and authorize users and groups that attempt to access a J2EE application. User managers differ in performance and are employed based on the security you require. Confidentiality is automatically provided by the Oracle HTTP Server.
This chapter describes the following topics:
For more detail on OC4J security, see the security chapters in the Oracle9iAS Containers for J2EE Services Guide. For a broader description of Oracle9iAS security in middle-tier environments that connect to the Internet, see the Oracle9i Application Server Security Guide.
OC4J security is based on a two-step process. First, a user or group attempting to access a J2EE application is authenticated, and then it is authorized. Authentication and authorization, along with OC4J confidentiality, are introduced below:
You define users and groups in a user repository. A user repository is used by a user manager to verify the identity of a user or group attempting to access a J2EE application. A user repository can be a file or a directory server, depending on your environment. The Oracle Internet Directory is an example of a user repository.
Although the J2EE application determines which user can use the application, it is the user manager, employing the user name and password, that verifies the user's identity, based on information in the user repository.
OC4J supports two types of authentication providers: JAZN and XML. These are described below in "Provider Types".
You specify authorization for users and groups (identities) in the J2EE and OC4J-specific deployment descriptors. J2EE and OC4J-specific deployment descriptors indicate what roles are needed to access the different parts of the application. Roles are the identities that each application uses to indicate access rights to its different objects. The OC4J-specific deployment descriptors provide a mapping between the logical roles and the users and groups known by OC4J.
Authorization identities are defined in the XML deployment descriptors for each application. The application refers to the users, groups, and roles of the authentication provider (JAZN or XML). The application XML deployment descriptor modifications are discussed in "Authorization In J2EE Applications".
Authentication and authorization are implemented in a user manager class of the com.evermind.security.UserManager interface. User manager classes manage users, groups, and passwords with methods such as createUser(), getUser(), and getGroup().
OC4J security supplies two types of security providers--JAZN and XML--which are implemented in their own user manager classes--JAZNUserManager or XMLUserManager. JAZN is the default security provider, because JAZN is more secure than the XML provider.
|
Note: You can also customize your own user manager. See "Creating Your Own User Manager". |
Table 8-1 lists the user managers available in OC4J security.
| User Manager Class | User Repository |
|---|---|
|
oracle.security.jazn.oc4j. |
Two types: |
|
com.evermind.server. |
The |
|
Custom user manager |
Customized user repository |
See "Specifying Your User Manager" for details for directions on how to define the user manager type for all applications (globally) or for a specific application using Enterprise Manager.
The following sections describe the JAZN and XML user managers:
The JAZNUserManager class is the default user manager and offers the best security. The primary purpose of the JAZNUserManager class is to leverage the JAAS provider as the security infrastructure for OC4J. For a complete description of the JAAS provider, see the Oracle9iAS Containers for J2EE Services Guide.
By integrating the JAAS provider with OC4J, the following benefits can be achieved:
mod_osso integration
mod_ossl integration
run-as identity support, delegation support (from servlet to EJB)
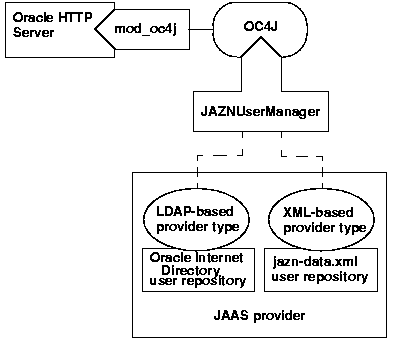
Use the JAZNUserManager class if you want OC4J security that has secure, centralized storage, retrieval, and administration of JAAS provider data. This data consists of realm (user and roles) and JAAS policy (permissions) information. Figure 8-1 illustrates the architecture of OC4J security under the JAZNUserManager class.
There are two types of JAZN supplied with OC4J security: XML-based or Lightweight Directory Access Protocol (LDAP)-based.
jazn-data.xml file.
Select JAZN-XML as the user manager in the Enterprise Manager. Configure its users, roles, and groups using either the Enterprise Manager or the JAZN Admintool. You must have a preconfigured jazn-data.xml file before configuring this user manager. Since this is the default, there is a default jazn-data.xml file. For directions on the XML elements and how to modify this file, see the appropriate security chapters in Oracle9iAS Containers for J2EE Services Guide.
Select JAZN-LDAP as the user manager in the Enterprise Manager. Configure its users and groups using the Delegated Administrative Service (DAS) from Oracle Internet Directory. The user repository is an Oracle Internet Directory, which necessitates that the application server instance is associated with an infrastructure. If it is not associated with an Oracle Internet Directory, JAZN-LDAP is not a security option.
Figure 8-1 demonstrates how JAZN is broken up into two different provider types.
The XMLUserManager class is a simple user manager that manages users, groups, and roles in a file-based system. It does allow user passwords to be passed in the clear, and is not secure. All of its configuration information is stored in the principals.xml file, which is the user repository for the XMLUserManager class.
The user manager, employing the user name and password, verifies the user's identity based on information in the user repository. The user manager defines what type of authentication you will be using. It contains your definitions for users, groups, or roles. The default user manager is the JAZNUserManager.
You can define a user manager for all applications or for specific applications.
Figure 8-2 shows the Enterprise Manager Security page that enables you to choose the type of user manager you prefer. This page is the same both for global and application-specific security definition.

To modify the global user manager, do the following:
JAZNUserManager requires that you enter the realm and location of the jazn-data.xml file.
/j2ee/home/config. This is because the global application resides in this directory.
j2ee/home/application-deployments/<appname>.
Modifying the user manager for a specific application is similar as follows:
Once you apply the changes, go back up to the application page and choose Security. If you chose JAZNUserManager or XMLUserManager, a page is shown where you can add users, groups, or roles that are appropriate for the user manager.
If you chose one of the JAZN provider types, then the type is designated in the jazn.xml file that is located in j2ee/home/config. The jazn.xml file is used to configure the provider type, but you can also add other JAZN configuration information in this file. See Oracle9iAS Containers for J2EE Services Guide for information on this file.
The following is a sample jazn.xml file with both provider types. The JAZN-LDAP provider is commented out.
<?xml version="1.0" encoding="UTF-8" standalone='yes'?>
<!DOCTYPE jazn PUBLIC "JAZN Config"
"http://xmlns.oracle.com/ias/dtds/jazn.dtd">

<jazn provider="XML" location="./jazn-data.xml" />

<!--
<jazn provider="LDAP" location="ldap://myoid.us.oracle.com:389" />
-->
Each provider type enables you to define users, groups, and roles in the following ways:
You manage users, groups, and roles for the JAZN-XML and XML user managers with the same Enterprise Manager pages. The following sections discusses how to modify both JAZN-XML and XML provider type users, groups, and roles using Enterprise Manager.
Shared users and groups are listed in the user repository, which are defined in the Security section on the OC4J Home Page. The type of user manager as the default for all applications is defined in the General section of the default application page.
To add groups, users, and roles for all applications, do the following:
Application-specific users and groups are listed in the application-specific user repository, which are defined in the Security section on the application page. The type of user manager used for this application is defined in the General section of this application.
Modifying groups, users, and roles for a specific application is similar as follows:
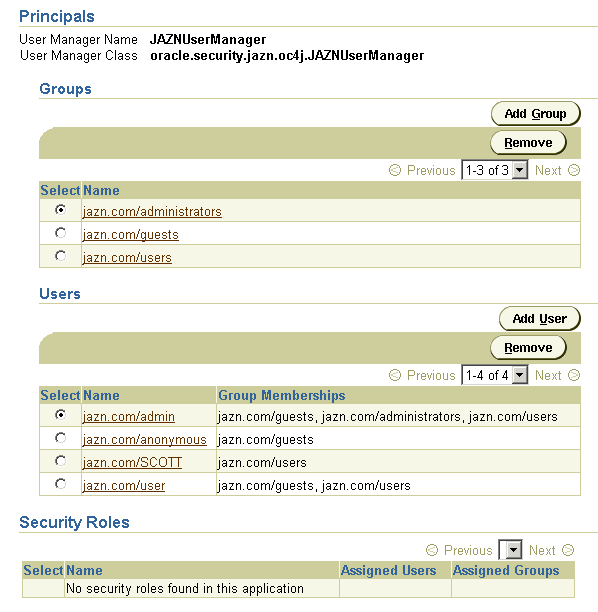
Figure 8-3 shows an example of how to specify groups, users, and roles for the JAZNUserManager.
If you are familiar with the OC4J XML configuration, the JAZN-XML users, roles, and groups are defined in the jazn-data.xml file. When you add users, roles, and groups using the Enterprise Manager pages, these are stored in the jazn-data.xml file. The passwords are obfuscated.
The following jazn-data.xml is an example of a JAZN-XML group named allusers and a user named guest.
<role>
  <name>allusers</name>
  <members>
   <member>
    <type>user</type>
    <name>guest</name>
   </member>
  </members>
</role>
Unlike the XML from the XMLUserManager user repository, the password is encrypted under the JAZNUserManager.
<user> <name>guest</name> <description>The default user</description><credentials>NVgOIAV2Xe0Is+t+Q1xhU/3G5glW/KH8</credentials></user>
These elements define a role of allusers with a member of user/guest and its credentials on the Security page.
The XMLUserManager users, roles, and groups are defined in the principals.xml file. The following XML from the principals.xml file (the user repository for the XMLUserManager class) shows how to define a group named allusers and a user named guest with password welcome. The guest user is made a member of the allusers group. The passwords provided in a principals.xml file are not encoded; thus, they constitute a security risk.
<principals> <groups><group name="allusers"><description>Group for all normal users</description> <permission name="rmi:login" /> <permission name="com.evermind.server.rmi.RMIPermission" /> </group> ....other groups... </groups> <users><user username="guest" password="welcome"><description>Guest user</description><group-membership group="allusers" /></user> </users> </principals>
Use these elements to define a group of allusers with the correct Permissions, with a user of guest/welcome on the Security page.
The Enterprise Manager does not enable you to add Permissions. To add Permissions, use the JAZN Admintool for JAZN-XML and the Delegated Administrative Service for JAZN-LDAP. See Oracle9iAS Containers for J2EE Services Guide for more information.
Most clients are Web browsers that access OC4J through the Oracle HTTP Server mod_oc4j module. OC4J requests the client to authenticate itself when accessing protected URLs. You can achieve authentication through a user name and password, or in the case of SSL, through an SSL certificate. Although in most cases where authentication is required, the user will be prompted to enter a user name and password.
If a servlet turns around and invokes an EJB, the caller principal is delegated to the EJB. That is, the caller user name and password are passed along to the EJB for authentication.
When you access EJBs in OC4J, you must pass valid credentials to this server.
jndi.properties file, either deployed with the EAR file or in the InitialContext object.
InitialContext object, which is created to look up the remote EJBs.
If the client exists within the same application as the target, or the target exists within its parent, you do not need a JNDI properties file. If not, you must initialize your JNDI properties either within a jndi.properties file, in the system properties, or within your implementation, before the JNDI call. If you store your password in a jndi.properties file, it is not encoded.
The following sections discuss these three options:
A servlet that exists in the same application with the target bean automatically accesses the JNDI properties for the node. Therefore, accessing the EJB is simple: no JNDI properties are required.
//Get the Initial Context for the JNDI lookup for a local EJB
InitialContext ic = new InitialContext();
//Retrieve the Home interface using JNDI lookup
Object empObject = ic.lookup("java:comp/env/employeeBean");
This is also true if the target bean is in an application that has been deployed as this application's parent. To specify parents, configure the parent application in the application.xml file in the EAR when deploying the originating application.
If setting the JNDI properties within the jndi.properties file, set the properties as follows. Ensure that this file is accessible from the CLASSPATH.
java.naming.factory.initial=com.evermind.server.ApplicationClientInitialContextFactory
The ORMI default port number is 23791, which can be modified in j2ee/home/config/rmi.xml. Therefore, set the URL in the jndi.properties, in one of the two ways:
java.naming.provider.url=ormi://<hostname>/<application-name>
- or -
java.naming.provider.url=ormi://<hostname>:23791/<application-name>
When you access EJBs in OC4J, you must pass valid credentials to this server. Standalone clients define their credentials in the jndi.properties file deployed with the code of the client. When using JAZN, both the realm and the user name are defined as the principal. If only one realm exists, then the user name can be specified alone. The assumption is to use the single realm.
java.naming.security.principal=<JAZNrealm/username>
java.naming.security.credentials=<password>
Set the properties with the same values, but with different syntax. For example, JavaBeans running within the container pass their credentials within the InitialContext, which is created to look up the remote EJBs.
To pass JNDI properties within the Hashtable environment, set these as shown below. This example shows the client using JAZN-XML format by providing 'jazn.com/guest' in the realm/username format.
Hashtable env = new Hashtable();
env.put("java.naming.provider.url", "ormi://localhost/ejbsamples");
env.put("java.naming.factory.initial",
      "com.evermind.server.ApplicationClientInitialContextFactory");
env.put(Context.SECURITY_PRINCIPAL, "jazn.com/guest");
env.put(Context.SECURITY_CREDENTIALS, "welcome");
Context ic = new InitialContext (env);
Object homeObject = ic.lookup("java:comp/env/employeeBean");

// Narrow the reference to a TemplateHome.
EmployeeHome empHome =
	 (EmployeeHome) PortableRemoteObject.narrow(homeObject,
                                                   EmployeeHome.class);
For most clients, set the initial context factory class to ApplicationClientInitialContextFactory. If you are not using a J2EE logical name defined in the <ejb-ref> in your XML configuration file, then you must provide the actual JNDI name of the target bean. In this case, you can use a different initial context factory class, the com.evermind.server.RMIInitialContextFactory class.
The following servlet uses the JNDI name for the target bean: /cmpapp/employeeBean. Thus, this servlet must provide the JNDI properties in an RMIInitialContext object, instead of the ApplicationClientInitialContext object. The environment is initialized as follows:
INITIAL_CONTEXT_FACTORY is initialized to a RMIInitialContextFactory.
InitialContext, it is retrieved.
Hashtable env = new Hashtable(); env.put(Context.PROVIDER_URL, "ormi://localhost/cmpapp"); env.put(Context.SECURITY_PRINCIPAL, "jazn.com/guest"); env.put(Context.SECURITY_CREDENTIALS, "welcome"); env.put(Context.INITIAL_CONTEXT_FACTORY,"com.evermind.server.rmi.RMIInitialContextFactory");Context ic =new com.evermind.server.rmi.RMIInitialContextFactory().Object homeObject = ic.lookup("/cmpapp/employeeBean"); // Narrow the reference to a TemplateHome. EmployeeHome empHome =getInitialContext(env);(EmployeeHome) PortableRemoteObject.narrow(homeObject,EmployeeHome.class);
Authorization is the process of granting or denying a user access to a J2EE application based on its identity. Authorization is distinct from authentication, which is the process of verifying that a user is valid.
You specify authorization for users and groups in the J2EE and OC4J-specific deployment descriptors. The J2EE deployment descriptor is where you specify the access rules for using logical roles. The OC4J-specific deployment descriptor is where you map logical roles to actual users and groups, which are defined in a user repository.
The following sections describe how to define users, groups, and roles:
Specify the logical roles that your application uses in the XML deployment descriptors. Depending on the application component type, update one of the following with the logical roles:
In each of these deployment descriptors, the roles are defined by an XML element named <security-role>.
The following steps describe the XML necessary to create a logical role named VISITOR in the ejb-jar.xml deployment descriptor.
VISITOR, in the <security-role> element.
<security-role>
 <description>A role for every user</description>
 <role-name>VISITOR</role-name>
</security-role>
<method-permission> element.
<method-permission>
 <description>VISITOR role needed for CustomerBean methods</description>
 <role-name>VISITOR</role-name>
 <method>
  <ejb-name>customerbean</ejb-name>
  <method-name>*</method-name>
 </method>
</method-permission>
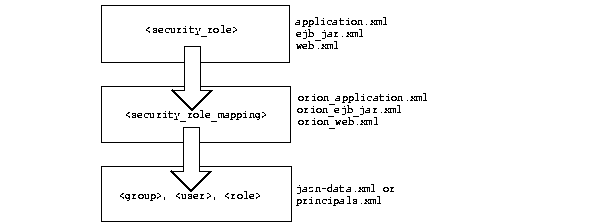
Map logical roles defined in the application deployment descriptors to actual users and groups defined in a user repository. The mapping is specified in the OC4J-specific deployment descriptor with a <security-role-mapping> element. Figure 8-4 illustrate this mapping.
This example maps the logical role VISITOR to the allusers group in the orion-ejb-jar.xml file. Any user that can log in as part of this group is considered to have the VISITOR role and can therefore execute the methods of customerbean.
<security-role-mapping name="VISITOR">
 <group name="allusers" />
</security-role-mapping>
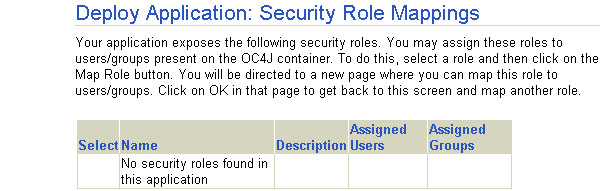
The previous demonstrated the XML that you can provide in the orion-ejb-jar.xml file in your application EAR file. However, if you decide to not map the logical role at this time, the deployment wizard gives you a chance to map all logical roles in the security role mapping stage. The deployment wizard would display the logical name VISITOR and provide you a field that you can map it to allusers.
The following screen shows the security role mapping stage of the deployment wizard:
To create your own user manager, complete the following steps:
UserManager interface. Table 8-2 describes the methods of this interface.
Table 8-2 Methods of the UserManager Interface
OC4J provides an example of a custom user manager--the DataSourceUserManager class. This class manages the users in a database specified by the DataSource interface.
Thus, you do not need to implement this class, but only configure it as designated in steps 2-4 above.
On the General Properties page, choose the Custom User Manager button with the class of "com.evermind.sql.DataSourceUserManager." In addition, this class requires certain input parameters for startup. Thus, at the bottom of the User Manager section of this page you will enter these parameters and their values in the Initialization Parameters for Class section. For each of the following parameters, click the Add Another Row button and enter the parameter name and its value.
In addition, this DataSourceUserManager class assumes that the following tables exist in the database:
Notice that no table exists for the list of groups that are available. Instead, the list of groups is specified in the principals.xml file. The mappings from groups to roles is specified in the application.xml.
The user manager is a hierarchical implementation with a parent-child relationship. The parent of the DataSourceUserManager class is the file-based XMLUserManager class, which uses the principals.xml user repository. However, you can change the parent with the setParent() method. The sample DataSourceUserManager class invokes parent.getGroups() to retrieve all the available groups.
|
|
 Copyright © 2002 Oracle Corporation. All Rights Reserved. |
|