Release 2 (9.0.2)
Part Number A95453-01
Home |
Solution Area |
Contents |
Index |
| Oracle9i Application Server Web Services Developer's Guide Release 2 (9.0.2) Part Number A95453-01 |
|
This chapter describes how to consume Web Services in J2EE applications. Two types of Web-based information or services are supported:
In addition, when a Java2 Enterprise Edition (J2EE) application acquires a WSDL document at runtime, the dynamic invocation API is used to invoke any SOAP operation described in the WSDL document. See Dynamic Invocation of Web Services for information about how to use the dynamic invocation API.
Oracle9iAS Containers for Java2 Enterprise Edition (J2EE), also referred to as OC4J, provides support for processing XML or HTML streams accessible through the HTTP/S protocols for consuming into J2EE applications. The Web Service HTML/XML Stream Processing Wizard assists developers in creating an Enterprise JavaBean (EJB) whose methods will access and process the desired XML or HTML streams.
In the simplest case, suppose a developer wants programmatic access to an XML news feed accessible through a static URL. In another case, a developer wants programmatic access to a dynamic stream accessed through the submission of an HTML form. Now, suppose HTTP/S basic authentication is required to access either of these two types of resources. In either case, developers must be able to quickly and easily process XML or HTML streams, thus consuming these Web Services in their own specific J2EE applications.
Developers using the Web Service HTML/XML Stream Processing Wizard first specify how the XML/HTML stream should be accessed and then define the desired processing actions on the stream.
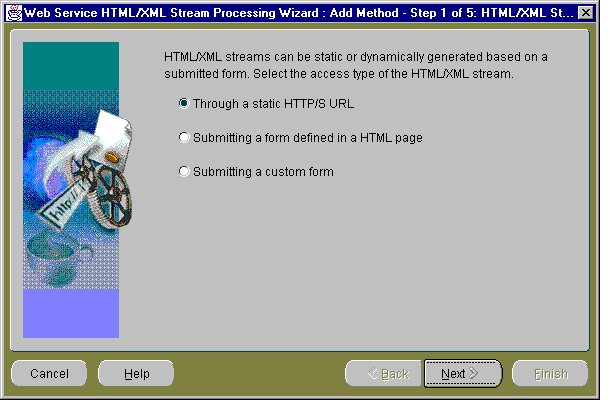
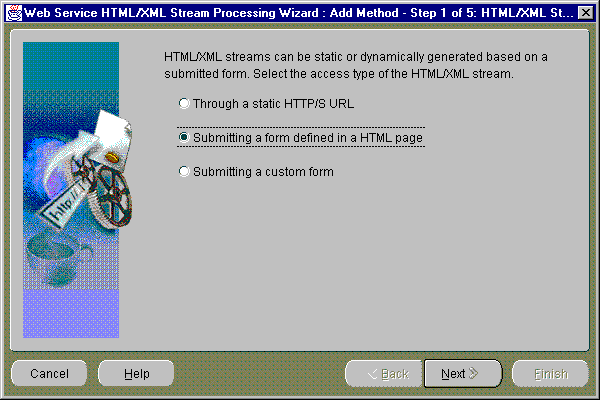
Developers can choose among the following options when specifying their XML/HTML stream access:
Additional HTTP-related settings can also be specified. They include HTTP proxy settings, authentication, and HTTPS Oracle Wallet information.
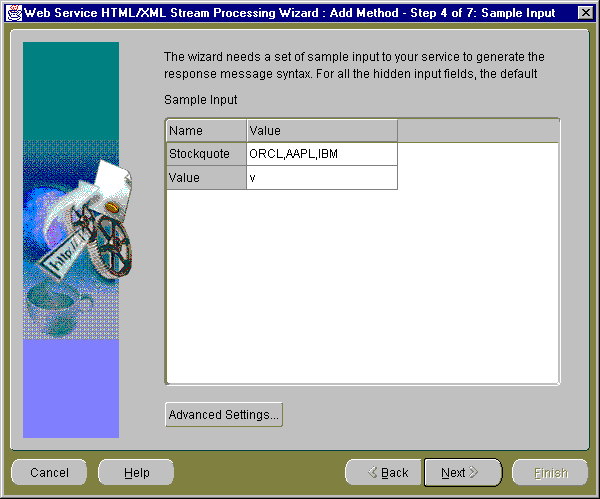
To assist developers in defining the processing to be applied to the stream, the wizard accesses the XML/HTML stream (prompting the developer for sample form values if necessary). The resulting sample XML/HTML stream is shown in a searchable XML tree. Through the wizard, the developer can perform the following actions:
The wizard allows developers to create multi-operation services by repeating the steps described previously for each operation.
Upon completion of the steps described previously, the Web Service HTML/XML Stream Processing Wizard generates a JavaBean and an EJB whose methods perform the appropriate HTTP request and processing of the XML or HTML response. If it is necessary to support multi-operation services, then the generated stub keeps the HTTP session information in its state, and the generated stub is modeled as a stateful session EJB user option. The resulting Java code is then compiled and archived, creating the required .ear file that the developer can immediately deploy in Oracle9iAS.
This section describes two sample use cases for a better understanding of how to use the Web Service HTML/XML Stream Processing Wizard.
The following steps generate the Java stubs that consume a static XML or HTML stream.
java -jar WebServicesHtmlXmlWizard.jar
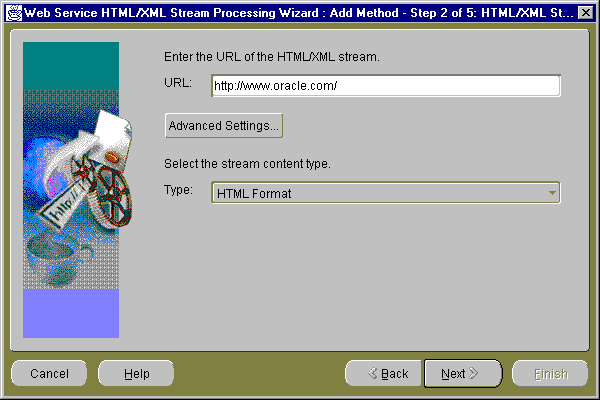
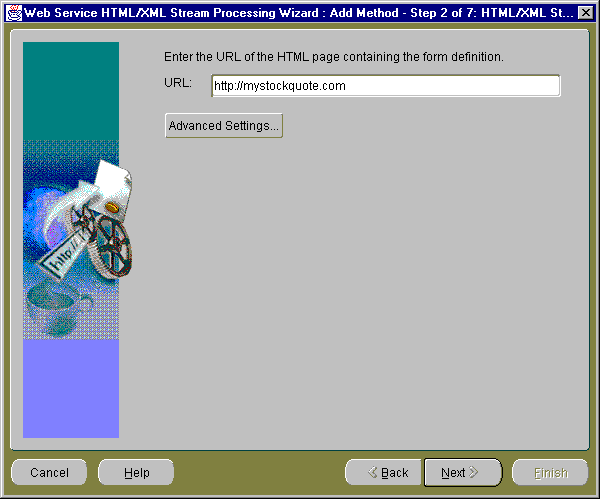
If you must access the URL from outside a firewall, click Advanced Settings. For this example, assume you must go through a firewall to access the desired URL.

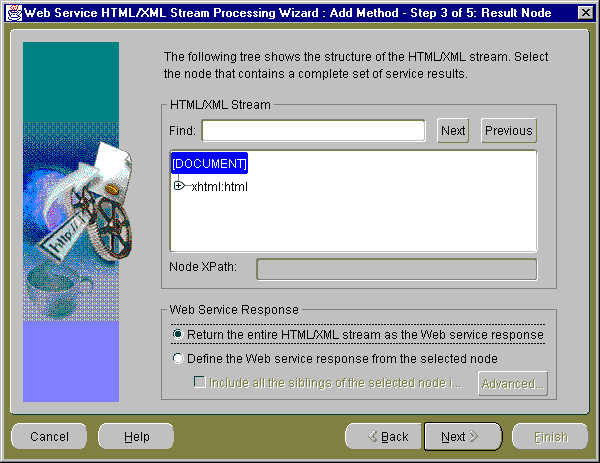
Then, for the Web Service Response section, select how you want to build the Web Service response; you can select one of two options:
For this sample use, you want to take the entire page content as the Web page content, therefore, select the first option, Return the entire HTML/XML stream as the Web service response.
|
Note: If you select the Define the Web service response from the selected node option, a Service Response Fields window displays. This option lets you finalize the output extracting process by letting you select elements of interest to be outputs and assign names to the output fields. See list item number 8 for more information about the Service Response Fields window. |
Click Next to continue to the next step.
If this is the first HTML or XML stream you are processing in this session, then you will see only the EJB method name. You need to enter only the EJB method name and click Finish to complete the operation of creating your EJB method.
If this is the second or subsequent HTML or XML stream you are processing in this session, then the suggested EJB method information is displayed for your EJB method, describing the name for the J2EE application, the EJB name, the name of the service package, and the name of the service class. By default, the names are preselected based on the information that is already known.
If you want to retain this suggested EJB method information and display it in the next step, the Console window, then leave the option Use the method information to define EJB as follows selected (checkmarked). If not, deselect this option and the EJB method information that appeared previously will be displayed in the Console window.
You cannot change the values for any of these EJB definition fields in this step; however, in the final step (Console window), you can change these names.
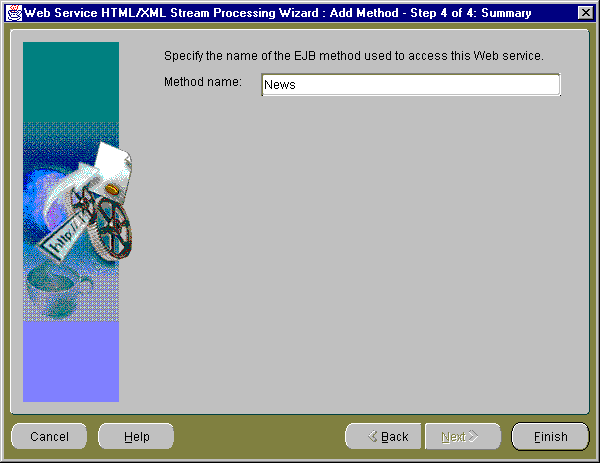
Enter an EJB method name, then click Finish to continue to the next step.
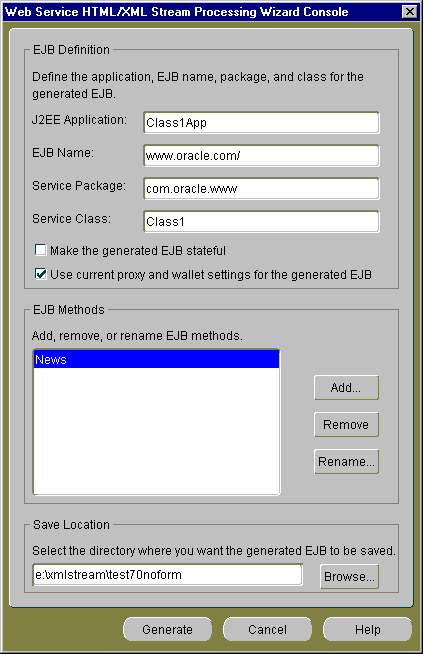
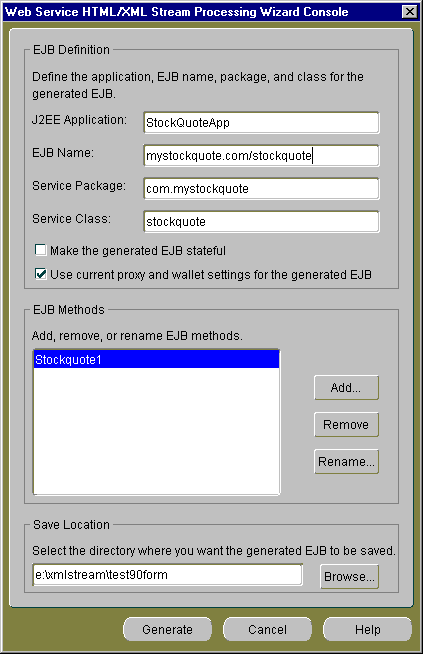
The Console window is divided into three sections: EJB Definition, EJB Methods, and Save Location.
The EJB Definition section contains the default EJB definition for your current EJB consisting of the J2EE application name, the EJB name, the service package name, and the service class name. You can change any of these definition names by placing the cursor in the field and editing the name.
You can make the generated EJB stateful by selecting the Make the generated EJB stateful option. By default this option is not selected.
You can choose to use the current proxy and wallet settings for the generated EJB by selecting the Use current proxy and wallet settings for the generated EJB option. By default this option is already selected.
The EJB Methods section lets you add, remove, or rename EJB methods.
If you click Add, you return to Step 1 of this wizard, the Step 1 of 5: HTML/XML Stream Type window where you can begin again the process of adding another EJB method definition that accesses an HTML or XML stream through the HTTP/S protocol.
If you select an EJB method and click Remove, the highlighted EJB method is removed. Note that there is a confirmation window that pops up as part of this operation.
If you select an EJB method name and click Rename, a Rename pop-up window lets you rename the EJB method. You can click OK to complete the rename operation and return to the Console window, or you can click Cancel to cancel this rename operation and return to the Console window.
The Save Location section lets you specify where you want the generated EJB method to be saved. You can either enter a drive and directory name or browse to the desired location by clicking Browse.
If you want, edit the EJB definition names in the EJB Definition section, then enter the directory name where you want to save your generated EJB. You can optionally browse to this directory location and select it, or browse to the desired directory and create a new directory name.
Select the Make the generated EJB stateful option if you are creating a multi-operational service. When you create a multi-operational service, which needs to maintain a conversational state with the remote HTTP server across method calls, you must access other site content and perform the defined processing. In addition, keep the HTTP/S session information in its state so other method calls can share the same session information. The generated Java stub will then be modeled as a stateful session EJB.
An example of a multioperational service would be one operation that includes the login methods for HTTP or HTTPS authentication. A second operation would include the methods that scrape the Web site to which you were granted access through login authentication. In this case, method calls for both operations share the same session information.
For this sample use, leave the Make the generated EJB stateful box without a checkmark because this is a single operational service.
Click Generate to save your generated EJB.
At this point, you can quit from the wizard by clicking Cancel and at the Warning confirmation pop-up window, click OK.
You can add another EJB method by clicking Add the EJB Methods section, which starts you again at Step 1 of the wizard, the HTML/XML Stream Type window.
The Web Service HTML/XML Stream Processing Wizard generates the following sets of files located within the destination directory name you specified in the Console window. The wizard will save the generated files using the following directory layout:
 Root /
      + app.ear
      + src/
        + ... generated java sources ...
      + classes/
        + META-INF/
          + ejb-jar.xml
        + ... compiled classes and xml resources ....
      + deploy/
        + ejb.jar
        + META-INF/
          + application.xml
application.xml file located in the /deploy/META-INF directory for UNIX or the \deploy\META-INF directory for Windows serves as the EAR manifest file.
/deploy directory for UNIX or the \deploy directory for Windows. The JAR file includes all EJB application class files and the deployment descriptor file.
ejb-jar.xml), for all the beans in the module, is located within the /classes/META-INF directory for UNIX or the \classes\META-INF directory for Windows. The XML deployment descriptor describes the application components and provides additional information to enable the container to manage the application.
/src directory for UNIX or the \src directory for Windows. The generated JavaBean and EJB Java source code is contained in subdirectories according to their Java package names.
/classes directory for UNIX or the \classes directory for Windows contains the compiled generated classes and additional XML resources used by the generated code.
The following code is generated in the src/com/oracle/www/Class1.java file on UNIX or the src\com\oracle\www\Class1.java file on Windows showing the remote interface (Class1) of the generated EJB. In this case, a method (news) with no parameters that return an org.wc3.dom.Element is generated because the HTML stream was selected as a static HTML page.
public interface Class1 extends EJBObject
{
  public org.w3c.dom.Element news()
    throws RemoteException;
}
The following steps generate the Java stubs that consume a dynamic XML or HTML stream requiring a form to be submitted.
java -jar WebServicesHtmlXmlWizard.jar
Note that you can optionally select the Submitting a custom form option if you must customize the form to allow for variables such as where the Web server offers a certain action, but the corresponding form is not provided in the HTML page.
If you must access the URL from outside a firewall, click Advanced Settings. For this example, assume you must go through a firewall to access the desired URL.

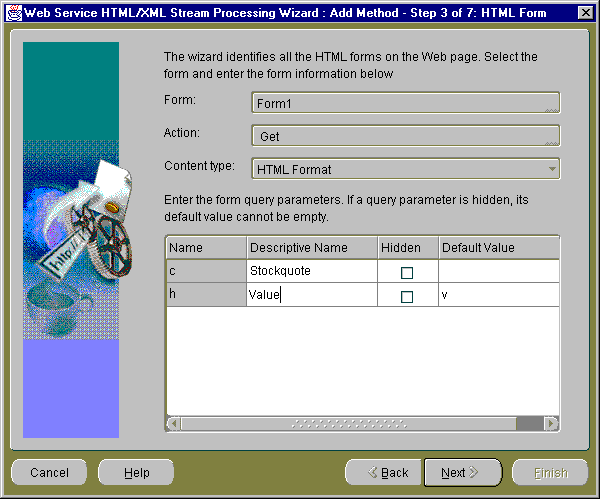
In the form query parameters section, checkmark the names of the query parameters and add descriptive names as needed in the Descriptive Names column for each query parameter. Descriptive names are used as the name of the parameter in the signature of the method being defined. For query parameters that should remain hidden, click the appropriate row and column to change the default value from unchecked to checked. Note that for each hidden query parameter, you must also enter a default value. Hidden parameters are not exposed as Java parameters in the signature of the method being defined. When you have made all the necessary changes, click Next to continue to the next step.
If you want to check your Web proxy information, enter basic HTTP authentication information, or enter basic HTTPS authentication information, click Advanced Settings and enter or edit the desired information.
Click Next to continue to the next step.
The Result Node window shows the structure of the HTML or XML stream as an HTML/XML stream tree and lets you define your Web Service response based on the contents of the HTML/XML stream.
You have two options in defining your Web Service response:
The Web Service Response section lets you define the Web Service response as either the entire HTML/XML stream or as the parent node you selected in the HTML/XML Stream section. If the parent node contains siblings, you can optionally select them all to be included in the Web Service response. If you choose to include all the siblings, you can click Advanced Settings to display the Advanced Settings pop-up window where you can enter a predicate that filters the set of sibling nodes, view the resulting Xpath, and view or edit the Response element name.
If you want to select the entire HTML/XML stream to be part of your Web Service response, select the first option Return the entire HTML/XML Stream as the Web service response, then click Next at the bottom of the window to continue to the next step.
If you want to select just the node that contains the complete set of information you are interested in, select the second option Define the Web service response from the selected node. Then, navigate to the node you want by moving down the HTML/XML stream tree.
You can quickly locate the desired element in the HTML/XML stream tree by entering its name in the Find field and clicking Next at the end of this field. The name of the element is highlighted in the HTML/XML stream tree. You can go to the next or previous occurrence of this element by clicking Next or Previous the end of the Find field.
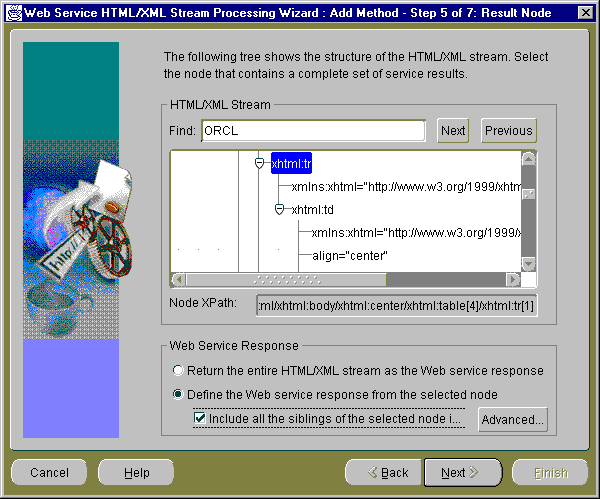
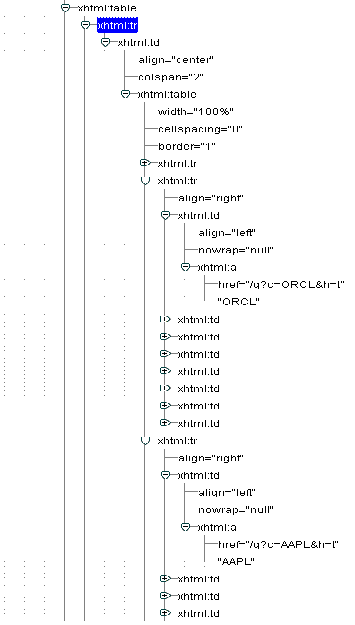
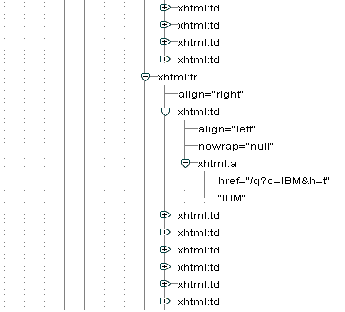
From the highlighted element, navigate toward the root of the tree to the node that contains the complete set of information in which you are interested. The node of interest is usually the next lowest table row node (xhtml:tr) that is within a different table; it is usually located one level lower toward the root of the tree.
Figure 9-1 and Figure 9-2 together show an excerpt of what the xhtml tree would appear like when expanded. The selected node xhtml:tr is located in the next lower table node, which is one level lower and than the xhtml:tr nodes for ORCL and its two siblings AAPL and IBM.
Note that the Node Location field contains the complete name of the node you selected.
When you select the option Define the Web service response from the selected node, another option is now available and that is whether or not to include all the siblings of the selected node in the response.
If the node you selected has siblings that you want to include in the Web Service response, select the option Include all the siblings of the selected node in the response. When you make this selection, an Advanced Settings button enables. Click Advanced Settings to display the Advanced Settings pop-up window where you can enter a predicate that filters the set of sibling nodes, view the resulting Xpath, and view or edit the Response element name.
The following predicate filters out the first position: position() != 1. Enter this predicate expression in the Predicate that filters the set of sibling nodes field of the Advanced Settings pop-up window to filter the first sibling from the Web Service response.
For more information about predicates, filters, syntax, and composing a predicate expression, see the Xpath section of the following Web site: http://www.w3c.org/TR/xpath.
Then, click OK to return to the Result Node window.
Click Next to continue to the next step.
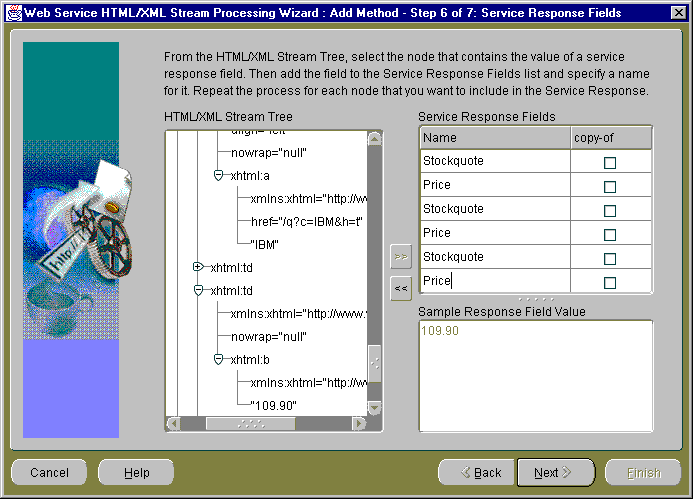
Service Response Field Names are mapped to XML Element names of the service response. By default, the value of each node selected in the HTML/XML stream is contained in an XML Element name as specified in the Service Response Fields table. For example, if the <a>test</a> node from the HTML/XML stream tree is added to the Service Response Fields pane, the service response then contains an XML Element such as <respA>test</respA>, where respA is the corresponding service response field name. The value of the node is extracted using the XSLT value-of operation.
If the copy-of column is selected for a result field, the corresponding XML/HTML stream node is copied in the service response. For example, if the <a>test</a> node from the HTML/XML stream tree is added to the Service Response Fields pane and the copy-of option is selected, the service response then contains an XML Element, such as <respA><a>test</a></respA>, where respA is the corresponding service response field name. The copy of a node is built using the XSLT copy-of operation as shown in the following code example taken from a generated XSL stylesheet. In this example, <resp:Stockquote> and <resp:Price> are the corresponding service response field names showing the copy of a node that was built using the XSLT copy-of operation where the Copy-of column option was selected.
- <resp:Stockquote>
  <xsl:copy-of select="./xhtml:td/xhtml:table/xhtml:tr[2]/xhtml:td[1]/xhtml:a/text()" />
  </resp:Stockquote>
- <resp:Price>
  <xsl:copy-of select="./xhtml:td/xhtml:table/xhtml:tr[2]/xhtml:td[3]/xhtml:b/text()" />
  </resp:Price>
- <resp:Stockquote>
  <xsl:copy-of select="./xhtml:td/xhtml:table/xhtml:tr[3]/xhtml:td[1]/xhtml:a/text()" />
  </resp:Stockquote>
- <resp:Price>
  <xsl:copy-of select="./xhtml:td/xhtml:table/xhtml:tr[3]/xhtml:td[3]/xhtml:b/text()" />
  </resp:Price>
- <resp:Stockquote>
  <xsl:copy-of select="./xhtml:td/xhtml:table/xhtml:tr[4]/xhtml:td[1]/xhtml:a/text()" />
  </resp:Stockquote>
- <resp:Price>
  <xsl:copy-of select="./xhtml:td/xhtml:table/xhtml:tr[4]/xhtml:td[3]/xhtml:b/text()" />
  </resp:Price>
In the HTML/XML Response Tree pane, navigate to the node that contains the value of the service response field of interest and select the value to highlight it. Then, click the double, right-arrow to the right of this HTML/XML Response Tree pane to move the value of the response field to the lower right Sample Response Field Value pane. This action also adds a row to the Service Response Fields list in the upper right Service Response Fields pane. Select the empty field in the Name column of the Service Response Fields pane and enter a descriptive name for this field. Repeat this process for each element that you want to include in the service response. As you follow this process, you will be building a list of response fields of interest in the Service Response Fields list.
If you want to remove a service response field from the Service Response Fields list, select the value of the name in the Service Response Fields pane and click the double, left-arrow to the left side of this pane. This action removes this service response field from the Service Response Fields list.
When you have made all your selections, click Next to continue to the next step.
If this is the first HTML or XML stream you are processing in this session, then you will see only the EJB method name.
If this is the second or subsequent HTML or XML stream you are processing in this session, then the suggested EJB method information is displayed for your EJB method, describing the name for the J2EE Application, the EJB Name, the name of the service package, and the name of the service class. By default, the names are preselected based on the known information.
If you want to retain this suggested EJB method information and display it in the next step, the Console window, then leave the option Use the method information to define EJB as follows selected (with a check mark). If not, deselect this option and the EJB method information that appeared previously will be displayed in the Console window.
You cannot change the values for any of these EJB definition fields in this step; however, in the final step (Console window), you can change these values.
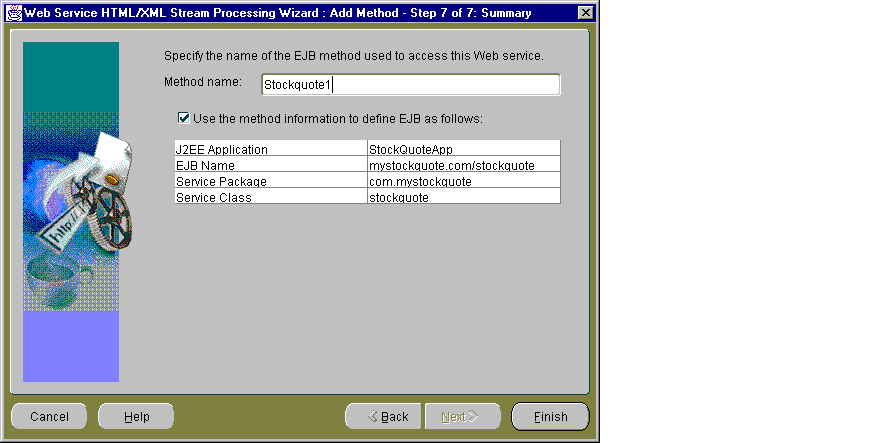
Enter an EJB method name, then click Finish to continue to the next step.
The Console window is divided into three sections: EJB Definition, EJB Methods, and Save Location.
The EJB Definition section contains the EJB definition for your current EJB consisting of the J2EE application name, the EJB name, the service package name, and the service class name. You can change any of these definition names by placing the cursor in the field and editing the name.
You can make the generated EJB stateful by selecting the Make the generated EJB stateful option. By default this option is not selected.
You can choose to use the current proxy and wallet settings for the generated EJB by selecting the Use current proxy and wallet settings for the generated EJB option. By default this option is already selected.
The EJB Methods section lets you add, remove, or rename EJB methods.
If you click Add, you return to Step 1 of this wizard, the Step 1 of 7: HTML/XML Stream Type window where you can begin again the process of adding another EJB method definition that accesses an HTML or XML stream through the HTTP/S protocol.
If you select an EJB method and click Remove, the highlighted EJB method is removed. Note that there is a confirmation window that pops up as part of this operation.
If you select an EJB method name and click Rename, a Rename pop-up window lets you rename the EJB method. You can click OK to complete the rename operation and return to the Console window, or you can click Cancel to cancel this rename operation and return to the Console window.
The Save Location section lets you specify where you want the generated EJB method to be saved. You can either enter a drive and directory name or browse to the location by clicking Browse.
If you want, edit the EJB definition names in the EJB Definition section, then enter the directory name where you want to save your generated EJB. You can optionally browse to this desired directory location and select it, or browse to the desired directory and create a new directory name.
Select the Make the generated EJB stateful option if you are creating a multi-operational service. When you create a multi-operational service, which needs to maintain a conversational state with the client across method calls, you must access other site content and perform the defined processing. In addition, keep the HTTP/S session information in its state so other method calls can share the same session information. The generated Java stub will then be modeled as a stateful session EJB.
For this sample use, leave the Make the generated EJB stateful box without a check mark because this is a single operational service.
Click Generate to save your generated EJB.
At this point, you can quit from the wizard by clicking Cancel and at the Warning confirmation pop-up window, click OK.
You can add another EJB method by clicking Add in the EJB Methods section, which starts you again at Step 1 of the wizard, Step 1 of 7: HTML/XML Stream Type.
The Web Service HTML/XML Stream Processing Wizard generates the following sets of files located within the parent directory name you specified in the last step, the Console window. The wizard will save the generated files using the following directory layout:
 Root /
      + app.ear
      + src/
        + ... generated java sources ...
      + classes/
        + META-INF/
          + ejb-jar.xml
        + ... compiled classes and xml resources ....
      + deploy/
        + ejb.jar
        + META-INF/
          + application.xml
application.xml file located in the /deploy/META-INF directory for UNIX or the \deploy\META-INF directory for Windows serves as the EAR manifest file.
/deploy directory for UNIX or the \deploy directory for Windows. The JAR file includes all EJB application class files and the deployment descriptor file.
ejb-jar.xml), for all the beans in the module, is located within the /classes/META-INF directory for UNIX or the \classes\META-INF directory for Windows. The XML deployment descriptor describes the application components and provides additional information to enable the container to manage the application.
/src directory for UNIX or the \src directory for Windows. The generated JavaBean and EJB Java source code is contained in subdirectories according to their Java package names.
/classes directory for UNIX or the \classes directory for Windows contains the compiled generated classes and additional XML resources used by the generated code.
The following code is generated in the <class-name>.java file showing the remote interface (stockquote) of the generated EJB. In this case, a method (stockquote1) with parameters (Stockquote and h) for each non-hidden form parameter that returns an org.wc3.dom.Element is generated. This stockquote1 method is generated because the HTML stream was selected as being dynamically generated based on a submitted form defined in the HTML page.
public interface stockquote extends EJBObject
{
  public org.w3c.dom.Element stockquote1(java.lang.String Stockquote,
                                         java.lang.String Value)
    throws RemoteException;
}
The following sections describe some changes you can make by editing the content of specific generated files. These changes can adapt your XSLT stylesheet to an enhanced response definition or satisfy changing requirements for using your generated EJB with another Web proxy server.
The generated <class-name>.jar file, located in the last child <class-name> directory within the /classes directory on UNIX or \classes on Windows, contains three files:
During runtime operations, the XML response returned by the remote server upon access of the XML URL or the submission of a form, is filtered through the XSLT transformation defined in this stylesheet.
You can edit the filtering stylesheet XSLT file to add logic or to change the behavior of your application. You can make comparable edits to the output response XML XSD file to custom adapt your response file for your J2EE application. You must know how to modify stylesheets and response definition files to complete these changes successfully.
When you have completed your changes to the response stylesheet and response XML files and saved your changes, you must do the following:
<class-name>.jar file in the deploy directory.
The generated ejb-jar.xml file is located in the /classes/META-INF directory on UNIX or \classes\META-INF directory on Windows directly below the root directory where you saved your generated EJB. This file contains an environment section denoted by <env-entry> and </env-entry> tags where the Web proxy information is stored. Once you generate your EJB, you can later edit this ejb-jar.xml file to modify your Web proxy settings (host address name and port number) to satisfy any requirements you might have for using your generated EJB with other Web proxy servers. You must jar your ejb jar and ear file again and redeploy them in your J2EE application server.
The wsdl2ejb utility can be used by J2EE developers to consume a Web Service described in Web Services Description Language (WSDL) document into their applications. This utility takes a WSDL document and some additional optional parameters and produces an EJB EAR file that can be deployed into Oracle9iAS OC4J. The EJB Remote Interface is generated based on the WSDL portType. Each WSDL operation is mapped to an EJB method. The EJB method parameters are derived from the WSDL operation input message parts, while the EJB method return value is mapped from the parts of the WSDL operation output message. The Oracle Simple Open Access Protocol (SOAP) Mapping Registry is used to map XML types to the corresponding Java types.
Additional references regarding WSDL and SOAP can be found in the following locations:
http://www.w3.org/TR/wsdl
http://www.w3.org/TR/SOAP/
The command-line options for running the wsdl2ejb utility are described in Table 9-1.
To run the wsdl2ejb utility, enter the following command where <destDir> is the destination directory to where the generated EJB EAR file is to be written and the file mydoc.wsdl is the location of the WSDL document:
java -jar wsdl2ejb.jar -d <destDir> mydoc.wsdl
If an HTTP URL is used to supply the location of the WSDL document and an HTTP proxy is required to access it, the following command and syntax must be used to run the utility:
java -Dhttp.ProxyHost=myProxyHost -Dhttp.proxyPort=80 -jar wsdl2ejb.jar -d
<destDir> http://myhost/mydoc.wsdl
In this example, the utility uses the supplied WSDL to generate the EJB EAR file in the destination directory (<destDir>). The EJB class name, Java Naming and Directory Interface (JNDI) binding key, and Java package name are derived from the location of the SOAP service described in the WSDL.
In this command syntax, the wsdl2ejb utility maps the XML types, which are supported by default by the Oracle SOAP Mapping Registry.
The wsdl2ejb utility generates the following sets of files located within the destination directory name (<destDir>) that you specify in the command line. The utility saves the generated files using the following directory layout:
 Root /
      + app.ear
      + src/
        + ... generated java sources ...
      + classes/
        + META-INF/
          + ejb-jar.xml
        + ... compiled classes and xml resources ....
      + deploy/
        + ejb.jar
        + META-INF/
          + application.xml
<destDir>) you specified in the command line. The .ear file contains the generated EJB, JAR, and XML files for your application, where the application.xml file located in the /deploy/META-INF directory for UNIX or the \deploy\META-INF directory for Windows serves as the EAR manifest file.
/deploy directory for UNIX or the \deploy directory for Windows. The JAR file includes all EJB application class files and the deployment descriptor file.
ejb-jar.xml) for the generated bean in the module is located within the /classes/META-INF directory for UNIX or the \classes\META-INF directory for Windows. The XML deployment descriptor describes the application components and provides additional information to enable the container to manage the application.
/src directory for UNIX or the \src directory for Windows. The generated JavaBean and EJB Java source code is contained in subdirectories according to their Java package name. An EJB client stub is also generated.
/classes directory for UNIX or the \classes directory for Windows contains the compiled generated classes and additional XML resources used by the generated code.
To have more controls on the EJB generated from a WSDL document, an XML configuration file can be supplied to the wsdl2ejb utility. Through the configuration file, developers can control several options on the WSDL source, as well as options on the generated EJB.
Developers can also use the configuration file to supply additional xml to Java type maps, so that WSDL documents using complex types can be supported.
The syntax of the wsdl2ejb configuration file is shown in its Document Type Definition (DTD) as follows:
<?xml version="1.0" encoding="UTF-8"?>
<!-- Specify the properties of the source WSDL document and of the target EJB. -->
<!ELEMENT wsdl2ejb (useProxy?, useWallet?, wsdl, ejb?, mapTypes?)>

<!-- Specify if the generated EJB should use the supplied HTTP proxy when accessing HTTP URLs -->
<!ELEMENT useProxy (#PCDATA)>
<!ATTLIST useProxy
          proxyHost CDATA   #REQUIRED
          proxyPort CDATA   #REQUIRED>

<!-- Specify the location of the wallet credential file used by the generated EJB for opening HTTPS
connection -->
<!ELEMENT useWallet (#PCDATA)>
<!ATTLIST useWallet
          location  CDATA   #REQUIRED>

<!--
    Specify how the wsdl2ejb tools should process the source WSDL document.
     In additional to the mandatory location of the WSDL document, the name of the WSDL service and
     its port can be specified. In this case, an EJB will be generated only for the supplied service and
    port.
     An alternative: the name of a WSDL service binding and the SOAP location to be used can be supplied.
     In the latter case, an EJB using the specified binding and the supplied SOAP location will be used.
     This is particularly useful when generating an EJB from a WSDL stored in a UDDI registry.
     In fact, following a UDDI best practice, the WDSL SOAP location will be managed separately from the
    WSDL document.
 -->
<!ELEMENT wsdl (location, ((service-name, service-port) | (service-binding, soap-location))?)>

<!-- Specify the location of the source WSDL document (for example, "/home/mywsdl.wsdl",
"http://myhost/mywsdl.wsdl") -->
<!ELEMENT location (#PCDATA)>


<!-- Specify the name of the WSDL service to be used for the generation.
     It is the name of one of the services defined in the source WSDL. -->
<!ELEMENT service-name (#PCDATA)>


<!-- Specify the service port of the WSDL service to be used for the generation.
     It is the name of one ports of the service name defined above in the source WSDL. -->
<!ELEMENT service-port (#PCDATA)>


<!-- Specify the name of the WSDL binding to be used for the generation.
     It is the name of one of the bindings defined in the source WSDL. -->
<!ELEMENT service-binding (#PCDATA)>

<!-- Specify the SOAP location service port of the WSDL service to be used for the generation.
     It is the name of one ports of the service name defined above in the source WSDL. -->
<!ELEMENT soap-location (#PCDATA)>

<!-- Specify the properties related to the generated EJB. -->
<!ELEMENT ejb (application-name?, ejb-name?, package-name?, remote-name?, session-type?)>

<!-- Specify the name of the J2EE application for the generated EAR.  -->
<!ELEMENT application-name (#PCDATA)>

<!-- Specify the JNDI binding key name for the generated EJB.  -->
<!ELEMENT ejb-name (#PCDATA)>

<!-- Specify the name for Java package under which the generated EJB will belong. (for example, com.oracle)
-->
<!ELEMENT package-name (#PCDATA)>

<!-- Specify the class name for the EJB Remote Interface (for example, MyWsdlEjb)  -->
<!ELEMENT remote-name (#PCDATA)>

<!-- Specify the if the generated EJB should be stateless or stateful (for example, Stateless | Stateful)
-->
<!ELEMENT session-type (#PCDATA)>

<!--
    Specify the custom Java types and map them to XML types.
     The JAR attribute value will point to a JAR file containing the defintion of the custom
     types or the serializer/deserializer to be used for the custom type.
-->
<!ELEMENT mapTypes (map*)>
<!ATTLIST mapTypes
          jar           CDATA   #IMPLED>

!--
     Specify a new XML to JAR type map.
     EncodingStyle: name of the encodingStyle under which this map will belong
                    (for example, http://schemas.xmlsoap.org/soap/encoding/)
     namespace-uri      : uri of the namespace for the XML type defined in this map
     local-name         : localname of the XML type defined in this map
      java-type          : Java class name to which this type is mapped to (for example, com.org.MyBean)
     java2xml-class-name: Java class name of the type serializer
                          (for example, org.apache.soap.encoding.soapenc.BeanSerializer)
     xml2java-class-name: Java class name of the type deserializer
                          (for example, org.apache.soap.encoding.soapenc.BeanSerializer)
-->
<!ELEMENT map (#PCDATA)>
<!ATTLIST map
          encodingStyle       CDATA   #REQUIRED
          namespace-uri       CDATA   #REQUIRED
          local-name          CDATA   #REQUIRED
          java-type           CDATA   #REQUIRED
          java2xml-class-name CDATA   #REQUIRED
          xml2java-class-name CDATA   #REQUIRED>
Table 9-2 describes the elements, subelements, and attributes of the wsdl2ejb XML configuration file as defined in the DTD. Required elements and attributes are shown as bold text.
Developers can run the wsdl2ejb utility with a configuration file using the following command:
java -jar wsdl2ejb.jar -conf wsdlconf.xml
The wsdl2ejb utility supports most WSDL documents using SOAP binding. This support includes both Remote Procedure Call (RPC) and document style documents as well as types that are encoded or literal. Table 9-3 shows how the supported XML Schema types are mapped to the corresponding Java type by default. Any other required type will have to be supported though the custom type mapping described previously.
|
Note: Arrays of supported types, shown in Table 9-3 are also supported. |
wsdl2ejb Utility
The following information describes the known limitations of the wsdl2ejb utility:
http://www.w3.org/2001/XMLSchema
<import> tag to include other WSDL documents.
The wsdl2ejb demo directory contains examples on how to use the wsdl2ejb utility. All the commands are assumed to be executed from the demo/web_services/wsdl2ejb directory. The demonstration (demo) will use some sample WSDL documents as sources and generate EJB that can be used to invoke the Web Service operations.
Both demos can be run using Jakarta ant. Review the build.xml file to make sure that the initial properties (RMI_HOST, RMI_PORT, RMI_ADMIN, RMI_PWD) are set correctly according to your configuration. The build.xml file will execute the wsdl2ejb utility on the demo WSDL documents, deploy the generated EJB, and execute the EJB clients.
The directory structure of the demos is as follows:
demo/web_services/wsdl2ejb:
   - README.txt                : Readme file
   - build.xml                 : Jakarta ant build file to run all the demos
   - rpc_doc                   : directory for simple RPC and document style operations
       - rpc_doc_conf.xml      : wsdl2ejb configuration file for the rpc_doc demo
       - TestRpcDocClient.java : client for the rpc_doc demo
       - DocAndRpc.wsdl        : sample WSDL for the rpc_doc demo
       - (generated)           : directory where the EJB will be generated
   - base
       - base_conf.xml         : wsdl2ejb configuration file for the base interoperability demo
       - TestInteropBaseClient.java : client for the base interoperability demo
       - InteropTest.wsdl           : WSDL document for the base interoperability demo
       - MySoapStructBean.java      : bean utilized to map the custom type used
                                        in the example defined in the WSDL document
       - MySoapStructBean.jar       : packaged-compiled custom type bean
       - (generated)                : directory where the EJB will be generated
This example uses a simple WSDL document that shows a couple of operations: Add and Multiply. Add is using the document-style operation using literal parts, while Multiply is RPC-style and uses encoded parts.
To generate the EJB stub, use the following command:
On UNIX
cd $<ORACLE_HOME>/j2ee/home/demo/web_services/wsdl2ejb
java -jar ../../../wsdl2ejb.jar -conf rpc_doc/rpc_doc_conf.xml

On Windows
cd $<ORACLE_HOME>\j2ee\home\demo\web_services\wsdl2ejb
java -jar ..\..\..\wsdl2ejb.jar -conf rpc_doc\rpc_doc_conf.xml
The utility generates the TestApp.ear file containing the definition of a stateless EJB, which can be used as a proxy for the Web Service. The EAR file can be deployed in Oracle9iAS OC4J as any standard EJB. Refer to Oracle9iAS Containers for J2EE User's Guide for information on how to deploy an EJB.
By looking at the generated EJB Remote Interface, you can see how the WSDL portType DocAndRpc.wsdl file has been mapped to Java.
WSDL PortType:
  <types>
    <s:schema elementFormDefault="qualified" targetNamespace="http://soapinterop.org">
      <s:element name="Add">
        <s:complexType>
          <s:sequence>
            <s:element minOccurs="1" maxOccurs="1" name="a" type="s:int" />
            <s:element minOccurs="1" maxOccurs="1" name="b" type="s:int" />
          </s:sequence>
        </s:complexType>
      </s:element>
      <s:element name="AddResponse">
        <s:complexType>
          <s:sequence>
            <s:element minOccurs="1" maxOccurs="1" name="AddResult" type="s:int" />
          </s:sequence>
        </s:complexType>
      </s:element>
    </s:schema>
  </types>
  <message name="AddSoapIn">
    <part name="parameters" element="s0:Add" />
  </message>
  <message name="AddSoapOut">
    <part name="parameters" element="s0:AddResponse" />
  </message>
  <message name="MultiplySoapIn">
    <part name="a" type="xsd:int" />
    <part name="b" type="xsd:int" />
  </message>
  <message name="MultiplySoapOut">
    <part name="MultiplyResult" type="s:int" />
  </message>
  <portType name="TestSoap">
    <operation name="Add">
      <input message="s0:AddSoapIn" />
      <output message="s0:AddSoapOut" />
    </operation>
    <operation name="Multiply">
      <input message="s0:MultiplySoapIn" />
      <output message="s0:MultiplySoapOut" />
    </operation>
  </portType>
From the Test.java file, the EJB Remote Interface is:
  public org.w3c.dom.Element add(org.w3c.dom.Element parameters)
    throws RemoteException;

  public int multiply(int a, int b)
    throws RemoteException;
When the WSDL operation is using RPC style and its parts are encoded, the parts XML schema type is mapped to a corresponding Java native type. In this example, xsd:int is mapped to Java int. In a document style using literal parts, each part is simply mapped to an org.w3c.dom.Element.
The following client code in the TestRpcDocClient.java file can be used to invoke the Add and Multiply Web Service operations. The code has been produced by modifying the client code stub generated by the wsdl2ejb utility.
import java.io.*;
import java.util.*;
import javax.naming.*;

import org.w3c.dom.*;
import oracle.xml.parser.v2.*;

import org.mssoapinterop.asmx.Test;
import org.mssoapinterop.asmx.TestHome;


/**
 * This is a simple client template. To compile it,
 * please include the generated EJB jar file as well as
 * EJB and JNDI libraries in classpath.
 */
public class TestRpcDocClient
{
  // replace the values
  private static String RMI_HOST  = "localhost";
  private static String RMI_PORT  = "23791";
  private static String RMI_ADMIN = "admin";
  private static String RMI_PWD   = "welcome";

  public TestRpcDocClient () {}

  public static void main(String args[]) {

    TestRpcDocClient client = new TestRpcDocClient();

    try {

      RMI_HOST  = args[0];
      RMI_PORT  = args[1];
      RMI_ADMIN = args[2];
      RMI_PWD   = args[3];

      Hashtable env = new Hashtable();
      env.put(Context.INITIAL_CONTEXT_FACTORY, "com.evermind.server.rmi.RMIInitialContextFactory");
      env.put(Context.SECURITY_PRINCIPAL, RMI_ADMIN);
      env.put(Context.SECURITY_CREDENTIALS, RMI_PWD);
      env.put(Context.PROVIDER_URL, "ormi://" + RMI_HOST + ":" + RMI_PORT + "/Wsdl2EjbTestApp1");
      Context ctx = new InitialContext(env);
      TestHome home = (TestHome) ctx.lookup("mssoapinterop.org/asmx/DocAndRpc.asmx");

      Test service = home.create();

      // call any of the Remote methods that folllow to access the EJB

      //
      // Add test
      //
      Document  doc = new XMLDocument();
      Element elAdd = doc.createElementNS("http://soapinterop.org", "s:Add");
      Element   elA = doc.createElementNS("http://soapinterop.org", "s:a");
      Element   elB = doc.createElementNS("http://soapinterop.org", "s:b");
      elA.appendChild(doc.createTextNode("4"));
      elB.appendChild(doc.createTextNode("3"));
      elAdd.appendChild(elA);
      elAdd.appendChild(elB);
      doc.appendChild(elAdd);

      Element elAddResponse = service.add(elAdd);
      Node tNode = elAddResponse.getFirstChild().getFirstChild();
      System.out.println("AddResponse: "+tNode.getNodeValue());

      //
      // Multiply Test
      //
      int a = 4;
      int b = 3;
      int iMultiplyResponse = service.multiply(a, b);
      System.out.println("MultiplyResponse: "+iMultiplyResponse);


    }
    catch (Throwable ex) {
      ex.printStackTrace();
    }
  }
}
The result of the execution of the client is the following:
AddResponse: 7
MultiplyResponse: 12
This example starts from a subset of the WSDL document defined by the base test suite of the second round of SOAP interoperability tests. The purpose of this demo example is to show the usage of built-in types in the SOAP Mapping Registry as well as how to add custom types mapping.
Start by looking at the WSDL portType in the InteropTest.wsdl file.
<types>
   <schema xmlns="http://www.w3.org/2001/XMLSchema"
targetNamespace="http://soapinterop.org/xsd">
      <complexType name="ArrayOfstring">
         <complexContent>
            <restriction base="SOAP-ENC:Array">
               <attribute ref="SOAP-ENC:arrayType" wsdl:arrayType="string[]"/>
            </restriction>
         </complexContent>
       </complexType>
       <complexType name="ArrayOfint">
          <complexContent>
            <restriction base="SOAP-ENC:Array">
               <attribute ref="SOAP-ENC:arrayType" wsdl:arrayType="int[]"/>
            </restriction>
          </complexContent>
       </complexType>
       <complexType name="ArrayOffloat">
          <complexContent>
             <restriction base="SOAP-ENC:Array">
                <attribute ref="SOAP-ENC:arrayType" wsdl:arrayType="float[]"/>
             </restriction>
          </complexContent>
       </complexType>
       <complexType name="ArrayOfSOAPStruct">
          <complexContent>
             <restriction base="SOAP-ENC:Array">
                <attribute ref="SOAP-ENC:arrayType"
wsdl:arrayType="s:SOAPStruct[]"/>
             </restriction>
         </complexContent>
      </complexType>
      <complexType name="SOAPStruct">
            <all>
                <element name="varString" type="string"/>
                <element name="varInt" type="int"/>
                <element name="varFloat" type="float"/>
            </all>
      </complexType>
   </schema>
</types>

<message name="echoStringRequest">
   <part name="inputString" type="xsd:string"/>
</message>
<message name="echoStringResponse">
   <part name="return" type="xsd:string"/>
</message>
<message name="echoStringArrayRequest">
   <part name="inputStringArray" type="s:ArrayOfstring"/>
</message>
<message name="echoStringArrayResponse">
   <part name="return" type="s:ArrayOfstring"/>
</message>
<message name="echoIntegerRequest">
   <part name="inputInteger" type="xsd:int"/>
</message>
<message name="echoIntegerResponse">
   <part name="return" type="xsd:int"/>
</message>
<message name="echoIntegerArrayRequest">
   <part name="inputIntegerArray" type="s:ArrayOfint"/>
</message>
<message name="echoIntegerArrayResponse">
   <part name="return" type="s:ArrayOfint"/>
</message>
<message name="echoFloatRequest">
   <part name="inputFloat" type="xsd:float"/>
</message>
<message name="echoFloatResponse">
   <part name="return" type="xsd:float"/>
</message>
<message name="echoFloatArrayRequest">
   <part name="inputFloatArray" type="s:ArrayOffloat"/>
</message>
<message name="echoFloatArrayResponse">
   <part name="return" type="s:ArrayOffloat"/>
</message>
<message name="echoStructRequest">
   <part name="inputStruct" type="s:SOAPStruct"/>
</message>
<message name="echoStructResponse">
   <part name="return" type="s:SOAPStruct"/>
</message>
<message name="echoStructArrayRequest">
   <part name="inputStructArray" type="s:ArrayOfSOAPStruct"/>
</message>
<message name="echoStructArrayResponse">
   <part name="return" type="s:ArrayOfSOAPStruct"/>
</message>
<message name="echoVoidRequest"/>
<message name="echoVoidResponse"/>
<message name="echoBase64Request">
   <part name="inputBase64" type="xsd:base64Binary"/>
</message>
<message name="echoBase64Response">
   <part name="return" type="xsd:base64Binary"/>
</message>
<message name="echoDateRequest">
   <part name="inputDate" type="xsd:dateTime"/>
</message>
<message name="echoDateResponse">
   <part name="return" type="xsd:dateTime"/>
</message>
<message name="echoDecimalRequest">
   <part name="inputDecimal" type="xsd:decimal"/>
</message>
<message name="echoDecimalResponse">
   <part name="return" type="xsd:decimal"/>
</message>
<message name="echoBooleanRequest">
   <part name="inputBoolean" type="xsd:boolean"/>
</message>
<message name="echoBooleanResponse">
   <part name="return" type="xsd:boolean"/>
</message>

<portType name="InteropTestPortType">
   <operation name="echoString" parameterOrder="inputString">
      <input message="tns:echoStringRequest"/>
      <output message="tns:echoStringResponse"/>
   </operation>
   <operation name="echoStringArray" parameterOrder="inputStringArray">
      <input message="tns:echoStringArrayRequest"/>
      <output message="tns:echoStringArrayResponse"/>
   </operation>
   <operation name="echoInteger" parameterOrder="inputInteger">
      <input message="tns:echoIntegerRequest"/>
      <output message="tns:echoIntegerResponse"/>
   </operation>
   <operation name="echoIntegerArray" parameterOrder="inputIntegerArray">
      <input message="tns:echoIntegerArrayRequest"/>
   <output message="tns:echoIntegerArrayResponse"/>
   </operation>
   <operation name="echoFloat" parameterOrder="inputFloat">
      <input message="tns:echoFloatRequest"/>
   <output message="tns:echoFloatResponse"/>
   </operation>
   <operation name="echoFloatArray" parameterOrder="inputFloatArray">
      <input message="tns:echoFloatArrayRequest"/>
      <output message="tns:echoFloatArrayResponse"/>
   </operation>
   <operation name="echoStruct" parameterOrder="inputStruct">
      <input message="tns:echoStructRequest"/>
      <output message="tns:echoStructResponse"/>
   </operation>
   <operation name="echoStructArray" parameterOrder="inputStructArray">
      <input message="tns:echoStructArrayRequest"/>
      <output message="tns:echoStructArrayResponse"/>
   </operation>
   <operation name="echoVoid">
      <input message="tns:echoVoidRequest"/>
      <output message="tns:echoVoidResponse"/>
   </operation>
   <operation name="echoBase64" parameterOrder="inputBase64">
      <input message="tns:echoBase64Request"/>
      <output message="tns:echoBase64Response"/>
   </operation>
   <operation name="echoDate" parameterOrder="inputDate">
      <input message="tns:echoDateRequest"/>
      <output message="tns:echoDateResponse"/>
   </operation>
   <operation name="echoDecimal" parameterOrder="inputDecimal">
      <input message="tns:echoDecimalRequest"/>
      <output message="tns:echoDecimalResponse"/>
   </operation>
   <operation name="echoBoolean" parameterOrder="inputBoolean">
      <input message="tns:echoBooleanRequest"/>
      <output message="tns:echoBooleanResponse"/>
   </operation>
</portType>
Notice that the WSDL document contains more complex types than the previous demo. Array of primitives types are now used as well as the struct primitive types. With the exception of the SOAPStruct complex type, every other type is supported as built-in type in the SOAP Mapping Registry. You then need to add a new complex type definition to the SOAP Mapping Registry to handle the SOAPStruct complex type.
The SOAPStruct schema definition is the following:
<complexType name="SOAPStruct">
      <all>
            <element name="varString" type="string"/>
            <element name="varInt" type="int"/>
            <element name="varFloat" type="float"/>
      </all>
</complexType>
In the MySoapStructBean.java file, this SOAPStruct complex type can be mapped to a simple JavaBean class such as the following, and have the marshalling and unmarshalling actions handled by the BeanSerializer.
public class MySoapStructBean implements java.io.Serializable
{
  private String m_varString = null;
  private int m_varInt = 0;
  private float m_varFloat = 0;

  public MySoapStructBean() {}
  public MySoapStructBean(String s, int i, float f) {
    m_varString = s;
    m_varInt    = i;
    m_varFloat  = f;
  }

  public String getVarString () { return m_varString; }
  public int getVarInt() { return m_varInt; }
  public float getVarFloat() { return m_varFloat; }

  public void setVarString (String s) { m_varString = s; }
  public void setVarInt(int i) { m_varInt = i; }
  public void setVarFloat(float f) { m_varFloat = f; }
}
With the mapping JavaBean class ready, and having identified what serializer and deserializer to use, you can now configure the wsdl2ejb utility so that a new schema to Java map is added. This can be achieved by adding the following to the wsdl2ejb configuration file, base_conf.xml:
<mapTypes jar="base/MySoapStructBean.jar" >
  <map encodingStyle="http://schemas.xmlsoap.org/soap/encoding/"
       local-name="SOAPStruct"
       namespace-uri="http://soapinterop.org/xsd"
       java-type="MySoapStructBean"
       java2xml-class-name="org.apache.soap.encoding.soapenc.BeanSerializer"
       xml2java-class-name="org.apache.soap.encoding.soapenc.BeanSerializer" />
</mapTypes>
The MySoapStructBean.jar file contains the definition of the MySoapStructBean class. With this map, the SOAPStruct complex type, belonging to the http://soapinterop.org/xsd namespace, will be mapped to the MySoapStructBean JavaBean class and the converse is true as well. For more information about SOAP serializers and deserializers, see the Oracle SOAP documentation.
With this additional configuration, you can now run the wsdl2ejb utility with the following command:
On UNIX
cd $<ORACLE_HOME>/j2ee/home/demo/web_services/wsdl2ejb
java -jar ../../../wsdl2ejb.jar -conf base/base_conf.xml
On Windows
cd $<ORACLE_HOME>\j2ee\home\demo\web_services\wsdl2ejb
java -jar ..\..\..\wsdl2ejb.jar -conf base\base_conf.xml
The wsdl2ejb utility generates the InteropLabApp.ear file that contains the definition of a stateless EJB, which can be used as a proxy for the Web Service. The EAR file can be deployed in Oracle9iAS OC4J as any standard EJB. See Oracle9iAS Containers for J2EE User's Guide for information on how to deploy an EJB.
The TestInteropBaseClient.java class file, saved in the base directory, can be used to test the generated EJB after it has been deployed. The result of the execution of the client is the following:
echoString: Hello World!
echoStringArray[0]: Hello World!
echoStringArray[1]: Seems to work!
echoStringArray[2]: Fine!
echoStringArray[3]: WOW
echoInteger: 7
echoIntegerArray[0]: 1
echoIntegerArray[1]: 2
echoIntegerArray[2]: 3
echoIntegerArray[3]: 4
echoFloat: 1.7777
echoFloatArray[0]: 1.1
echoFloatArray[1]: 1.2
echoFloatArray[2]: 1.3
echoFloatArray[3]: 1.4
echoStruct: varString=Hello World , varInt=1 , varFloat=1.777
echoStructArray: varString[0]=Hello World , varInt[0]=0 , varFloat=[0]=1.7771
echoStructArray: varString[1]=Hello World 1 , varInt[1]=1 , varFloat=[1]=1.7772
echoStructArray: varString[2]=Hello World 2 , varInt[2]=2 , varFloat=[2]=1.7773
echoStructArray: varString[3]=Hello World 3 , varInt[3]=3 , varFloat=[3]=1.7774
echoVoid.
echoDecimal: 1.77709999999999990194510246510617434978485107421875
echoBoolean: true
echoBase64[0]: 1
echoBase64[1]: 2
echoBase64[2]: 3
echoBase64[3]: 4
echoDate: Sat Nov 10 12:30:00 EST 2001
When a Java2 Enterprise Edition (J2EE) application acquires a WSDL document at runtime, the dynamic invocation API is used to invoke any SOAP operation described in the WSDL document. The dynamic invocation API describes a WebServiceProxyFactory factory class that can be used to build instances of a WebServiceProxy. Each created WebServiceProxy instance is based on the location of the WSDL document, (and optionally on additional qualifiers), that identify which service and port should be used. The WebServiceProxy class exposes methods to determine the WSDL portType, including the syntax and signatures of all operations exposed by the WSDL service and to invoke the defined operations.
This section briefly describes the dynamic invocation API and how to use it.
The dynamic invocation API contains two packages, oracle.j2ee.ws.client and oracle.j2ee,ws.client.wsdl, which contain additional classes grouped by interface, class, and exception, as shown in Table 9-4 and Table 9-5.
The oracle.j2ee.ws.client package is described in more detail in this section. The API documentation describes to use this proxy API can be found in the Oracle9iAS Documentation Library as Proxy API Reference (Javadoc) under Oracle9iAS Web Services, which is located under the J2EE and Internet Applications tab.
The WebServiceProxyFactory class contains methods that can instantiate a WebServiceProxy class given either the URL or the Java input stream of the WSDL document. Four methods let you use either the first service and its first port in the supplied WSDL document or use the name of one of services and the name of one of the ports of the service to create a WebServiceProxy instance. Two methods also let you create a WebServiceProxy instance for a WSDL document, which has been authored following the UDDI best practices for WSDL. A method lets you supply additional optional initialization parameters to the WebServiceProxy instance.
Table 9-6 briefly describes the WebServiceProxyFactory factory class methods and the required parameters for each method. See the JavaDoc for more detailed information about this factory class and its methods.
Table 9-7 describes the WebServiceProxy interface. The WebServiceProxyFactory factory methods optionally take additional parameters that are provided in the WebServiceProxy interface that can be used to dynamically invoke an operation in a WSDL document.
Table 9-8 describes the WebServiceMethod interface, which is used to invoke a Web Service method.
The oracle.j2ee.ws.client.wsdl package exposes methods to determine the WSDL portType, including the syntax and signatures of all operations exposed by the WSDL service.
The following client code shows the use of the dynamic invocation API followed by the output of the client execution. The client code shows the following:
The WSDL document is described as follows:
  <?xml version="1.0" encoding="utf-8" ?>
- <definitions xmlns:soap="http://schemas.xmlsoap.org/wsdl/soap/" xmlns:tns="http://soapinterop.org"
xmlns:s="http://www.w3.org/2001/XMLSchema" xmlns:http="http://schemas.xmlsoap.org/wsdl/http/"
xmlns:tm="http://microsoft.com/wsdl/mime/textMatching/" xmlns:mime="http://schemas.xmlsoap.org/wsdl/mime/"
xmlns:soapenc="http://schemas.xmlsoap.org/soap/encoding/" targetNamespace="http://soapinterop.org"
xmlns="http://schemas.xmlsoap.org/wsdl/">
  <types />
  - <message name="AddSoapIn">
      <part name="a" type="s:int" />
      <part name="b" type="s:int" />
    </message>
  - <message name="AddSoapOut">
      <part name="AddResult" type="s:int" />
    </message>
  - <portType name="TestSoap">
    - <operation name="Add">
        <input message="tns:AddSoapIn" />
        <output message="tns:AddSoapOut" />
      </operation>
    </portType>
  - <binding name="TestSoap" type="tns:TestSoap">
     <soap:binding transport="http://schemas.xmlsoap.org/soap/http" style="rpc" />
    - <operation name="Add">
         <soap:operation soapAction="http://soapinterop.org/Add" style="rpc" />
       - <input>
        <soap:body use="encoded" namespace="http://soapinterop.org"
encodingStyle="http://schemas.xmlsoap.org/soap/encoding/" />
         </input>
       - <output>
          <soap:body use="encoded" namespace="http://soapinterop.org"
encodingStyle="http://schemas.xmlsoap.org/soap/encoding/" />
        </output>
      </operation>
    </binding>
  - <service name="Test">
    - <port name="TestSoap" binding="tns:TestSoap">
        <soap:address location="http://mssoapinterop.org/asmx/Rpc.asmx" />
      </port>
    </service>
  </definitions>
package oracle.j2ee.ws.client.impl;

import java.util.*;
import java.io.*;
import java.net.*;
import oracle.j2ee.ws.client.*;
import oracle.j2ee.ws.client.wsdl.*;
import org.apache.soap.util.xml.QName;
import org.apache.soap.util.xml.XMLJavaMappingRegistry;

public class Client {

  public static void main(String[] args) throws Exception {

    String szWsdlUrl = "http://mssoapinterop.org/asmx/Rpc.asmx?WSDL";

    URL urlWsdl = new URL(szWsdlUrl);
    System.err.println("Wsdl url = " + urlWsdl);

    WebServiceProxyFactory wsfact= new WebServiceProxyFactory();

    //
    // Set some initial parameters
    //
    Hashtable ht = new Hashtable();
    ht.put("http.proxyHost", "www-proxy.us.oracle.com");
    ht.put("http.proxyPort", "80");
    wsfact.setProperties(ht);

    //
    // Create an instance of the proxy
    //
    WebServiceProxy wsp = wsfact.createWebServiceProxy(urlWsdl);

    //
    // Optional: Wsdl Introspection
    //
    PortType pt = wsp.getPortType();
    List opList = pt.getOperations();
    for (int i = 0; i < opList.size(); i++) {

      Operation op = (Operation) opList.get(i);
      String szOpName = op.getName();
      String szInput  = op.getInput().getName();
      String szOutput = op.getOutput().getName();

      System.err.println("operation["+i+"] = [" + szOpName +
                         "," + szInput + "," + szOutput + "]");

      //
      // show input message parts
      //
      Message msgIn = op.getInput().getMessage();
      Map     mapParts = msgIn.getParts();
      Collection colParts   = mapParts.values();
      Iterator itParts = colParts.iterator();

      WebServiceMethod wsm = wsp.getMethod(szOpName);
      String szInEncStyle = wsm.getInputEncodingStyle();
      XMLJavaMappingRegistry xmr = wsp.getXMLMappingRegistry();

      while (itParts.hasNext()) {
        Part part = (Part) itParts.next();
        String szPartName = part.getName();
        QName qname       = part.getTypeName();
        String szJavaType = xmr.queryJavaType(qname,
szInEncStyle).getName();
        System.err.println("part name = " + szPartName +
                           ", type = " + qname +
                           ", java type = " + szJavaType);
      }
    }

    //
    // invoke operation/method Add(2,10)
    //
    String[] inMsgPartNames = new String[2];
    inMsgPartNames[0] = "a";
    inMsgPartNames[1] = "b";
    Object[] inMsgPartValues = new Object[2];
    inMsgPartValues[0] = new Integer(2);
    inMsgPartValues[1] = new Integer(10);

    WebServiceMethod wsm = wsp.getMethod("Add");
    Object objRet = wsm.invoke(inMsgPartNames,
                               inMsgPartValues);

    System.err.println("Calling  method Add(" +inMsgPartValues[0] + ","
+
                       inMsgPartValues[1] +")" );
    System.err.println("return = " + objRet);
  }
}
The output of the client execution is as follows:
Wsdl url = http://mssoapinterop.org/asmx/Rpc.asmx?WSDL
operation[0] = [Add,,]
part name = b, type = http://www.w3.org/2001/XMLSchema:int, java type = int
part name = a, type = http://www.w3.org/2001/XMLSchema:int, java type = int
Calling  method Add(2,10)
return = 12
The following information describes the known limitations of the dynamic invocation API:
http://www.w3.org/2001/XMLSchema
<import> tag to include other WSDL documents.
|
|
 Copyright © 2002 Oracle Corporation. All Rights Reserved. |
|