Release 2 (9.0.3)
Part Number B10067-01
Home |
Solution Area |
Contents |
Index |
| Oracle9iAS TopLink CMP for Users of IBM WebSphere Guide Release 2 (9.0.3) Part Number B10067-01 |
|
TopLink includes several TopLink EJB 1.1 CMP example applications for WebSphere in the \examples directory:
See <INSTALL_DIR>/doc/demos.html for links to all the examples and details on configuring the examples for WebSphere Application Server.
This chapter details how the Single Bean example is built. Although the Single Bean example involves persisting just one entity bean, the information provided on development, configuration and deployment is the same as is needed for more complex multi-bean applications.
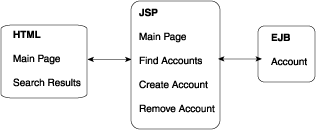
The Single Bean example application shows how a single bean can be made persistent using TopLink Container-Managed Persistence container managed persistence support. This example illustrates simple direct-to-field mappings and introduces the basic steps required to deploy a bean. The example consists of an entity bean called AccountBean.
The example is configured to on the IBM WebSphere Application Server.
The Single Bean example application demonstrates:
The Client application performs the following steps:
The Single Bean example provides a simplified view of the standard "bank account" example, and shows how a single class can be modeled as an entity bean and made persistent using TopLink.
examples.ejb.cmp11.singlebean.Account provides the public interface for the bean. It extends the javax.ejb.EJBObject interface, and contains all of the business methods that are accessible to clients of the entity. This includes getters and setters for the instance data, as well as deposit() and withdraw() methods.
examples.ejb.cmp11.singlebean.AccountBean provides the actual bean implementation for the bank account. It has methods corresponding to the methods on the remote interface, as well as the methods required by the javax.ejb.EntityBean interface, which it extends. The AccountBean's fields include accountId (String), balance (double), and owner (String).
examples.ejb.cmp11.singlebean.AccountHome provides the "home" interface of the bean. It extends the javax.ejb.EJBHome interface, and defines the required create, remove, and finder methods.
The Account data is stored in a single table.
| Column Name | Column Type | Details |
|---|---|---|
|
ACCOUNT_ID |
VARCHAR |
primary key |
|
BALANCE |
DOUBLE / NUMERIC |
balance in account |
|
OWNER |
VARCHAR |
owner's name |
A deployable component is typically developed as follows:
Each entity can contain either a home or remote interface, or both. These interfaces dictate how the bean is used by other components of the application. The Account interfaces required for the Single Bean example are located in the was/examples/ejb/cmp11/singlebean example directory.
Define instance variables for each CMP field and corresponding get and set methods. Also implement business methods on the bean. The AccountBean class required for the Single Bean example is located in the was/examples/ejb/cmp11/single bean example directory.
A JAR file requires an ejb-jar.xml and a toplink-ejb-jar.xml. The EAR file requires other descriptors, as do client application JAR files. The WebSphere AAT or other tools can be used to generate all but the toplink-ejb-jar.xml. The developer must manually create this TopLink deployment descriptor.
The TopLink deployment descriptor is included in the EJB JAR in the same META-INF directory as the ejb-jar.xml and the ibm extension files. This descriptor provides the information that TopLink needs to deploy the entities in the EJB JAR.
Because the entities deployed in a EJB JAR are all encompassed by a TopLink project, the deployment JAR file is associated with exactly one project. This project is in turn associated with exactly one TopLink session (as implied by the single session element in the descriptor).
The elements that have been modified for the Single Bean example in the toplink-ejb-jar.xml file are:
A session name (unique among all deployed JARs) that is used as a key for the deployed TopLink project (or the JAR that contains the project).
project deployment XML file that can be stored either in the deployable JAR file at the root directory or left on the file system.
The session type should always be set to <server-session/>.
The class specified controls the format of the SQL generated and other database specific behavior.
For TopLink to participate in WebSphere JTS transactions these should be both set to true.
This is the TopLink server-specific JTS controller class required when using external transaction control. For WebSphere 4.0 use oracle.toplink.jts.was.
JTSExternalTransactionController_4_0.
When set to true, TopLink will print logging information for several of its operations. This is very useful for debugging.
Options for different levels of TopLink logging.
For more information, see the toplink-was-ejb-jar_903.dtd.
This section describes the steps required to create the Account project using the Mapping Workbench.
For more information about creating projects using the Mapping Workbench, consult the Oracle9iAS TopLink Mapping Workbench Reference Guide.
This section assumes you have already read and completed the introductory tutorials in Oracle9iAS TopLink Tutorials, which offers an introduction to the fundamental concepts of the Mapping Workbench.
A TopLink project defines how the entity beans are persisted to the database. The Mapping Workbench enables you to easily build a TopLink project. The project is specified in the toplink-ejb-jar.xml in the <project-class> or <project-xml> element and used at run time to persist the beans.
ejb-jar.xml file to use for the project. For EJB 1.1 projects it is not required or even desirable to specify and ejb-jar.xml file here since under the EJB 1.1. specification the ejb-jar.xml file contains no mapping information that is not readily available in the bean classes.
For the Mapping Workbench to be able to read and update the ejb-jar.xml, it must have the EJB 2.0 DTD its DOCTYPE element. See "Working with the ejb-jar.xml file" in the Mapping Workbench Reference Guide for details on working with the ejb-jar.xml file.
The table can either be imported from the database or created in the Mapping Workbench. For more information on working with tables, see "Working with database tables" in the Oracle9iAS TopLink Mapping Workbench Reference Guide.
findByOwner and findLargeAccounts. The Queries tab of the AccountBean descriptor is used to define a query for each finder on the AccountHome. Each query requires:
toplink-ejb-jar.xml file, use either the <project-class> or <project-xml> depending on which export method was used.
The Single Bean example is packaged into an EAR file, which itself contains the following:
The TopLink deployment code generation tool must be used instead of WebSphere's to generate the deployable JAR file. The generated code contains callbacks to the TopLink persistence framework which makes CMP possible. TopLink's deploytool takes a non-deployed EJB 1.1 JAR as input, generates the TopLink-specific CMP code and calls the WebSphere deploytool for code generation.
EJB 1.1 JAR files can be created by any of a combination of the following tools:
TopLink's deploytool can be launched from the TopLink CMP Deployment Tool or from the command line.
In Windows, the deploy tool can be opened from the Start menu by clicking Start > Programs > Oracle9iAS TopLink > Tools > Deploy Tool for WebSphere Server. The deploy tool can be used with WebSphere Application Server or with WebSphere Studio Application Developer.
An Ant-based build script is included with the example application, which disassembles an EAR file, calls TopLink code generation on the JAR file, and reassembles the EAR file. A copy of the deployable JAR is placed in the server's installableApps\ directory.
You can deploy the EAR file several different ways (see the WebSphere Server documentation for more detailed information on how to deploy a EAR file into the server).
The Single Bean example is configured to run against the local HSQL database. Ensure that the HSQL database server is started before starting the application on the server. Also ensure that the HSQL toplink.examples.datasource is configured in the server before installing the application on the server. See the examples configuration documentation in the examples/ directory for details.
Included in the Single Bean directory, is a runClient.cmd which can be used to run the client.
|
|
 Copyright © 2002 Oracle Corporation. All Rights Reserved. |
|