3
Understanding Databases
When you create a descriptor for a class, the Mapping Workbench retrieves the table information from the database.
Working with Databases
Each Mapping Workbench project contains a database. You can create multiple logins for each database.
Database Properties
Use the Database properties to specify information about the database and login(s).
To specify the database properties:
- Click on the database object in the Project Tree pane. The database properties appear in the Properties pane.
Figure 3-1 Database Properties
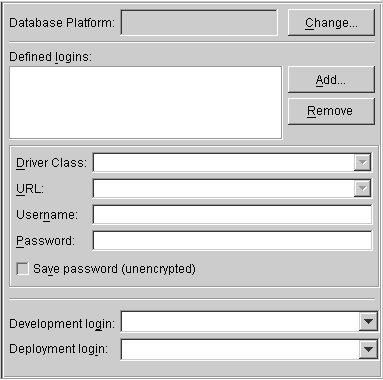
Text description of the illustration dbprop.gif
- Use this table to enter data in each field:
- After entering the information, continue with "Logging into the Database".
Logging into the Database
You must log into the database before importing or exporting table information.
To log into the database:
Click on the database object in the Project Tree pane and click on the Login button
 in the toolbar. The Mapping Workbench logs into the database. The database object in the Project Tree pane changes to
 .
.
You can also log into the database by right-clicking on the database object and selecting Log In from the pop-up menu or Selected > Log in from the menu.
Note:
f you have not defined a login, the system displays a warning message. See "Database Properties" for more information on creating a database login.
|
Working with Database Tables in the Project Tree Pane
When you expand the database object in the Project Tree pane, the Mapping Workbench displays the database tables associated with the project. You can associate tables by importing them from the database or by creating them within the Mapping Workbench.
Figure 3-2 Sample Database Tables
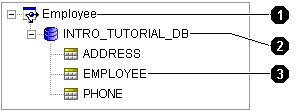
Text description of the illustration dbtable.gif
Database pane icons called out in Figure 3-2:
- Project
- Database
- Database table
Each database table contains the following tabs in the Properties pane:
- Fields - Add or modify the table's fields, and specify the field's properties
- References - Specify references between tables
Creating New Tables
Use this procedure to create a new database table within the Mapping Workbench.
To create a new table:
- Select the database object in the Project Tree pane and click on the Add New Table button
 . The New Table window appears.
You can also create a new table by right-clicking on the database object and selecting Add New Table from the pop-up menu or Selected > Add New Table from the menu.
Figure 3-3 New Table
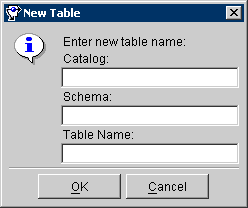
Text description of the illustration newtable.gif
- Use this table to enter data in each field.
- Enter the necessary information click on OK. The Mapping Workbench adds the database table to the project.
Continue with "Working with Database Tables in the Properties Pane" to use these tables in your project.
Importing Tables from Database
The Mapping Workbench can automatically read the schema for a database and import the table data into the project.
JDBC Driver Requirements
To retrieve table information from the database, the database driver must support the following JDBC methods:
getTables( )
getTableTypes( )
getImportedKeys( )
getCatalogs( )
getPrimaryKeys( )
To import tables from the database:
- Select the database object in the Project Tree pane and click on the Add/Update Existing Tables from Database button
 . The Import tables from database window appears.
You can also import tables from the database by right-clicking on the database object in the Project Tree and selecting Add/Update Existing Tables from Database from the pop-up menu or Selected > Add/Update Existing Tables from Database from the menu.
Figure 3-4 Import tables from Database
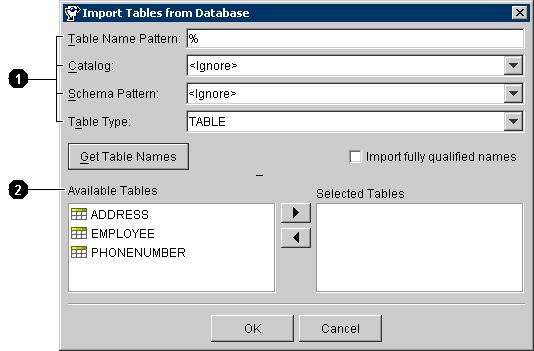
Text description of the illustration importdb.gif
User-interface components called out in Figure 3-4:
- Filters
- Database tables that match the filters
- Use this table to enter data in each filter field on the window:
- Enter the filter information and click on Get Table Names. TopLink examines the database and displays the tables that match the filters in the Available Tables field.
- Select the table(s) in the Available Tables area to import and click on
 . TopLink adds the table to the Selected Tables field.
- Select all the tables to import, click on OK. TopLink imports the tables from the database into the Mapping Workbench project.
- Examine each table's properties to verify that the imported tables contain the correct information. See "Working with Database Tables in the Properties Pane".
Removing Tables
Use this procedure to remove a database table from the project.
To remove a table:
- Click on a database table in the Project Tree pane and click on the Remove Table button
 in the toolbar. The Mapping Workbench prompts for confirmation.
You can also remove a database table from the project by right-clicking on the database object and selecting Remove from the pop-up menu or Selected > Remove Table from the menu.
- Click on OK. The Mapping Workbench removes the table from the project.
Note:
The table remains in the database.
|
Renaming Tables
Use this procedure to rename a database table in the Mapping Workbench project.
To rename the table:
- Right-click on the table in the Project Tree pane and select Rename from the pop-up menu. The Rename window appears
You can also rename the table by choosing the table and selecting Selected > Rename from the menu.
- Enter a new name and click OK. The Mapping Workbench renames the table.
Note:
The original table name remains in the database.
|
Working with Database Tables in the Properties Pane
When you select a database table in the Project Tree pane, its properties appear in the Properties pane. Each database table contains the following property tabs:
- Fields - Add or modify the table's fields, and specify the field's properties
- References - Specify references between tables
Working with Field Properties
Use the database table's Field tab to specify properties for the database table's fields.
Note:
Some properties may be unavailable, depending on your database type.
|
To specify table field properties:
- Select a database table in the Project Tree pane. The table's properties display in the Properties pane.
- Click on the Fields tab.
Figure 3-5 Field Properties
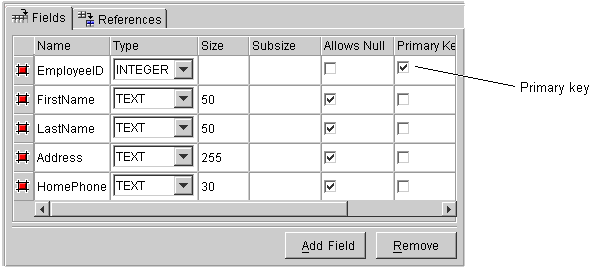
Text description of the illustration fields.gif
- Use this table to enter information in each field.
Note:
Use the scroll bar to display the additional fields.
|
- Enter the necessary information for the existing fields or click on Add Field to add a new field.
To remove a field, select the field and click on Remove.
Setting a Primary Key for Database Tables
Use this procedure to set primary key(s) for a database table.
Note:
The Mapping Workbench can automatically import primary key information, if supported by the JDBC driver.
|
To set a primary key:
- Choose a database table in the Project Tree pane. Its properties appear in the Properties pane.
- Click on the Fields tab.
Figure 3-6 Setting Primary Key for a Database Table
Text description of the illustration fields.gif
- Select the Primary Key field(s) for the table.
Working with Reference Properties
References are table properties that contain the foreign key - they may or may not correspond to an actual constraint that exists on the database. The Mapping Workbench uses these references when you define relationship mappings and multiple table associations.
When importing tables from the database (see "Importing Tables from Database"), the Mapping Workbench can automatically create references (if the driver supports this) or you can define references from the workbench.
Creating table references
To create a new table reference:
- Select a database table in the Project Tree pane. The table's properties displays in the Properties pane.
- Click on the Table Reference tab.
- In the Table References area, click on the Add button. The New Reference window appears.
Figure 3-7 New Reference Window
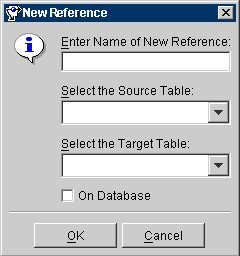
Text description of the illustration newref.gif
- Use this table to enter information in each field.
Continue with Creating Field References.
Creating Field References
To specify table reference properties:
- Select a database table in the Project Tree pane. The table's properties display in the Properties pane.
- Click on the Table Reference tab.
Figure 3-8 References properties
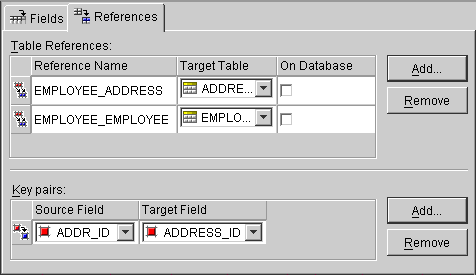
Text description of the illustration reftab.gif
- In the Table references area, select a Table Reference (see "Creating table references").
- In the Key Pairs area, click on the Add button. The Source and Target fields appear on the tab.
- Use the Source Field and Target Field drop-down lists to select the key pair for this reference.
Generating Data from Database Tables
The Mapping Workbench can automatically generate the following information from the database tables.
- SQL scripts
- Descriptors and classes
- EJB entities
You can also generate database tables from descriptors in your project.
Generating SQL Creation Scripts
Use this procedure to automatically generate SQL scripts to create the tables in a project.
To generate SQL scripts from database tables:
- Select the database table(s) in the Project Tree pane.
- Right-click on the table(s) and select Generate Creation Script for > Selected Table or All Tables from the pop-up menu. The SQL Creation Script window appears.
You can also generate SQL scripts by selecting Selected > Generate Creation Script for > Selected Table or All Tables from the menu.
Figure 3-9 SQL Creation Script
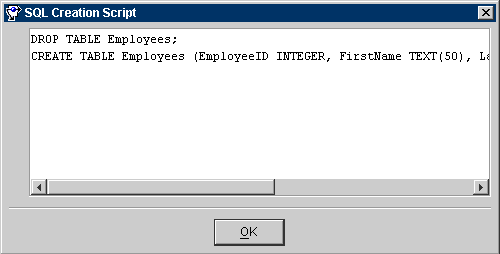
Text description of the illustration sqlscrip.gif
- Copy the script from the window and paste it into a file. You may need to edit the file to include additional SQL information that the Mapping Workbench could not generate.
Note:
If TopLink cannot determine how a particular table feature should be implemented in SQL, it generates a descriptive message in the script.
|
Generating Descriptors and Classes from Database Tables
The Mapping Workbench can automatically generate Java class definitions, descriptor definitions, and associated mappings from the information in database tables. You can later edit the generated information, if necessary.
For each table, the Mapping Workbench will:
To generate descriptors and classes from database tables:
- Select the database table(s) in the Project Tree pane.
- Right-click on the table(s) and select Generate Descriptors and Classes from > Selected Table or All Tables from the pop-up menu. The Save Project dialog box appears.
You can also generate SQL scripts by selecting Selected > Generate Descriptors and Classes from > Selected Table or All Tables from the menu.
- Click on Yes. The Generate Classes and Descriptors dialog box appears.
Figure 3-10 Generate Classes and Descriptors
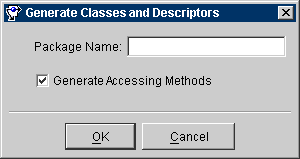
Text description of the illustration genclass.gif
- Use this table to enter data in each field:
- Enter the information and click on OK. If the table contains foreign key fields that may represent relationship mappings, the Choose Relationships to Generate window appears.
Figure 3-11 Choose Relationships to Generate
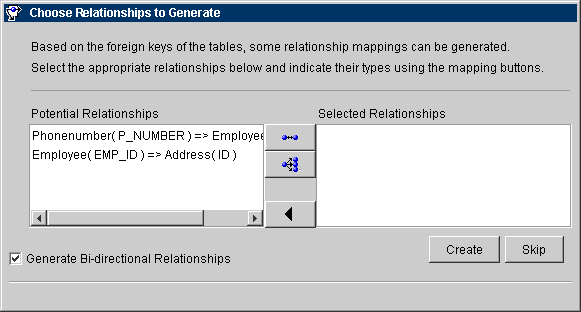
Text description of the illustration choose.gif
- Select a Potential Relationship and click on 1:1 Mapping
 or 1:M Mapping
 button. See Chapter 6, "Understanding Relationship Mappings" for more information on mappings.
You can also specify if the relationships are bidirectional.
- Click on Create to automatically create the relationships (or Skip to generate the descriptors without creating these relationships.).
The newly created descriptors appear in the Project Tree pane of the Mapping Workbench.
Generating Tables on the Database
Use this procedure to create a table on the database, based on the information in the Mapping Workbench.
To create a table on the database:
- Select the database table(s) in the Project Tree pane.
- Right-click on the table(s) and select Create on Database > Selected Table or All Tables from the pop-up menu. The Save Project dialog box appears.
You can also create tables by selecting Selected > Create on Database > Selected Table or All Tables from the menu.
The Mapping Workbench creates the tables on the database.
Generating EJB Entities from Database Tables
Use this procedure to automatically generate EJB classes and descriptors for each database table. Generating EJB entities allows you to create:
To generate EJB entities:
- Select the database table(s) in the Project Tree pane.
- Right-click on the table(s) and select Generate EJB Entities and Descriptors from > Selected Table or All Tables from the pop-up menu. The Save Project dialog box appears.
You can also create entities by selecting Selected > Generate EJB Entities and Descriptors from > Selected Table or All Tables from the menu.
- Click on Yes to save your project before generating EJB entities. The Generate Enterprise Java Beans window appears.
Figure 3-12 Generate Enterprise Java Beans
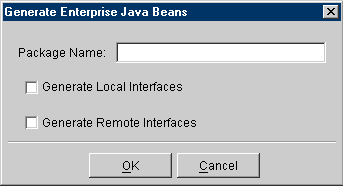
Text description of the illustration genejb.gif
- Enter a package name, select any persistence type options, and click on OK.
Note:
The Generate Local/Remote Interfaces options appear for 2.0 CMP and BMP projects only.
|
- If the table contains foreign key fields that may represent relationship mappings, the Choose Relationships To Generate window appears. Select a potential relationship and click on the 1:1 Mapping
or 1:M Mapping
button.
You can also specify if the relationships are bi-directional.
- Repeat step 5 for all appropriate sets of tables.
- Click Create to generate the relationship mappings (or Skip to generate the EJB descriptors without creating these relationships.).
The system creates the remote primary key, home, and bean classes for each bean and adds this information to the project. The newly created descriptor(s) appear in the Project Tree pane of the Mapping Workbench. Use the EJB Info tab to modify the EJB information.
