Skip Headers

Oracle9iAS Single Sign-On Administrator's Guide
Release 2 (9.0.2)

Part Number A96115-01
Go To Documentation Library
Home
Go To Product List
Solution Area
Go To Table Of Contents
Contents
Go To Index
Index

Go to previous page Go to next page

2
Administering Oracle Single Sign-On

This chapter describes GUI-based and command-line methods for administering and configuring the Single Sign-On Server and applications enabled by the server. It also describes how to grant administrative privileges.

The chapter covers the following topics:

Default Single Sign-On Schemas

When Oracle9iAS is installed, five Single Sign-On schemas are created by default. Table 2-1 lists and describes these schemas.

Table 2-1 Single Sign-On Schemas Created by Default
Schema Description

ORASSO

The schema in which the Single Sign-On server is installed.

ORASSO_PUBLIC

The schema used to execute the procedures that display Single Sign-On server pages.

ORASSO_DS

The schema for the Oracle9iAS Discoverer password store. This product has its own store because it accesses different databases.

ORASSO_PA

The schema used to generate the configuration table for partner applications when these applications are registered.

ORASSO_PS

The schema for the Single Sign-On password store.

The Single Sign-On Administrator's Role

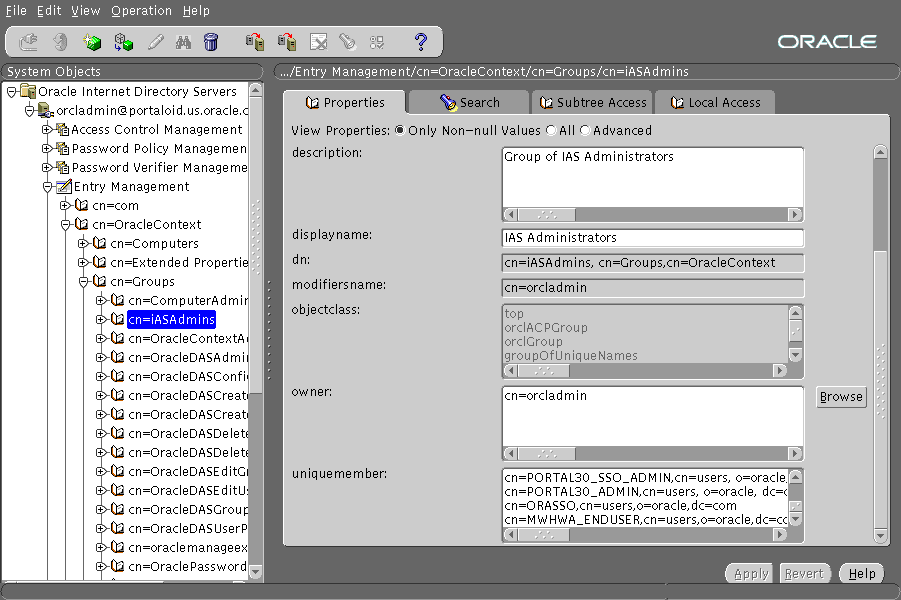
When the Single Sign-On server is accessed for the first time, only one Single Sign-On administrator exists: orcladmin, the iAS superuser. The person installing iAS selects the password for this user at install time. The orcladmin account is used to create other accounts, including accounts for iASAdmins, the group that administers Single Sign-On.

Single Sign-On administrators have full privileges for the Single Sign-On server. Using the Single Sign-On administration pages, they can do the following:

Granting Privileges to Single Sign-On Administrators

To exercise their privileges, Single Sign-On administrators must be members of the administrative group iASAdmins. This means that an existing member of this group must add a new administrator to it. The Single Sign-On server becomes a member of the group iASAdmins when the server is installed. Use the GUI tool Oracle Directory Manager (ODM) to assign administrative privileges.

To grant administrative privileges to an existing user:

  1. Start Oracle Directory Manager. To learn how to start this tool, see "Using Oracle Directory Manager" in Chapter 4 of Oracle Internet Directory Administrator's Guide.

  2. Log in to ODM as orcladmin, the directory superuser. You must use the password that was assigned to this user when Oracle Internet Directory was installed.


    Note:

    The directory superuser orcladmin is not the same as the iAS superuser orcladmin. These are separate, hierarchically unequal accounts.


  3. In the System Objects frame of ODM, select in succession the following entries:

    • Entry Management

    • cn=OracleContext

    • cn=Groups

    • cn=iASAdmins

  4. In the uniquemembers text box of the iASAdmins tab, add an entry for the user. Use the following format:

    cn=user,cn=users,o=subscriber,dc=com


    uniquemembers is an attribute of the entry iASAdmins. As such it defines members of the group iASAdmins.

  5. Select Apply

Figure 2-1 reproduces the interface for granting administrative privileges.

Figure 2-1 iASAdmins Tab of Oracle Directory Manager

Text description of odm_adda.gif follows.

Text description of the illustration odm_adda.gif

New users are created with a Web tool called Delegated Administration Service (DAS). This tool is accessed at a URL of the following form:

http://host:port/oiddas/

Accessing the Single Sign-On Administration Pages

Single Sign-On administrative functions are performed through the Single Sign-On home page.

To access the Single Sign-On home page:

  1. Enter a URL of the following form:

    http://host:port/pls/Single_Sign_On_DAD
    

    where host is the name of computer on which the Single Sign-On server is located, port is the port number of the server, and Single_Sign_On_DAD is the database access descriptor for the Single Sign-On schema. The default DAD is orasso.

    The Access Partner Applications page appears.

  2. Select Login in the upper right corner of the Access Partner Applications page.

    The Single Sign-On Login page appears.

  3. Enter your user name and password and then select the Login button.

  4. The Single Sign-On home page appears. To perform administrative functions, select the SSO Server Administration link.

Figure 2-2 reproduces the SSO Server Administration page.

Figure 2-2 SSO Server Administration Page

Text description of sso_admi.gif follows.

Text description of the illustration sso_admi.gif

Edit SSO Server Page

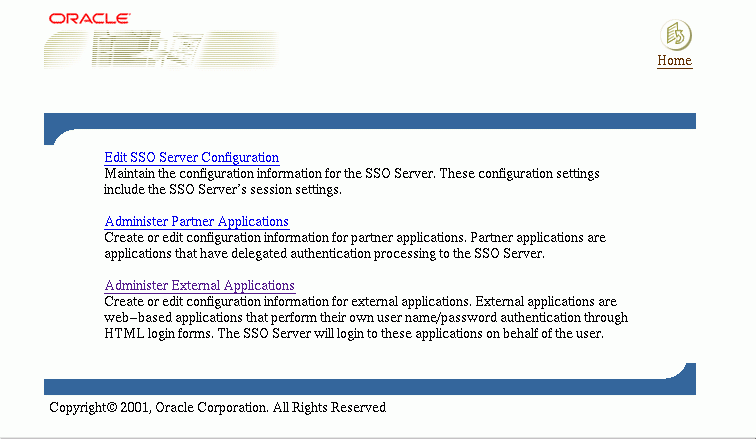
The Edit SSO server page is used to fix the length of Single Sign-On sessions, to verify IP addresses, to enable users to choose territory and language, and to retrieve information about the authentication repository.

To access the Edit SSO Server page, select the link Edit SSO Server Configuration on the SSO Server Administration page.

The Edit SSO Server page contains the following headings and fields:

Table 2-2 SSO Session Policy
Field Description

Single Sign-On session duration

Enter the number of hours a user can be logged in to the Single Sign-On server without having to time out and log in again.

Verify IP addresses for request made to the Single Sign-On server

Select to verify that the IP address of the browser is the same as the IP address in the authentication request to the Single Sign-On server.


Note:

The fields under the heading Authentication Mechanism cannot be modified through the user interface. Instead, see "Changing Single Sign-On Server Settings in the Directory" in Chapter 3, "Directory-Enabled Single Sign-On."


Table 2-3 Territory Selection
Field Description

Enable users to choose territory

Select to enable users to choose their geographical location and language when they log in. Localization settings such as date, currency, and decimal formats are determined by territory settings.

Administering Partner Applications

The Administer Partner Applications page, accessible as a link on the SSO Server Administration page, is used to add, edit, or delete a partner application. Within the Administer Partner Applications page are links for adding and editing applications.

This section covers the following topics:

Adding a Partner Application

Selecting the Add Partner Applications link takes you to the Create Partner Applications page. Use the fields on this page, described in the tables immediately following, to register an application with the Single Sign-On server.


Note:

If mod_osso authentication is used, mod_osso is the only application that must be registered. If SDK authentication is used, each Single Sign-On application must be registered.


Table 2-4 Partner Application Login
Field Description

Name

Enter a unique name for the partner application.

Home URL

Enter the URL of the home page for the application.

Success URL

Enter the URL to the routine responsible for establishing the partner application's session and session cookies. This routine should redirect the browser to the URL that the user originally requested.

The URL must point to a procedure that processes the user identification information from the Single Sign-On server. Include the http:// prefix in the URL. The following example shows a success URL for Oracle9iAS Portal:

http://server.domain.com:5000/pls/DAD/portal.wwsec_app_priv.process_signon

Logout URL

Enter the URL for the logout routine of the application. The Single Sign-Off page invokes this URL in parallel with others, enabling users to simultaneously log out of the server and active partner applications.

Table 2-5 Valid Login Timeframes
Field Description

Start Date

Enter the date when users will first be able to access the partner application through the Single Sign-On server. Use the format shown next to the field label.

End Date

Enter the end date when users will last be able to access the partner application through the Single Sign-On server. Use the format shown next to the field label.

Note: If you leave this field blank, users can log in to the partner application using the Single Sign-On server indefinitely.

Table 2-6 Application Administrator
Field Description

Administrator E-mail

Enter the e-mail address of the partner application administrator.

Administrator Information

Enter any additional information that you want to include about the partner application administrator.

Use the following steps to add a partner application:

  1. From the Administer Partner Applications page, select Add Partner Application.

    The Create Partner Application page appears.

  2. In the Partner Application Login section, enter the name and URL of the partner application and a success URL. The success URL points to a Web page where the browser should be redirected after a successful login. It must correspond to the procedure that processes the user identification information provided by the Single Sign-On server. Enter the logout URL for the application.

  3. In the Valid Login Timeframe section, enter the dates when users can log in to the application through the Single Sign-On server. If you leave the End Date field blank, users can log in to the application indefinitely.

  4. In the Application Administrator section, enter the e-mail address and other information for the application contact person or administrator.

  5. Select OK. The new partner application appears in the Edit/Delete Partner Application list on the Partner Application page.

Editing a Partner Application

The Edit Partner Application page is used to edit configuration information for partner applications.

The Edit Partner Application page contains all of the fields that are in the Create Partner Application page, plus five additional fields in the Partner Application Login section. Table 2-7 describes the additional fields.

Table 2-7 Fields on the Edit Partner Application Page
Field Description

ID

The ID value is automatically set when a partner application is added. It is used by the Single Sign-On server to identify the partner application.

Token

The token is automatically set when a partner application is added. It is used by the Single Sign-On server to identify the partner application. The partner application must use the application token to identify itself to the Single Sign-On server when requesting authentication.

Encryption Key

The encryption key is automatically set when a partner application is added. When a user tries to log in using Oracle9iAS Single Sign-On, the Single Sign-On server generates a token that indicates a user's identity and whether the user has been authenticated. This key is used to encrypt the login cookie.

Login URL

This is the same as the success URL, which sets the application session and cookies.

Single Sign-Off URL

This is the same as the application logout URL.

Use the following steps to edit a partner application:

  1. From the Administer Partner Applications page, select an application from the list that appears under the heading Edit/Delete Partner Application.

  2. Select the Edit link for that application. This link appears as a pencil icon.

  3. On the Edit Partner Application page, edit the appropriate field values, as described in Table 2-4 through Table 2-9.

  4. Select Apply to store changes for the current screen and to display the updated screen. Select OK to store all changes and to return to the previous screen.

    See Also:

    "Partner Applications" in Chapter 1, "Single Sign-On Basics"

Administering External Applications

The Administer External Applications page, accessible as a link on the SSO Server Administration page, is used to add, edit, or delete an external application. Within the Administer External Applications page are links for adding and editing external applications.

This section covers the following topics:

Adding an External Application

Selecting the Add External Application link takes you to the Create External Application page. This page contains the following headings and fields:

Table 2-8 External Application Login
Field Description

Application Name

Enter a name that identifies the external application. This is the default name for the external application.

Login URL

Enter the URL to which the HTML login page for the external application is submitted for authentication. For example, the login URL for Yahoo! Mail is http://login.yahoo.com/config/login?6p4f5s403j3h0

Username/ID Field Name

Enter the term that identifies the user name or user ID field of the HTML login form for the application. You find this term by viewing the HTML source for the login form. (See the example after the steps immediately following). This field is not applicable if you are using Basic authentication.

Password Field Name

Enter the term that identifies the password field of the HTML login form for the external application. You find this term by the viewing the HTML source for the login form. (See the example after the steps immediately following). This field is not applicable if you are using Basic authentication.

Table 2-9 Authentication Method
Field Description

Type of Authentication Use

Use the pulldown menu to select the form submission method for the application. This method specifies how message data is sent by the browser. You find this term by viewing the HTML source for the login form. Select one of the following three methods:

POST:
Posts data to the Single Sign-On server and submits login credentials within the body of the form.

GET:
Presents a page request to a server, submitting the login credentials as part of the login URL.

BASIC AUTHENTICATION:
Submits the login credentials in the application URL, which is protected by HTTP Basic authentication


Warning:

The Basic authentication method poses a security risk because the user name and password may be stored in clear text in the browser cache and browser URL history.


Table 2-10 Additional Fields
Field Description

Field Name

Enter the name of any additional fields on the HTML login form that may require user input to log in to the application. This field is not applicable if you are using Basic authentication.

Field Value

Enter a default value for a corresponding field name value, if applicable. This field is not applicable if you are using Basic Authentication.

Use the following steps to add an external application:

  1. From the Administer External Applications page, select Add External Application.

    The Create External Application page appears.

  2. In the External Application Login field, enter the name of the external application and the URL to which the application's HTML login form is submitted or the protected URL to access if you are using Basic authentication.

  3. If the application uses HTTP POST or HTTP GET authentication, in the User Name/ID Field Name field, enter the term that identifies the user name or user ID field of the external application's HTML login form. You can find the name by viewing the HTML source for the login form.

    If the application uses the Basic authentication method, the User Name/ID Field Name should be empty.

  4. If the application uses HTTP POST or HTTP GET authentication, in the Password Field Name field, enter the term that identifies the password field of the external application. See the HTML source for the login form.

    If the application uses the Basic authentication method, the Password Field Name field should be empty.

  5. In the Additional Fields field, enter the name and default values for any additional fields on HTML login form that may require user input.

    If the application uses the Basic authentication method, these fields should be empty.

  6. Select the Display to User check box to allow the default value of an additional field to be changed by the user on the HTML login form.

  7. Select OK. The new external application appears under the heading Edit/Delete External Application on the Administer External Applications page, along with the other external applications.

  8. Select the link for the application to test the login.

The following example shows the source of the values that are used for Yahoo! Mail.

<form method=post action="http://login.yahoo.com/config/login?6p4f5s403j3h0"
autocomplete=off name=a>
...
<td><input name=login size=20 maxlength=32></td>
....
<td><input name=passwd type=password size=20 maxlength=32></td>
...
<input type=checkbox name=".persistent" value="Y" >Remember my ID & password
...
</form>

The source provides values for the following:

Editing an External Application

Selecting the pencil icon next to an application takes you to the Edit External Application page, where you can edit the values that you entered when you added the application. When you are finished editing, select Apply to enter the changes and to redisplay the page with the updated values.

Storing External Application Credentials in the Single Sign-On Database

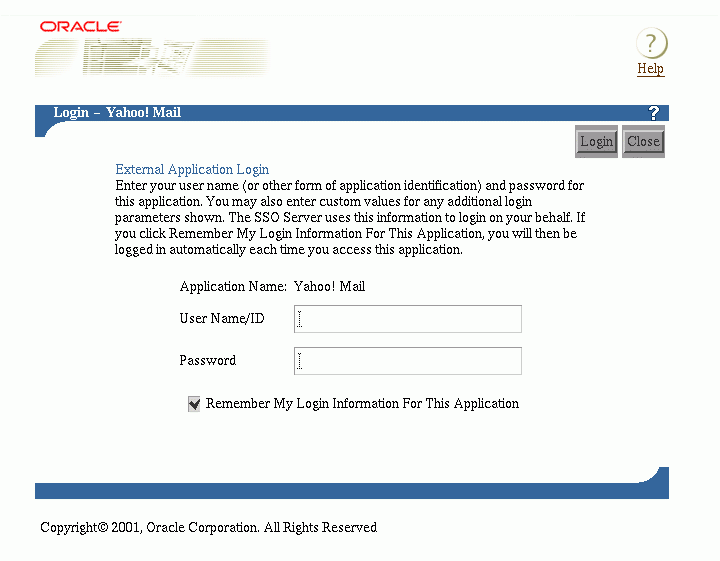
Each external application expects to receive a user name and password each time the user logs in to the application. To enable single sign-on to these applications, users are given the option of storing their credentials in the Single Sign-On database when they log in to the application.

If Single Sign-On users are logging in to an external application for the first time, they are presented with the External Application Login page. After entering credentials they can select the check box Remember My Login Information for This Application. If they choose this option, the next time they access the application, the Single Sign-On server logs in on their behalf.

Figure 2-3 reproduces the External Application Login page

Figure 2-3 External Application Login Page

Text description of ext_logi.gif follows.

Text description of the illustration ext_logi.gif


Note:

If you change your password for an external application, you must also update your password on the External Application Login page. If you neglect to do so, this page returns an error message when you attempt to log in.


See Also:

"External Applications" in Chapter 1, "Single Sign-On Basics"

Changing Passwords

Single Sign-On users and administrators can change their passwords at any time by selecting the Change Password link on the SSO Administration page.

To access the SSO Administration page, user and administrator alike must enter the the URL for the Single Sign-On home page, as explained in "Accessing the Single Sign-On Administration Pages".

The administrator can alter the Change Password page to suit his tastes by following the procedures in Chapter 8, "Customizing the Single Sign-On Interface". For rules governing passwords, see "Password Policies" in Chapter 3, "Directory-Enabled Single Sign-On".

Configuring National Language Support

The Single Sign-On administrator can enable users to select from a number languages, including Chinese and other languages encoded in multibyte character sets. These languages can be selected when iAS is installed. If the user chooses a language, territories associated with that language appear at login. This feature enables the user to choose localization settings such as date, currency, and decimal formats.

Users select a particular language at login time. When they select a language, The server sets a persistent cookie in the user's browser. This cookie retains the user's chosen language between sessions. The default language is English.

At the same time, the Single Sign-On server passes the user's language preference as an attribute (accept_language) to partner applications. This attribute enables these applications to set up sessions in the user's chosen language.

If the Single Sign-On administrator has selected the Enable Users to Choose Territory check box on the Edit SSO Server page, links for territories associated with a chosen language appear in the Single Sign-On interface. These links can be used to specify localization settings such as date, currency, and decimal formats.

Configuring the Global User Inactivity Timeout

The global user inactivity timeout is not configured by default. You must enable it by running the script ssogito.sql.

To configure the global user activity timeout:

  1. Log in to SQL*Plus using the Single Sign-On schema name and password. The default in both cases is orasso.

  2. Run the script ssogito.sql by entering the following command:

    SQL> @ssogito.sql
    
  3. Running the script brings up a list of fields.

  4. In the field Enter value for timeout_cookie_domain, enter a domain name that is common to all of the applications enabled by the Single Sign-On server.


    Note:

    If this field is left blank, the domain name defaults to the host name for the Single Sign-On server.


  5. In the field Enter value for inactivity period, enter the length of the desired inactivity period--say, 15 minutes.

  6. To enable the new settings, select the return key. To cancel the transaction, select the return key twice.

    Once you have completed a transaction, the script furnishes you a summary of the new timeout settings.

  7. In the file mod_osso.conf, make sure that the parameter ossoIdleTimeout exists and that it is set to on. The path to this file is as follows:

    IAS_HOME/Apache/mod_osso/conf/mod_osso.conf
    

    See Also:

    "Global User Inactivity Timeout" in Chapter 1, "Single Sign-On Basics"

Enabling the Single Sign-On Server for SSL

The Single Sign-On server can be enabled for Secure Sockets Layer (SSL) at install time. If the administrator does not select this option, SSL must be configured manually.

To configure the Single Sign-On server for SSL:

  1. Configure the Oracle HTTP server to use SSL. See "Using Secure Sockets Layer (SSL) to Authenticate Users" in Chapter 3 of Oracle9i Application Server Security Guide.

  2. Change all references of HTTP in Single Sign-On URLs to HTTPS. The script ssocfg.sh is provided for this purpose. It can be found at the following location:

    IAS_HOME/sso/bin

    Enter the command, using the following syntax:

    ssocfg.sh protocol host port [sso_schema_name]

    In this case, protocol is https. (To change back to HTTP, use http.) The parameter new_host is the host name of the Oracle HTTP listener for the Single Sign-On server. You can either assign a new host name or use an existing one. The parameter new_port is the port number of the listener, and sso_schema_name is the name of the Single Sign-On schema. The default schema name is orasso. Note from the syntax that this last parameter is optional.

    Here is an example:

    ssocfg.sh https login.acme.com 443


    Port 443 is the default port number for Single Sign-On over SSL.

  3. Protect Single Sign-On URLs to use SSL. In the dads.conf file, use the following HTTP directive to protect the Single Sign-On DAD with SSL.

    <IfDefine SSL>
       <Location /pls/orasso>
          SSLRequireSSL
       </Location>
    </IfDefine>
    

    The dads.conf file can be found at the following location:

    IAS_HOME/Apache/modplsql/conf/dads.conf
    

Protecting URLs Accessed by Oracle9iAS Portal and Mod_osso

Some Single Sign-On URLs must be configured so that only browsers on Oracle9iAS Portal and mod_osso hosts can access them. Oracle Portal must be able to show the authenticated user a list of links to external applications. A mod_osso host configured for extended Basic authentication must be able to access these applications. In both cases, the dads.conf file must be modified.

For Oracle Portal, enter the following lines:

  <Location /pls/orasso/orasso.wwsso_app_admin.external_apps_list*>
    Order deny,allow
    Deny from all
    Allow from <oracle_portal_host>
  </Location>

  <Location /pls/orasso/orasso.wwsso_app_admin.print_fapp_username*>
    Order deny,allow
    Deny from all
    Allow from <oracle_portal_host>
  </Location>

For mod_osso, enter the following lines:

  <Location /pls/orasso/orasso.wwsso_app_admin.get_ext_app*>
    Order deny,allow
    Deny from all
    Allow from <mod_osso_host>
  </Location>

Go to previous page Go to next page
Oracle
Copyright © 2002 Oracle Corporation.

All Rights Reserved.
Go To Documentation Library
Home
Go To Product List
Solution Area
Go To Table Of Contents
Contents
Go To Index
Index