Release 2 (9.0.2)
Part Number A95101-01
Home |
Solution Area |
Contents |
Index |
| Oracle9i Application Server Application Developer's Guide Release 2 (9.0.2) Part Number A95101-01 |
|
The wireless feature in Oracle9iAS enables wireless clients to access your applications. Because wireless clients use protocols different from HTTP and markup languages other than HTML, you have to make some modifications to your application to support wireless clients.
Contents of this chapter:
If your application uses the MVC design, you only need to make a few changes to your application to support wireless clients:
This task is simplified by the separation of the presentation data from the business logic objects. If there were no clear separation between presentation data and business logic objects, you would have more difficulty merging presentation code for wireless clients with presentation code for desktop browsers.
See Section 7.3.3, "Separating Presentation Data into Separate Files".
Because wireless clients do not use a standardized markup language, you have to write presentation data for the clients in XML based on a generic DTD specification. The wireless feature in Oracle9iAS transforms the XML to the specific markup language that the wireless client can process.
Like HTML, applications can generate XML from JSP files or static files. In the sample application, the presentation data comes from JSP files because it contains dynamic data. See Chapter 5, "Creating Presentation Pages".
The generic XML for wireless clients is based on the SimpleResult DTD. For details on the DTD and how to use its elements, see the Oracle9iAS Wireless Developer's Guide.
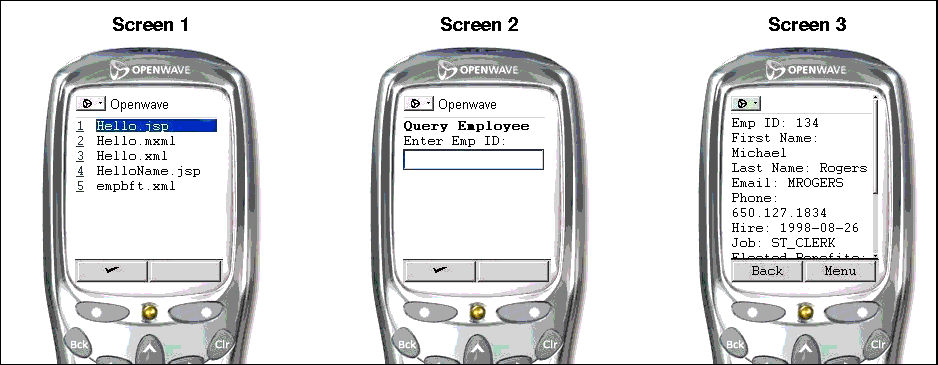
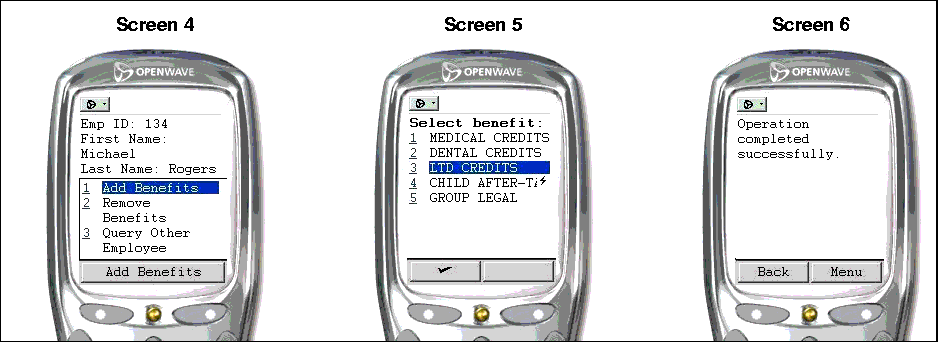
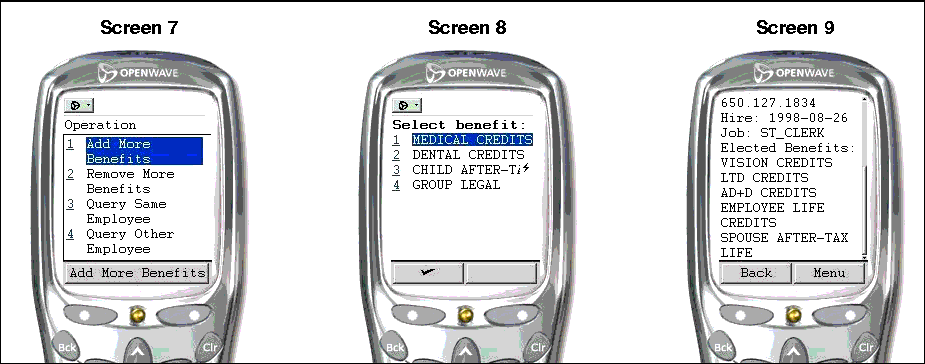
Figure 7-1 to Figure 7-3 show the Employee Benefit sample application on an OpenWave simulator. The application on a wireless client looks similar to the application on a desktop browser.

On Screen 1, the wireless client lists the applications that it can run. This is essentially a list of the files in:
$OMSDK_HOME/oc4j_omsdk/omsdk/j2ee/applications/pmsdk/apps/
$OMSDK_HOME is the home directory for Oracle9iAS Wireless SDK.
Screen 2 shows the sample application's starting point, which is the empbft.xml file. The file displays a text input field where the user can enter an employee ID.
Screen 3 shows the results of the query. The wireless client has a scrollbar that enables the user to scroll down the page to view all the information. At this screen, the user can press the Menu button to add or remove benefits.

Screen 4 shows the menu, which offers selections such as add benefits, remove benefits, and query other employee.
Screen 5 shows a list of benefits that the user can add. The user selects one benefit to add and clicks OK to submit the request. Note that on wireless clients, the user can select only one item to add or remove at a time. See Section 7.2.2, "Differences Between the Wireless and the Browser Application".
Screen 6 tells the user that the add benefit operation was completed successfully. This screen also has a Menu option.

Screen 7 shows the menu. It has four options: add more benefits, remove more benefits, query same employee, and query other employee.
Screen 8 shows the list of benefits after the user has added a benefit.
Screen 9 is similar to Screen 3, except that it is scrolled down to show the list of benefits for the user.
In the browser version of the Employee Benefit application, users can select multiple benefits to add or remove. On wireless devices, however, users can select only one item at a time. To assist users in adding/removing multiple items, the application provides options called "Add More Benefits" and "Remove More Benefits" to enable users to select another benefit to add or remove (screen 7). These options are not available on browsers.
These options are made available from successWireless.jsp, which is displayed after the application adds or removes a benefit successfully (screen 6). This screen displays a success message. When users click Menu on this screen, they see the "Add More Benefits" and "Remove More Benefits" options.
// from successWireless.jsp <SimpleText> <SimpleTextItem>Operation completed successfully.</SimpleTextItem> <Action label="Add More Benefits" type="SOFT1" task="GO" target="/empbft/controller?action=addBenefitToEmployee&clientType=wireless&a mp;empID=<%=empId%>"></Action> <Action label="Remove More Benefits" type="SOFT1" task="GO" target="/empbft/controller?action=removeBenefitFromEmployee&clientType=wirel ess&empID=<%=empId%>"></Action> <Action label="Query Same Employee" type="SOFT1" task="GO" target="/empbft/controller?action=queryEmployee&clientType=wireless&empI D=<%=empId%>"></Action> <Action label="Query Other Employee" type="SOFT1" task="GO" target="/empbft/controller?action=queryEmployee&clientType=wireless"></Actio n> </SimpleText>
When the user selects the "Add More Benefits" or "Remove More Benefits" option, the request is similar to the request to add or remove a benefit. The request contains an action parameter, an empID parameter, and a clientType parameter. The application requeries the database and displays an updated list of benefits (Screen 8).
You can write the XML presentation data for wireless clients in the same JSP file as the one that generates the HTML, or in a different JSP file. Regardless of where you put the presentation data, you still need to determine if a request came from a wireless or desktop client.
You can determine the origin of a request by inserting a parameter in the request to identify wireless clients. You can include the parameter and its value using a hidden input form element.
The sample application uses a parameter name of clientType and parameter value of wireless to identify wireless clients. Each wireless client request contains this parameter. For example, in empbft.xml, which is the first file in the application that wireless clients see:
// empbft.xml
<?xml version = "1.0" encoding = "ISO-8859-1"?>
<SimpleResult>
  <SimpleContainer>
    <SimpleForm title="Query Employee" target="/empbft/controller">
       <SimpleFormItem name="empID" format="*N">Enter Emp ID: </SimpleFormItem>
       <SimpleFormItem name="action" type="hidden" value="queryEmployee" />
       <SimpleFormItem name="clientType" type="hidden" value="wireless" />
    </SimpleForm>
  </SimpleContainer>
</SimpleResult>
You can then check for the clientType parameter in servlets or JSPs in the same way that you check for other parameters.
In servlets:
String client = req.getParameter(SessionHelper.CLIENT_TYPE_PARAMETER);
boolean wireless =
          client != null && client.equals(SessionHelper.CLIENT_TYPE_WIRELESS);
In JSPs:
<%
  String client = request.getParameter(SessionHelper.CLIENT_TYPE_PARAMETER);
  boolean wireless =
            client != null && client.equals(SessionHelper.CLIENT_TYPE_WIRELESS);
%>
If you use this method, determine the origin of the request (whether it came from a wireless or desktop client) in the JSP file itself. You can then generate HTML or XML depending on the origin. For example:
// import classes for both wireless and browsers <%@ page import="java.util.*" %> <%@ page import="empbft.component.employee.ejb.*" %> <%@ page import="empbft.component.employee.helper.*" %> <%@ page import="empbft.util.*" %> // check the client type that sent the request <% String client = request.getParameter(SessionHelper.CLIENT_TYPE_PARAMETER); boolean wireless = ( (client != null) && client.equals(SessionHelper.CLIENT_TYPE_WIRELESS) ); if (wireless) { %> <?xml version = "1.0" encoding = "ISO-8859-1"?> <%@ page contentType="text/vnd.oracle.mobilexml; charset=ISO-8859-1" %> <SimpleResult> <SimpleContainer> <SimpleForm title="Query Employee" target="/empbft/controller"> <SimpleFormItem name="empID" format="*N">Enter Emp ID: </SimpleFormItem> <SimpleFormItem name="action" type="hidden" value="queryEmployee" /> <SimpleFormItem name="clientType" type="hidden" value="wireless" /> </SimpleForm> </SimpleContainer> </SimpleResult> <% } else { %> <%@ page contentType="text/html;charset=ISO-8859-1"%> <html> <head> <meta http-equiv="Content-Type" content="text/html; charset=ISO-8859-1"> <link rel="stylesheet" href="css/blaf.css" type="text/css"> <title>Query Employee</title> </head> <body> <h2>Employee Benefit Application</h2> <% String empId = request.getParameter(SessionHelper.EMP_ID_PARAMETER); if (empId == null) { %> <h4>Query Employee</h4> <form method=get action="/empbft/controller"> <input type=hidden name=action value=queryEmployee> <table> <tr> <td>Employee ID:</td> <td><input type=text name=empID size=4></td> <td><input type=submit value="Query Employee"></td> </tr> </table> <h4>Actions</h4> <a href="/empbft/">Home</a><br> </form> <% } else { int id = Integer.parseInt(empId); EmployeeManager mgr = SessionHelper.getEmployeeManager(request); EmployeeModel emp = mgr.getEmployeeDetails(id); %> <h4>Employee Details</h4> <table> <tr><td>Employee ID: </td><td colspan=3><b><%=id%></b></td></tr> <tr><td>First Name: </td><td><b><%=emp.getFirstName()%></b></td><td>Last Name: </td><td><b><%=emp.getLastName()%></b></td></tr> <tr><td>Email: </td><td><b><%=emp.getEmail()%></b></td><td>Phone Number: </td><td><b><%=emp.getPhoneNumber()%></b></td></tr> <tr><td>Hire Date: </td><td><b><%=emp.getHireDate().toString()%></b></td><td>Job: </td><td><b><%=emp.getJobId()%></b></td></tr> </table> <h4>Elected Benefits</h4> <table> <% Collection benefits = emp.getBenefits(); if (benefits == null || benefits.size() == 0) { %> <tr><td>None</td></tr> <% } else { Iterator it = benefits.iterator(); while (it.hasNext()) { BenefitItem item = (BenefitItem)it.next(); %> <tr><td><%=item.getName()%></td></tr> <% } // end of while } // end of if %> </table> <h4>Actions</h4> <table> <tr><td><a href="/empbft/controller?empID=<%=id%>&action=addBenefitToEmployee">Add benefits to the employee</a></td></tr> <tr><td><a href="/empbft/controller?empID=<%=id%>&action=removeBenefitFromEmployee">Rem ove benefits from the employee</a></td></tr> <tr><td><a href="/empbft/controller?action=queryEmployee">Query other employee</a></td></tr> <tr><td><a href="/empbft/">Home</a><br></td></tr> </table> <% } // end of else (empId != null) %> </body> </html> <% } // end of else (wireless) %>
If you are using different files, edit the subclasses of ActionHandler to check the origin of the request, and forward the request to the proper JSP file. For example:
public void performAction(HttpServletRequest req, HttpServletResponse res)
    throws ServletException
{
   String client = req.getParameter(SessionHelper.CLIENT_TYPE_PARAMETER);
   boolean wireless =
           client != null && client.equals(SessionHelper.CLIENT_TYPE_WIRELESS);
   String empIdString = req.getParameter(SessionHelper.EMP_ID_PARAMETER);
   boolean validEmpId = true;
   if (empIdString != null) {
      int empId = Integer.parseInt(empIdString);
      validEmpId = (empId >= 100 && empId <= 206) ? true : false;
   }

   // Forward to appropriate page
   if (wireless) {
      if (validEmpId) {
         forward(req, res, "/queryEmployeeWireless.jsp");
      } else {
         forward(req, res, "/errorWireless.jsp");
      }
   } else {
      if (validEmpId) {
         forward(req, res, "/queryEmployee.jsp");
      } else {
         forward(req, res, "/error.jsp");
      }
   }
}
The value of CLIENT_TYPE_PARAMETER is defined in SessionHelper to be clientType. This is the name of the parameter.
The value of CLIENT_TYPE_WIRELESS is defined in SessionHelper to be wireless. This is the value of the parameter.
This parameter and the value of the parameter are defined in empbft.xml. This file corresponds to the ID page for wireless. It enables users to enter a number in a text input field.
// empbft.xml
<?xml version = "1.0" encoding = "ISO-8859-1"?>
<SimpleResult>
  <SimpleContainer>
    <SimpleForm title="Query Employee" target="/empbft/controller">
       <SimpleFormItem name="empID" format="*N">Enter Emp ID: </SimpleFormItem>
       <SimpleFormItem name="action" type="hidden" value="queryEmployee" />
       <SimpleFormItem name="clientType" type="hidden" value="wireless" />
    </SimpleForm>
  </SimpleContainer>
</SimpleResult>
You have to make some changes in the header of your JSP files for wireless clients:
The first line of the JSP file should specify that the file is an XML file:
<?xml version = "1.0" encoding = "ISO-8859-1"?>
In the JSP files for wireless clients, you need the following line at the top of the files to set the content type of the response and the character set.
<%@ page contentType="text/vnd.oracle.mobilexml; charset=ISO-8859-1" %>
You need to do this because the default value for contentType for JSPs is text/html, and this is not what you want for wireless clients.
The transformer uses the text/vnd.oracle.mobilexml value when transforming the page into data that the wireless client can understand.
To Oracle9iAS, requests from wireless clients look the same as requests from desktop browsers except that the user agent field contains the name of the wireless device. However, the way in which wireless requests get to Oracle9iAS is different: Wireless requests first go through gateways (such as WAP, Voice, or SMS), which convert the requests to the HTTP protocol. The gateways then route the requests to Oracle9iAS Wireless.
Oracle9iAS Wireless processes the requests by invoking an adapter to retrieve XML from the mobile application. The XML is based on a schema defined by Oracle9iAS.
Oracle9iAS Wireless then invokes a transformer, which takes the XML and transforms it to a markup language appropriate for the wireless client. Oracle9iAS sends the resulting data to the gateway, which may encode the data (to make the data more compact) before sending it to the client.
See the Oracle9iAS Wireless Developer's Guide and the Oracle9iAS Getting Started and System Guide for further details.
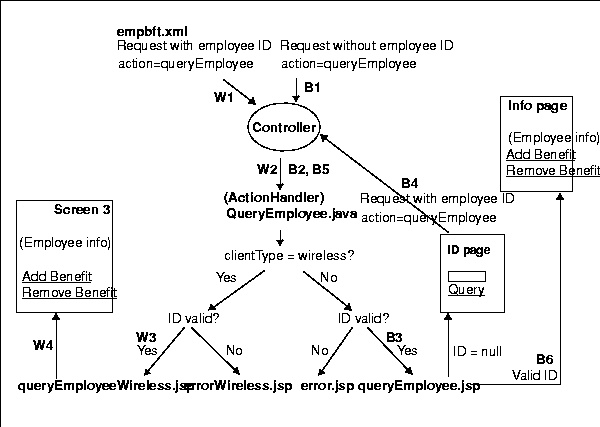
Figure 7-4 shows the flow of the query operation with wireless and browser clients. This figure is a more complex form of Figure 6-1.

The figure above contains two sequences of events. One sequence is for requests that come from browsers; steps in this sequence are noted in the figure with a "B". The other sequence is for requests that come from wireless clients; steps in this sequence are noted with a "W".
The steps for browser requests are covered in Section 6.2, "Query Employee Operation". This section covers the wireless steps.
W1: The server sends the request to the Controller with the action parameter set to queryEmployee and the empID parameter set to the employee ID entered by the user.
W2: QueryEmployee.java checks the clientType parameter to determine if the request came from a wireless client or a browser. This parameter is set only in the XML files that the application sends to wireless clients; requests from browsers do not have this parameter. QueryEmployee.java also checks if the employee ID is valid.
W3: QueryEmployee.java forwards the request to queryEmployeeWireless.jsp.
W4: queryEmployeeWireless.jsp is similar to queryEmployee.jsp. It retrieves and displays employee data. Note that the retrieval method is the same in both files. The only difference is in the tags used (HTML for browsers, XML for wireless clients).
queryEmployeeWireless.jsp looks like the following:
// queryEmployeeWireless.jsp <?xml version = "1.0" encoding = "ISO-8859-1"?> <%@ page contentType="text/vnd.oracle.mobilexml; charset=ISO-8859-1" %> <%@ page import="java.util.*" %> <%@ page import="empbft.component.employee.ejb.*" %> <%@ page import="empbft.component.employee.helper.*" %> <%@ page import="empbft.util.*" %> <SimpleResult> <SimpleContainer> <% String empId = request.getParameter(SessionHelper.EMP_ID_PARAMETER); if (empId == null) { %> <SimpleForm title="Query Employee" target="/empbft/controller"> <SimpleFormItem name="empID" format="*N">Enter Emp ID: </SimpleFormItem> <SimpleFormItem name="action" type="hidden" value="queryEmployee" /> <SimpleFormItem name="clientType" type="hidden" value="wireless" /> </SimpleForm> <% } else { int id = Integer.parseInt(empId); EmployeeManager mgr = SessionHelper.getEmployeeManager(request); EmployeeModel emp = mgr.getEmployeeDetails(id); %> <SimpleText> <SimpleTextItem>Emp ID: <%=empId%></SimpleTextItem> <SimpleTextItem>First Name: <%=emp.getFirstName()%></SimpleTextItem> <SimpleTextItem>Last Name: <%=emp.getLastName()%></SimpleTextItem> <SimpleTextItem>Email: <%=emp.getEmail()%></SimpleTextItem> <SimpleTextItem>Phone: <%=emp.getPhoneNumber()%></SimpleTextItem> <SimpleTextItem>Hire: <%=emp.getHireDate()%></SimpleTextItem> <SimpleTextItem>Job: <%=emp.getJobId()%></SimpleTextItem> <SimpleTextItem>Elected Benefits: </SimpleTextItem> <% Collection benefits = emp.getBenefits(); if (benefits == null || benefits.size() == 0) { %> <SimpleTextItem>None</SimpleTextItem> <% } else { Iterator it = benefits.iterator(); while (it.hasNext()) { BenefitItem item = (BenefitItem)it.next(); %> <SimpleTextItem><%=item.getName()%></SimpleTextItem> <% } // end of while } // end of if %> <Action label="Add Benefits" type="SOFT1" task="GO" target="/empbft/controller?action=addBenefitToEmployee& clientType=wireless&empID=<%=empId%>"></Action> <Action label="Remove Benefits" type="SOFT1" task="GO" target="/empbft/controller?action=removeBenefitFromEmployee& clientType=wireless&empID=<%=empId%>"></Action> <Action label="Query Other Employee" type="SOFT1" task="GO" target="/empbft/controller?action=queryEmployee& clientType=wireless"></Action> </SimpleText> <% } // end of else (empId != null) %> </SimpleContainer> </SimpleResult>
The Action tag defines popup menus (Figure 7-1, Screen 4). The user presses the Menu button to access the popup menu.
The add and remove benefits operations for wireless clients are similar to the corresponding operations for browsers. The changes in the application needed to support these operations for wireless clients include:
While you are developing wireless applications, you may not have access to an environment where you can run your applications from actual wireless clients. In such cases, you can test your applications using simulators. However, before you deploy your applications in a production environment, it is highly recommended that you find or set up an environment where you can test your applications with actual wireless clients.
To access the application from a wireless client simulator:
http://<host>:<port>/omsdk/rm
/omsdk/rm points to the wireless application. It displays a screen with two choices:
This selection displays a screen with a text field that enables you to enter a URL to visit.
This selection displays a screen (Figure 7-1, Screen 1) that lists all the applications in a certain directory (see Section 7.2.1, "Screens for the Wireless Application").
To access the application from an actual web-enabled wireless client such as a cell phone or PDA, check that you have the following:
Oracle9iAS and the database need to be freely accessible because requests from wireless clients go through gateways, which can communicate only with machines that are outside of any firewalls.
Your application should then appear on the list of applications when you enter the URL and follow the steps listed in Section 7.6.1, "Using a Simulator".
|
|
 Copyright © 2002 Oracle Corporation. All Rights Reserved. |
|