Release 9.0
Part Number A92102-01
Home |
Solution Area |
Contents |
Index |
| Oracle9iAS Reports Services Publishing Reports to the Web Release 9.0 Part Number A92102-01 |
|
Now that pluggable data sources are part of the benefits offered to you through Oracle9iAS Reports Services, you may want to spare your users having to log in to multiple data sources in order to run one job. You can do this through single sign-on (SSO).
SSO enables you to establish unique identities for each user that are tied to resources unique to that user. The user's resources contain key-identified connection strings for accessing different data sources. The user is uniquely identified through his or her once-per-session login, and the login references the user's resources to ensure that he or she has access to the appropriate data sources, without users having to enter this information themselves.
SSO is made possible through the partnership of Oracle9iAS Reports Services, Oracle Internet Directory, and the Oracle Login Server, all delivered through the Oracle9i Application Server.
SSO can be implemented only in a secure server environment. This means that you must have a security policy in place in your Reports Server configuration file before you can consider implementing SSO with Reports.
|
Note:
Security settings are discussed in the following places: Chapter 3, "Configuring Oracle9iAS Reports Services" tells you how to specify the Java class that defines the security policy for the server; Chapter 5, "Controlling User Access" tells you how to apply security settings to servers, printers, and reports through Oracle9iAS Portal; Appendix A, "Command Line Arguments" provides information about the |
With SSO, your administrator establishes a user identity for each user. The administrator does this in the Oracle Internet Directory (OID), through its user interface, the Delegated Administration Service (DAS), or through Oracle9iAS Portal (once you register a user in Portal, that information is saved to the OID).
The user identity is comprised of the user name and password. Once users are established, the administrator can assign resources to them, comprised of connection strings to different data sources. At login, users will enter their user names and passwords (their user identities), which will in turn have access to all resources associated with those identities. The Oracle Login Server issues a session cookie that effectively acts as a key that opens all authorized doorways for that session.
This chapter discusses data source SSO. It includes information about the architecture of the SSO environment and helpful tips for setting up user resources (connection strings) for SSO.
|
Note: For detailed information about the requirements and procedures required for setting up SSO-related components, such as the Oracle Internet Directory, see the Oracle Internet Directory Administrator's Guide and the Oracle HTTP Server Administrator's Guide on the Oracle9iAS documentation CD and on the Oracle Technology Network (http://otn.oracle.com). |
This chapter contains the following main sections:
Figure 7-1 provides an overview of SSO component architecture.
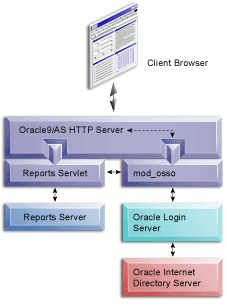
The components of the SSO environment include:
Within the context of SSO, the Oracle HTTP server acts as an intermediary between the client and mod_osso.
The mod_osso module is an Oracle Login Server partner application that provides authentication support. In the Reports environment, it acts as an intermediary between the Reports Servlet and the Oracle Login Server.
The Reports Servlet is a component of Oracle9iAS Reports Services that runs inside of the Oracle HTTP Server's Oracle9iAS Containers for Java 2 Enterprise Edition (OC4J). Within the SSO context, the Reports Servlet acts as an intermediary between mod_osso and the Reports Server.
The Reports Server processes client requests, which includes ushering them through authentication and authorization checking, scheduling, caching, and distribution. Within the context of SSO, the Reports Server informs the Reports Servlet whether or not the Reports Server is secure.
The Oracle SSO Server is responsible for managing users' single sign-on sessions. The mod_osso module is the intermediary between the Reports Servlet and the SSO Server. The mod_osso module passes authentication requests to the server. The server verifies users' login credentials by looking them up in the Oracle Internet Directory (OID).
OID is a repository for user information. This includes personal information, such as home address, e-mail, and telephone number, as well as access information, such as user IDs and connection strings. OID is Oracle's native Lightweight Directory Access Protocol version 3 (LDAPv3) service. It's built as an application on top of the Oracle9i relational database. All LDAP-enabled products that Oracle produces, including Oracle9i, Oracle9iAS, and Oracle9iAS Portal, ship as supported Oracle Internet Directory clients.
DAS provides the user interface service for management of users and groups in OID. You use the DAS interface to enter user and connection string information into OID. DAS is a servlet written as an OID client. You access it through a browser, through a URL you set up during installation.
A transaction in an SSO environment follows these steps:
Although the Oracle Internet Directory (OID) provides tools that enable you to batch load users from an LDAP source to the OID, there currently are no tools for doing the same for those users' connection strings (the passwords and schema IDs that allow users to access data sources). Consequently, this information must be entered manually, or a procedure must be developed to handle it. (A knowledgeable LDAP programmer can create a procedure that will populate the resources in OID.)
In the presence of a large user base, this task can be daunting.
Fortunately, there are a couple of methods wherein each user enters his or her own connection string information. This section provides an overview of those methods.
To begin with, both methods require that your users are already entered into the OID. If you are new to the OID, and you have your user base entered in some other LDAP data source, you can use the tools OID provides to batch load your users.
|
Note: See the Oracle Internet Directory Administrator's Guide for information on batch loading. You'll find it on the Oracle9iAS documentation CD and on the Oracle Technology Network (http://otn.oracle.com). |
If you do not have users in an LDAP data source, you must enter them manually.
The first method for getting users to enter their own connection string information is to give them access to OID. The user interface into OID is called Oracle Delegated Administration Service, or DAS.
|
Note: Before users can access DAS, an administrator must have already entered a user identity in the OID for each user. This can be done by batch loading information that is already entered into an LDAP directory in some other source. See the Oracle Internet Directory Administrator's Guide for information on batch loading. You'll find it on the Oracle9iAS documentation CD and on the Oracle Technology Network (http://otn.oracle.com). |
During Oracle9iAS installation, you specify the location of DAS. When you provide users access to DAS, you do so by giving them a URL that points to this location.
Once in DAS, users can enter their own information via the Resource Assignment section of the Extended Preferences tab. One possible hitch with this scenario is that, for the Extended Preferences tab to appear to users, there must already be a resource in place.
You could enter default resources for your user base, but this might also prove too time consuming.
The second method is probably more secure and more efficient. It's more secure in that it does not require that users make a direct entry into DAS. It's more efficient in that the information entry is just an integral part of sending a report request.
This method involves letting users enter their own information the first time they log in to a data source.
The OID administrator sends an e-mail to each user with a URL to a report. Each e-mail includes a unique password and schema connection string for the recipient and contains instructions to the user to use that connection string.
The URL includes the SSOCONN command line option, which calls a connection key or keys that do not yet exist. For example:
ssoconn=mykey1/DB,mykey2/PDSApp
Each URL can call the same connection key (e.g., mykey1). Because, rather than the key name, the unique information is the data that each user enters.
The user enters the connection information when prompted, and that information is automatically saved in the OID.
In the future, when users run reports, they'll be prompted for their user identity, that is, their user name and password. The resulting cookie will contain the user identity, which will be sent to the Reports Servlet to get connection string information (resources) in OID.
|
|
 Copyright © 2002 Oracle Corporation. All Rights Reserved. |
|