Version 9.0.2
Part Number A90879-02
Home | Solution Area | Contents |
Index |
| Oracle9iAS Discoverer Plus User's Guide Version 9.0.2 Part Number A90879-02 |
|
This chapter explains how to use Discoverer's sorting capabilities such as alphabetical, numeric, and group sorting. This section contains the following topics:
Sorting is the process of arranging data into meaningful order so that you can analyze it more effectively. For example, you might want to order sales data by calendar month so that you can produce a graph of sales performance. You can use Discoverer to sort data as follows:
Sorting worksheet data also makes it easier to analyze. For example, you might want to sort sales data from most profitable sales to least profitable sales to show the relative position of your company's best selling products.
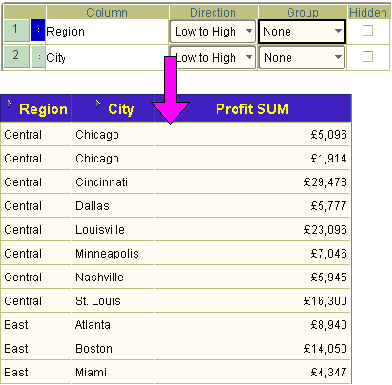
Discoverer offers great flexibility when sorting data within data. You can do this to many different levels. For example, you can sort by City within Region.
Note: Discoverer sorts data according to the alphabetical or numeric sequence most appropriate for the local language. For more information about choosing a language when you start Discoverer, contact the Discoverer manager.
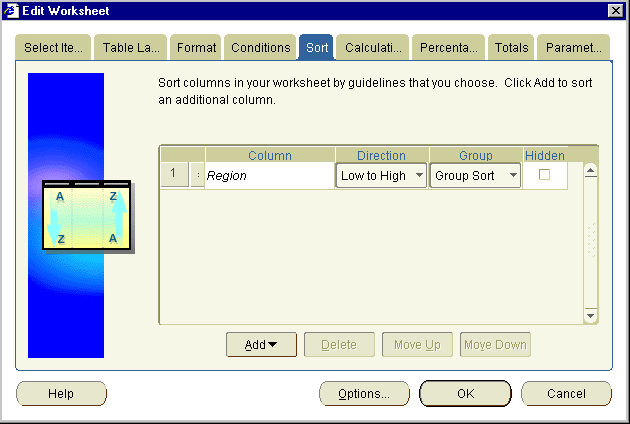
On table worksheets, you can sort columns individually or in groups. For example, the figure below shows a worksheet sorted on one item (Region) in the order low to high (i.e. A to Z).

The figure below shows a table worksheet sorted on two items, City within Region in the order low to high (i.e. A to Z).
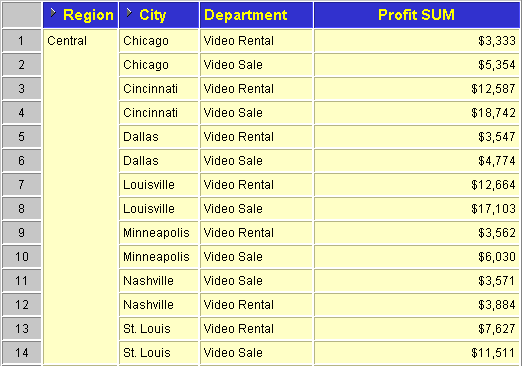
For more examples on sorting in Discoverer, see "Examples of sorting".
On crosstab worksheets, you can sort by either of the following:
By default, Discoverer sorts data on a crosstab automatically as follows:
Because the location of data on a crosstab worksheet determines the relationship of one data item to another, sorting on a crosstab worksheet is different to sorting on a table worksheet. When you sort on a crosstab worksheet, you typically want to maintain data relationships while rearranging the data.
Whichever way you sort (i.e. by column or row) Discoverer automatically maintains data relationships.
Note: On crosstab worksheets, you can remove additional sorts that you have added to the worksheet but you cannot remove the original default sort.
The figure below shows a crosstab worksheet sorted on Profit SUM in the order high to low (i.e. A to Z).
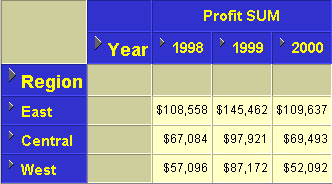
Note: In the example above, the worksheet is sorted on Region by default. This default sort cannot be removed.
For more examples on sorting in Discoverer, see "Examples of sorting".
Group sorting is a facility available on table worksheets that removes repeated values to make reports easier to analyze. Group sorting has the following effects:
In figure below, the worksheet on the left has the Group Sort option turned off, and the worksheet on the right has the Group Sort option turned on.
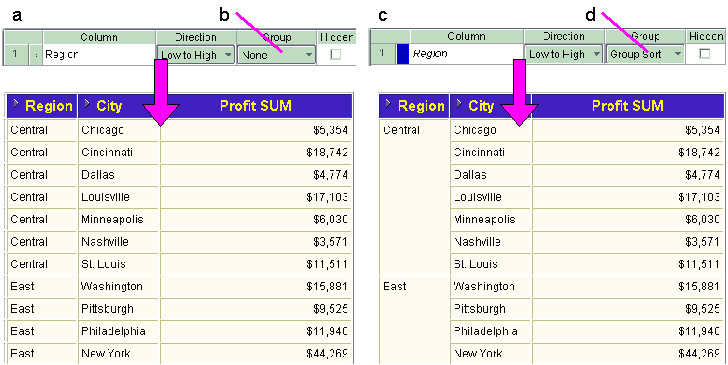
Key to figure:
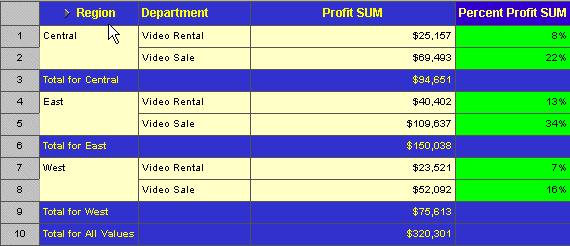
You can also sort data within groups. The following example shows data that is first sorted by Region, and then sorted within each Region group by Profit Sum from low to high. You can easily see the relative profit standings of each department within each region.
You sort worksheet data to arrange it for more effective analysis. For example, you might want to sort a list of sales figures numerically so that you analyze the relative standing of sales people.
To sort data on a table worksheet:
Text description of the illustration st.gif
The Sort Table dialog displays current sort options in a sort list.
Hint: You can also:
Discoverer refreshes the worksheet according to the sort options that you select.
You sort a crosstab when you want to change the default sort order that is automatically applied to crosstab worksheets (for more information, see "About sorting on crosstab worksheets").
To sort data on a crosstab worksheet:
Text description of the illustration sct.gif
The Sort Table dialog displays current sort options in a sort list.
Discoverer refreshes the worksheet according to the sort options that you select.
You use the group sort facility on table worksheets to arrange data for more effective analysis and remove repeated values to make data more presentable.
Note: You cannot use group sorting on crosstab worksheets.
To group sort data:
Text description of the illustration st.gif
The Sort Table dialog displays current sort options in a sort list.
Hint: If the sort list is empty, click Add then select an item to add it to the sort list.
Note: Group sorts take precedence over non-group sorts. Therefore, if there is more than one item in the sort list, the item you selected automatically becomes the first item in the sort list.
Discoverer refreshes the worksheet according to the group sort options that you select.
You can change the sort order of worksheet data at any time. For example, to reverse the sort order, hide the sorted column, or change a sort into a group sort.
To edit a sort:
The Sort dialog displays current sort options in a sort list.
Discoverer refreshes the worksheet according to the sort options that you select.
When you no longer want to sort a worksheet, you can remove the sort(s) from the worksheet. For example, you might have created a temporary sort to produce an ad hoc report that you now want to remove.
Table worksheets and crosstab worksheets behave differently, as follows:
Note: Crosstab worksheets are group sorted automatically (for more information, see "About sorting on crosstab worksheets").
To delete a sort:
The Sort dialog displays current sort options in a sort list.
Note: On crosstab worksheets, you cannot remove the original default sort (see "About sorting on crosstab worksheets").
Discoverer refreshes the worksheet according to the sort options that you select.
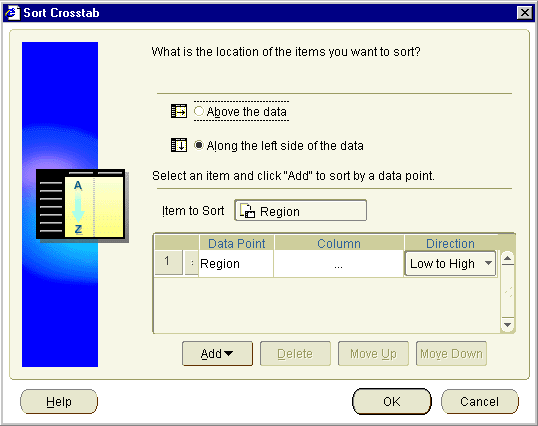
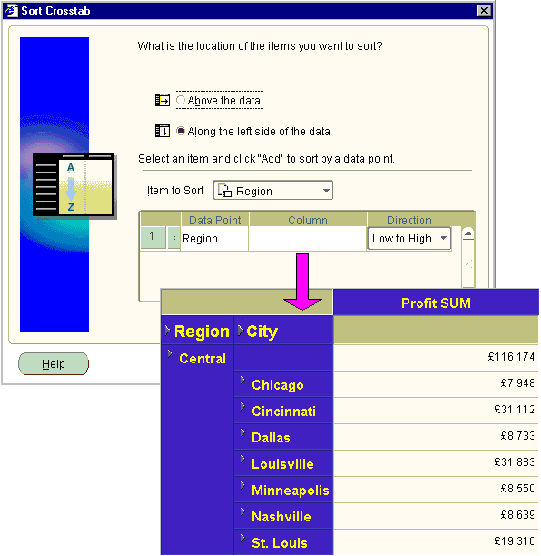
Example 1: This example shows how to use the Sort Crosstab dialog to sort a crosstab worksheet. In the figure below, a table worksheet is sorted on Region, which is on the left axis.
Example 2: This example shows how to use the Sort dialog to sort on one item within another item. In the figure below, you want to sort on City within Region. To specify Region as the primary sort, you place Region in the sort list as item 1. To specify City as the secondary sort, you place City in the sort list as item 2. You can add further levels of sorting as required.
|
|
 Copyright © 2002 Oracle Corporation. All Rights Reserved. |
|