Version 9.0.2
Part Number A90879-02
Home | Solution Area | Contents |
Index |
| Oracle9iAS Discoverer Plus User's Guide Version 9.0.2 Part Number A90879-02 |
|
This chapter explains how to use some of Discoverer's advanced features, and includes the following topics:
This section describes how to improve productivity using Discoverer's scheduling facilities, and includes the following topics:
Scheduled workbooks are Discoverer workbooks that are processed at a specified time and frequency in the database. For example, regular weekly reports or complex reports that must be processed at off-peak times.
Note: You must have the required privileges to schedule workbooks. Contact the Discoverer manager for more details.
When scheduled workbooks are processed, scheduled workbook results are produced. Scheduled workbook results can then be analyzed just like ordinary Discoverer workbooks. For example, to produce reports and graphs.
You do not have to be connected to Discoverer to process scheduled workbooks.
For more information about how workbooks are processed, see "About how scheduled workbooks are processed?"
The figure below illustrates how a scheduled workbook produces regular scheduled workbook results at a specified time.
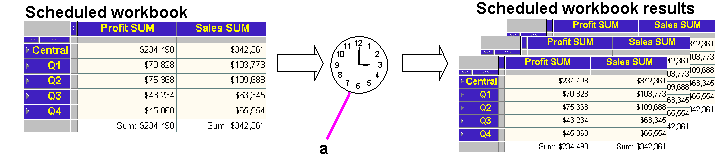
Key to figure:
Typically you schedule workbooks in any of the following circumstances:
Scheduled workbooks have the following characteristics:
In the figure below, a workbook is scheduled to run at 1.00 a.m. on January 1, 2003, and then once a week at the same time.
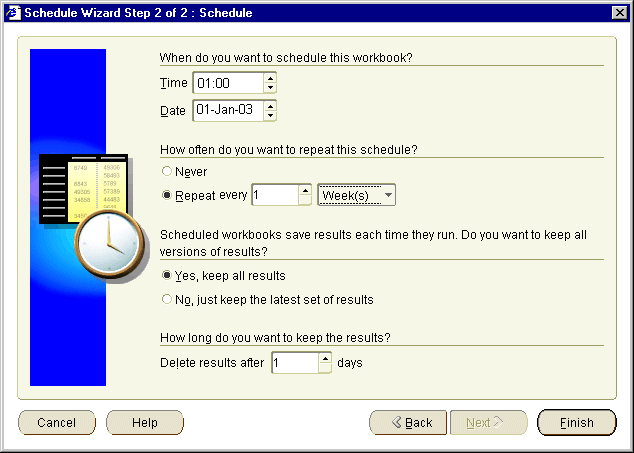
Key to figure:
Scheduled workbook results can be viewed in Discoverer Plus or Discoverer Viewer.
You can open scheduled workbook results at any time when connected to Discoverer.
When you connect to Discoverer, you are alerted when scheduled workbook results have been processed and are ready to open.
Discoverer processes scheduled workbooks as follows:
When you create a new workbook, you schedule it when you want to process the workbook at a particular time and frequency. For example, to process a daily sales workbook at 1.00 a.m. every morning (because that is when the network has spare capacity).
To schedule the currently opened workbook:
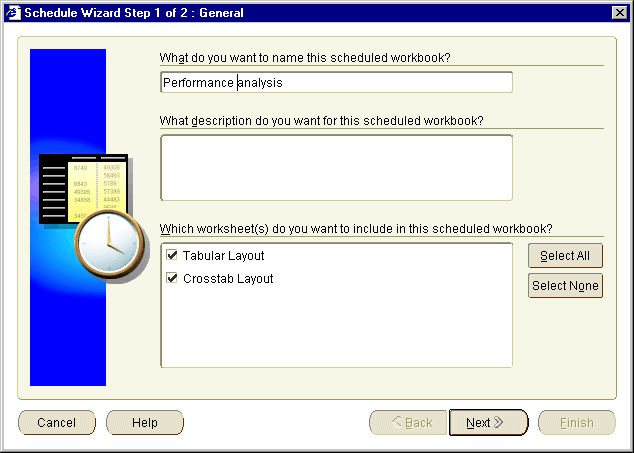
Text description of the illustration sw1.gif
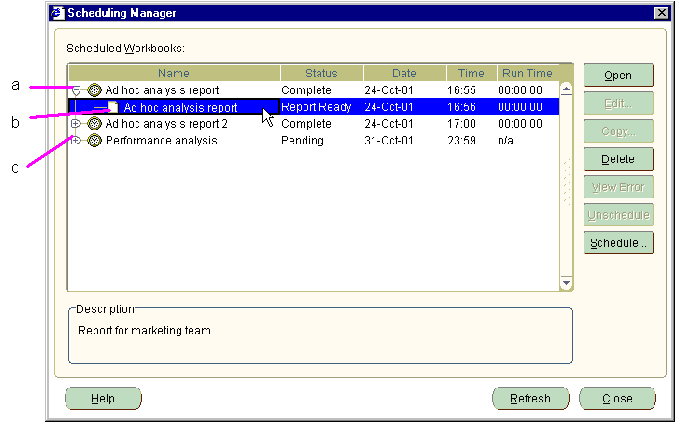
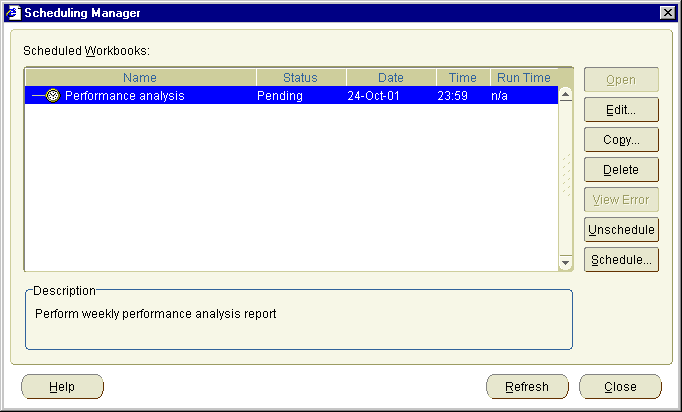
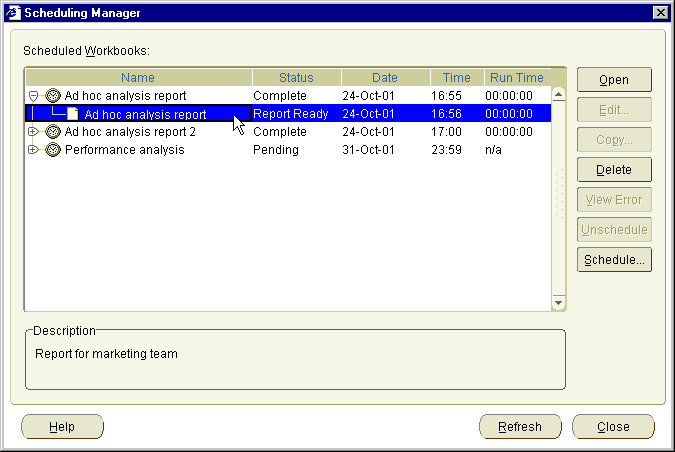
Hint: To monitor the progress of scheduled workbooks, use the "Scheduling Manager dialog". Choose File | Manage Workbooks | Scheduling Manager to display the "Scheduling Manager dialog"
You schedule unopened workbooks using the Scheduling Manager. For example, you might want to schedule a workbook previously created by another Discoverer user.
To schedule a workbook:
Text description of the illustration sw3.gif
Hint: To monitor the progress of scheduled workbooks, use the "Scheduling Manager dialog". Choose File | Manage Workbooks | Scheduling Manager to display the "Scheduling Manager dialog"
You change the properties of a scheduled workbook when you want to change how it is configured. For example, to change when a workbook is processed.
To edit a scheduled workbook:
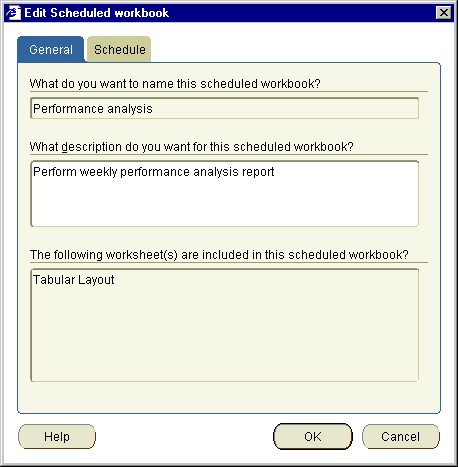
Text description of the illustration sw4.gif
Hint: To monitor the progress of scheduled workbooks, use the "Scheduling Manager dialog". Choose File | Manage Workbooks | Scheduling Manager to display the "Scheduling Manager dialog"
You copy a scheduled workbook when you want to quickly create a new scheduled workbook based on an existing scheduled workbook. For example, when a similar scheduled workbook already exists that you want to use as a template to quickly schedule a workbook.
To copy a scheduled workbook:
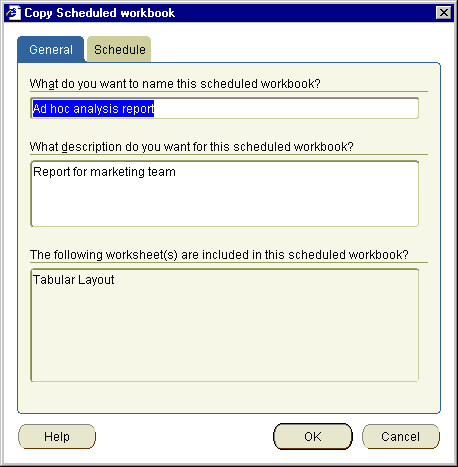
Text description of the illustration sw6.gif
Note: Enter a unique name here for the new scheduled workbook. If you do not enter a unique name, Discoverer generates a unique name for you and prompts you to verify the name.
The new scheduled workbook is displayed in the "Scheduling Manager dialog".
Hint: To monitor the progress of scheduled workbooks, use the "Scheduling Manager dialog". Choose File | Manage Workbooks | Scheduling Manager to display the "Scheduling Manager dialog"
You unschedule a workbook when you want to stop a scheduled workbook being processed. For example, when you no longer need to produce a monthly report. You can choose either to keep all results for this scheduled workbook or delete all results.
To unschedule a scheduled workbook:
Text description of the illustration sw3.gif
Changes to the scheduled workbook are reflected in the "Scheduling Manager dialog".
Hint: To monitor the progress of scheduled workbooks, use the "Scheduling Manager dialog". Choose File | Manage Workbooks | Scheduling Manager to display the "Scheduling Manager dialog"
You delete scheduled workbook results when you no longer need to use results generated by scheduled workbooks. For example, you might have monthly reports that have accumulated over the previous year that you want to delete permanently.
When you delete scheduled workbook results, you have the following options:
To delete a scheduled workbook:
Text description of the illustration sw3b.gif
Note: You can select more than one list item by pressing the Ctrl key and clicking another list item.
Changes to the scheduled workbook are reflected in the "Scheduling Manager dialog".
Hint: To monitor the progress of scheduled workbooks, use the "Scheduling Manager dialog". Choose File | Manage Workbooks | Scheduling Manager to display the "Scheduling Manager dialog"
This section describes how to improve productivity using Lists of Values (LOVs) in Discoverer, and includes the following topics:
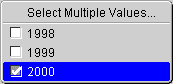
LOVs contain a list of valid values for an item. For example, a LOV for a year item might contain the values 1998, 1999, and 2000 (see figure below).
You use LOVs in:
LOVs are used in the following way:
This section contains examples of using LOVs.
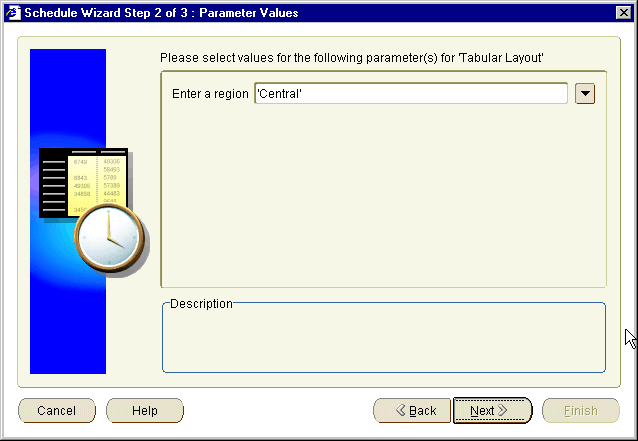
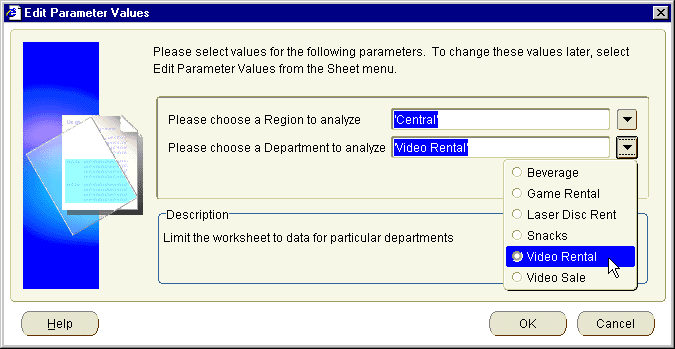
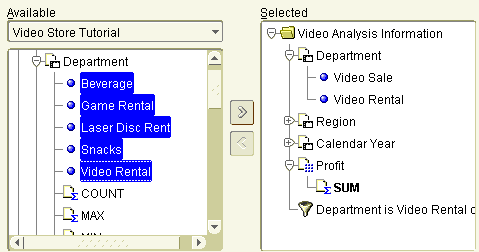
In the figure below, a LOV has been created on the department item, containing the departments Video Rental, Video Sale etc. If a LOV was not defined on Department, you might enter 'Video Hire' here, which would result in an empty worksheet because the database does not contain this department. The figure below shows the value Video Rental being selected from a LOV in a parameter dialog.
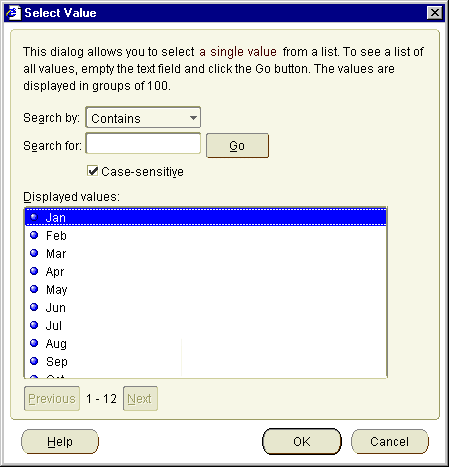
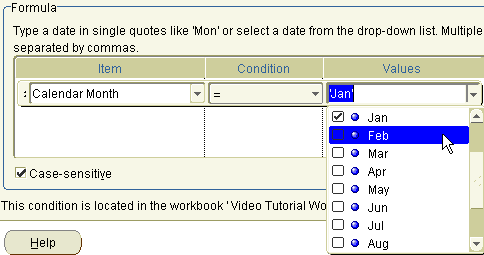
LOVs are also used when you create conditions. For example, in the figure below, the LOV containing months is used to choose values against which to match worksheet data. The figure below shows the value Feb (i.e. February) being selected from a LOV in a condition dialog
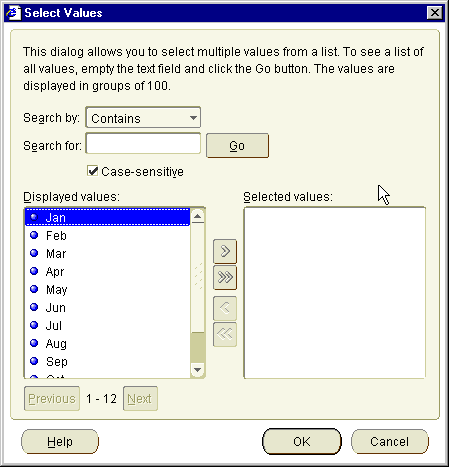
LOVs are also used in the Discoverer item navigator. For example, in the figure below, the LOV values Video Sales and Video Rentals are selected for display on a worksheet. In other words, the LOV values are used to filter the worksheet. The figure below shows the values Video Sale and Video Rental being selected in the Discoverer item navigator.
Note: LOVs in the Discoverer item navigator might be turned off. Contact the Discoverer manager for more details.
When LOVs contain a large number of values, Discoverer displays a dialog that enables you to search LOV values and select the values that you want. For example, if a LOV contains hundreds of values, you can select only values that begin with the letter 'A', or select only values that contain 'CPM'.
Note: For more information about Discoverer dialogs used to search LOVs, see "Select Value dialog" and "Select Values dialog".
When using long LOVs, the following rules apply:
For more information about selecting values from long LOVs, see "How to select single values from long LOVs" and "How to select multiple values from long LOVs".
When LOVs contain a large number of values, you select single LOV values using the "Select Value dialog". For example, to analyze data from the year 2000, you select 2000 from the LOV.
To select single values from long LOVs:
For example, Starts with or Equals.
For example, if you choose 'Starts with', type A to find LOV values that begin with A.
Note: For quicker searches, select the Case-sensitive check box.
Values that match the search criteria are displayed in the Displayed values list. Values are displayed in groups. For example, groups of 50 or groups of 100.
The LOV value that you specify is selected.
When LOVs contain a large number of values, you select multiple LOV values using the "Select Values dialog". For example, if you want to analyze data from the values beginning with 'CPM', you select CPM from the LOV.
To select multiple values from long LOVs:
For example, Starts with or Equals.
For example, if you choose 'Starts with', type A to find LOV values that begin with A.
Note: For quicker searches, select the Case-sensitive check box.
Values that match the search criteria are displayed in the Displayed values list. Values are displayed in groups. For example, groups of 50 or groups of 100.
The LOV values that you choose are selected.
This section explains how to use Discoverer's default settings, and contains the following topics:
Discoverer's default Graphical User Interface (GUI) settings determine Discoverer's appearance and behavior. You can change the default options to suit your preferences and requirements. For example, you might want new worksheets to have a grey background and blue text. Or you might want to limit the amount of data returned by a query so that worksheets are not too large.
You are advised to only change your default settings in one of the following circumstances:
Default settings are applied in the following manner:
Note: In addition to opening the Options dialog from the menus, you can also open the Options dialog by clicking the Options button in other dialogs (where available). In this case the options might apply only to worksheet components configured by that dialog.
You change default settings to change Discoverer's appearance and behavior. For example, you might want to:
To change default settings:
| Tab | Use to |
|---|---|
|
Specify how Discoverer displays data when worksheets are first opened |
|
|
Specify how Discoverer uses summaries, and how Discoverer manages queries |
|
|
Specify how Discoverer displays worksheets, such as with titles, grid lines, row numbers, and the number of rows per screen |
|
|
Specify how Discoverer displays new worksheet headings, data, and totals |
|
|
Specify how Discoverer uses automatic querying, fan trap detection and resolution, and multiple join paths (for more information on these options, see "Notes on setting Advanced options") |
|
|
Specify a default End User Layer (EUL). The Discoverer manager may have given you access to more than one EUL |
Changes to default options that you save take effect when you close the dialog.
Sometimes, after changing the default formats for a workbook, you might want to revert to the original default format settings. For example, if you change default text fonts to produce a particular style of report, you might want to set the text fonts back to their original default style.
Instead of changing each format setting individually, you can use the Reset facility.
Note: Default formats apply to all worksheets in a workbook.
To revert to original default format settings:
For example, Date Format or Heading Format.
If you reset the default formats, these original default formats apply when you close the Options dialog.
If you are a Discoverer manager, or an experienced Discoverer user, the following topics are relevant to the "Options dialog: Advanced tab".
When automatic querying is turned on, Discoverer automatically re-queries the database to get the up-to-date data every time a worksheet is changed to display different data. For example, when you add or remove an item, or pivot items.
In some circumstances however, you might not want Discoverer to automatically re-query the database every time you change the worksheet layout. For example, you might want to make several changes at once and not perform a re-query until you have finished.
Fan traps occur when the data items in two folders are not directly related but do have a relationship based on the data items in a third folder.
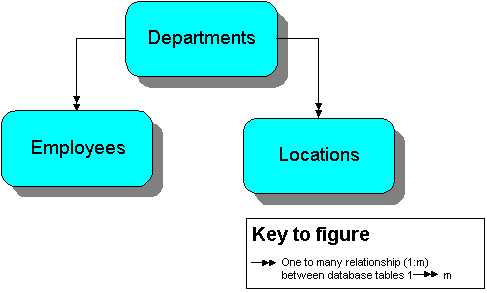
For example, a database contains three tables:
The figure below shows that the Department table is a master table to the Employees table and the Locations table in a relational one to many (1:M) relationship.
Each employee is associated with a single department because each employee works in only one department. In addition, each employee can only be based in one location. However, departments are associated with multiple locations because departments can have offices in different cities. Consequently, because of the mutual association of employees and locations with the Departments table, employees become unintentionally associated with multiple locations. This is incorrect because employees can only be in one location.
For example, a query to count the number of employees at each location and department produces an incorrect result. The same employee is counted at multiple locations because the departments are at multiple locations. In the example below, the real number of employees is four, but the query produces a count of eight employees. Clark, Miller, and Scott are counted for both London and Tokyo, and King is counted for both Amsterdam and San Francisco. The figure below shows how a query to return the number of employees returns eight rows in a fan trap relationship instead of four rows.
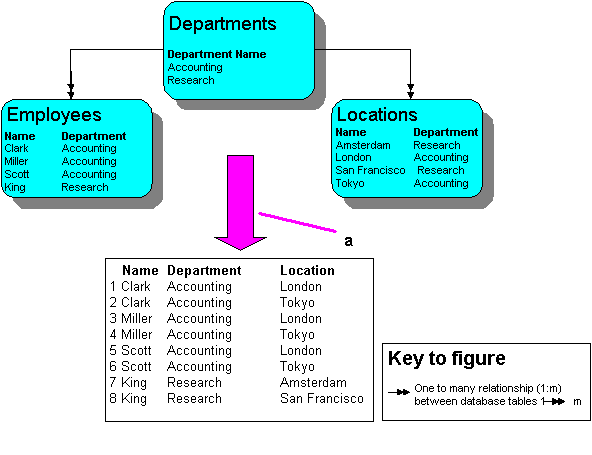
Key to figure:
When you create a worksheet, Discoverer automatically detects and resolves fan traps. If the fan trap is unresolvable, Discoverer disallows the worksheet and displays an error message.
For more information about enabling and disabling fan trap detection in Discoverer , see the "Options dialog: Advanced tab".
When you create new worksheets, the data items in the worksheets are often stored in multiple folders in the database. Discoverer checks to make sure that:
Multiple join paths occur when two tables can be linked in more than one way. For example, a sales order database might be linked to a customer database on the Customer ID field, because both tables contain the field Customer ID. If both tables also contain a field called Location, this provides an alternative join path for the two tables. This is known as a multiple join path.
Multiple join paths occur when databases are organized so that the relationships between items in different tables are ambiguous. When you are create new worksheets, Discoverer can automatically detect and warn you if potential multiple join paths exist. This ensures that you always get the results that you expect, because you do not associate items in a way that you did not intend.
Multiple join path warnings are not error messages. The warnings merely advises you that the database contains ambiguous relationships. If warnings occur, contact the Discoverer manager who can determine if the database's organization needs to be modified.
Note: To detect multiple join paths, make sure that the Disable Multiple Join Path Detection option is not selected on the "Options dialog: Advanced tab".
This section is aimed at experienced Discoverer users who are familiar with SQL (Structured Query Language) and who are interested in Discoverer's advanced facilities. Discoverer managers will also find this section useful.
This section contains the following topics:
SQL is a generic programming language used to extract and manipulate data in a database. In other words, SQL enables you to ask a question (known as a query) of the database that the database answers by displaying data.
For example, you might use SQL to ask the question 'Which products sell more than 10,000 per year?'. The database uses SQL to return a list of products that sell more than 10,000, and may also perform other analysis such as sorting, grouping, and totalling of the data.
SQL is a powerful language, but is difficult to learn and use. Although Discoverer itself uses SQL to display and analyze worksheet data, Discoverer users are shielded from underlying SQL.
Because Discoverer shields Discoverer users from underlying SQL, they do not need to know how SQL works. This enables users with no technical database experience and no knowledge of underlying database structures to perform sophisticated data analysis.
However, in some circumstances, you may want to look at SQL being used by Discoverer. For example, to improve Discoverer performance you might need to look at underlying SQL to ensure that queries are being run efficiently.
Summaries are database tables that contain commonly accessed, pre-processed data, which gives the following benefits:
A summary folder is how Discoverer represents an underlying summary or materialized view. Summaries and materialized views pre-compute and store aggregated data for use in SQL queries.
Summaries are created by the Discoverer manager to improve the performance of Discoverer, to help do your work more quickly and efficiently. Summary tables and materialized views are created as follows:
Note: For more information on summaries and materialized views, refer to the Oracle8i Data Warehousing Guide.
An execution plan is a sequence of operations that the Oracle Server performs to execute a SQL statement.
When looking at the underlying SQL that Discoverer is using, use the Discoverer execution plan tab to look the underlying execution plan being used.
You can look at an execution plan to see how a SQL statement is being executed. For example, when using Summaries, you may want to check that a query is using a summary or materialized view created by the Discoverer manager.
When running Discoverer against an Oracle 8 and later database, the server controls query redirection by rewriting the SQL to use materialized views. If a server rewrite occurs, the server Execution Plan tells you the name of the materialized view being used.
For information about materialized views and server rewrites, refer to the Discoverer Administrator Manager's Guide. Contact the Discoverer manager for more information.
Note: With a pre-8.1.6 database, you can look in the SQL tab on the SQL Inspector dialog to see the name of the summary being used.
You view SQL created by Discoverer when you want to see the underlying SQL instructions that Discoverer is using to display the current worksheet.
To view SQL created by Discoverer:
You can then switch to a different application and paste in the text. For example, you might want to paste this text into a text editor, edit the text, then save in a SQL file to that you can execute the file using SQL*Plus.
You view a SQL Execution Plan when you want to see the underlying instructions that Discoverer is sending to the server.
To view the execution plan used by Discoverer:
You can then switch to a different application and paste in the text.
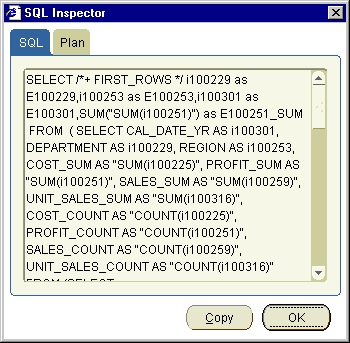
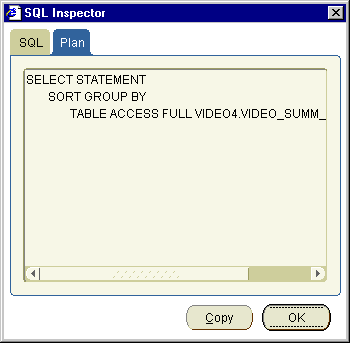
You can use the Execution Plan tab in the SQL Inspector dialog to see the SQL statement that Discoverer sends to the server.
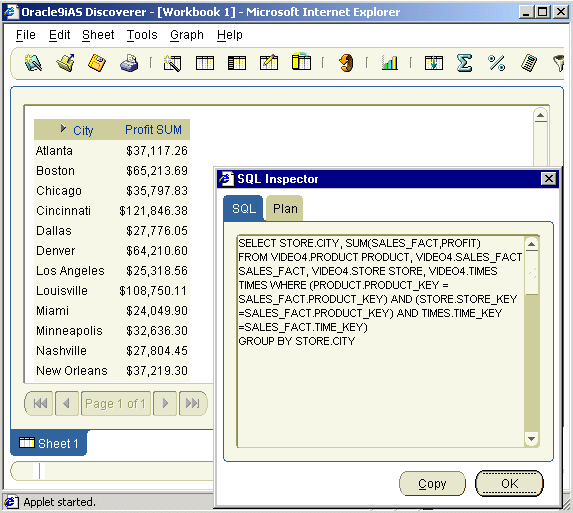
In the figure above, the worksheet contains the City and Profit SUM items. Although the Discoverer manager has created a Summary for these items, the SQL statement displayed in the SQL Inspector: SQL tab does not indicate whether a summary or materialized view is being used. To find out, look at the SQL Inspector: Plan tab (see figure below).
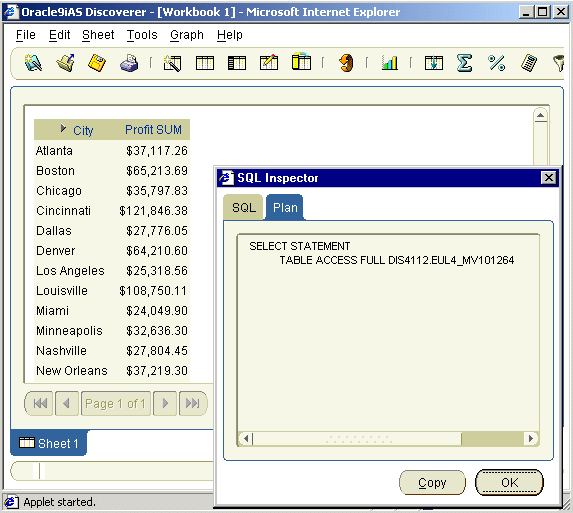
In the figure above, the SQL Inspector Plan: Plan tab shows that a materialized view (called EUL4_MV101264) is being use to retrieve information from the database.
Hint: Names of Materialized views created by Discoverer are prefixed with the EUL name followed by 'MV' and the materialized view ID.
|
|
 Copyright © 2002 Oracle Corporation. All Rights Reserved. |
|