| Oracle® Database Globalization Support Guide 10g Release 2 (10.2) Part Number B14225-02 |
|
|
View PDF |
| Oracle® Database Globalization Support Guide 10g Release 2 (10.2) Part Number B14225-02 |
|
|
View PDF |
This chapter shows how to customize locale data. It includes the following topics:
Creating a New Language Definition with the Oracle Locale Builder
Creating a New Territory Definition with the Oracle Locale Builder
Creating a New Character Set Definition with the Oracle Locale Builder
Creating a New Linguistic Sort with the Oracle Locale Builder
The Oracle Locale Builder offers an easy and efficient way to customize locale data. It provides a graphical user interface through which you can easily view, modify, and define locale-specific data. It extracts data from the text and binary definition files and presents them in a readable format so that you can process the information without worrying about the formats used in these files.
The Oracle Locale Builder manages four types of locale definitions: language, territory, character set, and linguistic sort. It also supports user-defined characters and customized linguistic rules. You can view definitions in existing text and binary definition files and make changes to them or create your own definitions.
This section contains the following topics:
The Oracle Locale Builder uses Unicode characters in many of its functions. For example, it shows the mapping of local character code points to Unicode code points. Oracle Locale Builder depends on the local fonts that are available on the operating system where the characters are rendered. Therefore, Oracle Corporation recommends that you use a Unicode font to fully support the Oracle Locale Builder. If a character cannot be rendered with your local fonts, then it will probably be displayed as an empty box.
There are many Windows TrueType and OpenType fonts that support Unicode. Oracle Corporation recommends using the Arial Unicode MS font from Microsoft, because it includes about 51,000 glyphs and supports most of the characters in Unicode 4.0.
After installing the Unicode font, add the font to the Java Runtime font.properties file so it can be used by the Oracle Locale Builder. The font.properties file is located in the $JAVAHOME/jre/lib directory. For example, for the Arial Unicode MS font, add the following entries to the font.properties file:
dialog.n=Arial Unicode MS, DEFAULT_CHARSET
dialoginput.n=Arial Unicode MS, DEFAULT_CHARSET
serif.n=Arial Unicode MS, DEFAULT_CHARSET
sansserif.n=Arial Unicode MS, DEFAULT_CHARSET
n is the next available sequence number to assign to the Arial Unicode MS font in the font list. Java Runtime searches the font mapping list for each virtual font and uses the first font available on your system.
After you edit the font.properties file, restart the Oracle Locale Builder.
See Also:
Sun's internationalization Web site for more information about thefont.properties fileThere are fewer choices of Unicode fonts for non-Windows platforms than for Windows platforms. If you cannot find a Unicode font with satisfactory character coverage, then use multiple fonts for different languages. Install each font and add the font entries into the font.properties file using the steps described for the Windows platform.
For example, to display Japanese characters on Sun Solaris using the font ricoh-hg mincho, add entries to the existing font.properties file in $JAVAHOME/lib in the dialog, dialoginput, serif, and sansserif sections. For example:
serif.plain.3=-ricoh-hg mincho l-medium-r-normal--*-%d-*-*-m-*-jisx0201.1976-0
Note:
Depending on the operating system locale, the locale-specificfont.properties file might be used. For example, if the current operating system locale is ja_JP.eucJP on Sun Solaris, then font.properties.ja may be used.See Also:
Your operating system documentation for more information about available fontsEnsure that the ORACLE_HOME parameter is set before starting Oracle Locale Builder.
In the UNIX operating system, start the Oracle Locale Builder by changing into the $ORACLE_HOME/nls/lbuilder directory and issuing the following command:
% ./lbuilder
In a Windows operating system, start the Oracle Locale Builder from the Start menu as follows: Start > Programs > Oracle-OraHome10 > Configuration and Migration Tools > Locale Builder. You can also start it from the DOS prompt by entering the %ORACLE_HOME%\nls\lbuilder directory and executing the lbuilder.bat command.
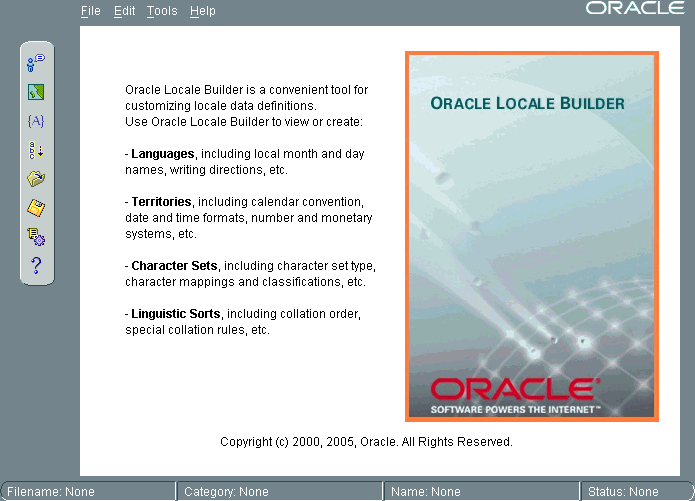
When you start the Oracle Locale Builder, the screen shown in Figure 13-1 appears.
Figure 13-1 Oracle Locale Builder Utility
Before using Oracle Locale Builder for a specific task, you should become familiar with tab pages and dialog boxes that include the following:
Note:
Oracle Locale Builder includes online help.When you choose New Language, New Territory, New Character Set, or New Linguistic Sort, the first tab page that you see is labelled General. Click Show Existing Definitions to see the Existing Definitions dialog box.
The Existing Definitions dialog box enables you to open locale objects by name. If you know a specific language, territory, linguistic sort (collation), or character set that you want to start with, then click its displayed name. For example, you can open the AMERICAN language definition file as shown in Figure 13-2.
Figure 13-2 Existing Definitions Dialog Box
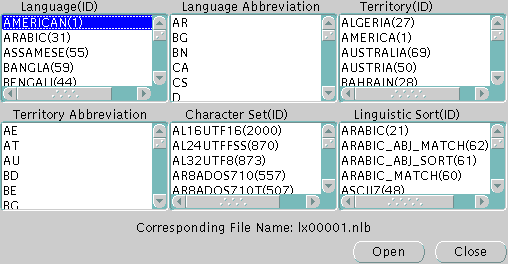
Choosing AMERICAN opens the lx00001.nlb file. An NLB file is a binary file that contains the settings for a specific language, territory, character set, or linguistic sort.
Language and territory abbreviations are for reference only and cannot be opened.
Choose Tools > View Log to see the Session Log dialog box. The Session Log dialog box shows what actions have been taken in the current session. Click Save Log to keep a record of all changes. Figure 13-3 shows an example of a session log.
The NLT file is an XML file with the file extension .nlt that shows the settings for a specific language, territory, character set, or linguistic sort. The Preview NLT tab page presents a readable form of the file so that you can see whether the changes you have made look correct. You cannot modify the NLT file from the Preview NLT tab page. You must use the specific elements of the Oracle Locale Builder to modify the NLT file.
Figure 13-4 shows an example of the Preview NLT tab page for a user-defined language called AMERICAN FRENCH.
You can see the Open File dialog box by choosing File > Open > By File Name. Then choose the NLB file that you want to modify or use as a template. An NLB file is a binary file with the file extension .nlb that contains the binary equivalent of the information in the NLT file. Figure 13-5 shows the Open File dialog box with the lx00001.nlb file selected. The Preview pane shows that this NLB file is for the AMERICAN language.
This section shows how to create a new language based on French. This new language is called AMERICAN FRENCH. First, open FRENCH from the Existing Definitions dialog box. Then change the language name to AMERICAN FRENCH and the Language Abbreviation to AF in the General tab page. Retain the default values for the other fields. Figure 13-6 shows the resulting General tab page.
The following restrictions apply when choosing names for locale objects such as languages:
Names must contain only ASCII characters
Names must start with a letter
Language, territory, and character set names cannot contain underscores
The valid range for the Language ID field for a user-defined language is 1,000 to 10,000. You can accept the value provided by Oracle Locale Builder or you can specify a value within the range.
Note:
Only certain ID ranges are valid values for user-definedLANGUAGE, TERRITORY, CHARACTER SET, MONOLINGUAL COLLATION, and MULTILINGUAL COLLATION definitions. The ranges are specified in the sections of this chapter that concern each type of user-defined locale object.Figure 13-7 shows how to set month names using the Month Names tab page.
All names are shown as they appear in the NLT file. If you choose Yes for capitalization, then the month names are capitalized in your application, but they do not appear capitalized in the Month Names tab page.
Figure 13-8 shows the Day Names tab page.
You can choose day names for your user-defined language. All names are shown as they appear in the NLT file. If you choose Yes for capitalization, then the day names are capitalized in your application, but they do not appear capitalized in the Day Names tab page.
Figure 13-9 shows the Common Info tab page.
You can display the territories, character sets, Windows character sets, and linguistic sorts that have associations with the current language. In general, the most appropriate or the most commonly used items are displayed first. For example, with a language of FRENCH, the common territories are FRANCE, BELGIUM, CANADA, and DJIBOUTI, while the character sets for supporting French are WE8ISO8859P1, WE8MSWIN1252, AL32UTF8, and WE8ISO8859P15. As WE8MSWIN1252 is more common than WE8ISO8859P1 in a Windows environment, it is displayed first.
This section shows how to create a new territory called REDWOOD SHORES and use RS as a territory abbreviation. The new territory is not based on an existing territory definition.
The basic tasks are as follows:
Assign a territory name
Choose formats for the calendar, numbers, date and time, and currency
Figure 13-10 shows the General tab page with REDWOOD SHORES specified as the Territory Name, 1001 specified as the Territory ID, and RS specified as the Territory Abbreviation.
Figure 13-10 General Tab Page for Territories
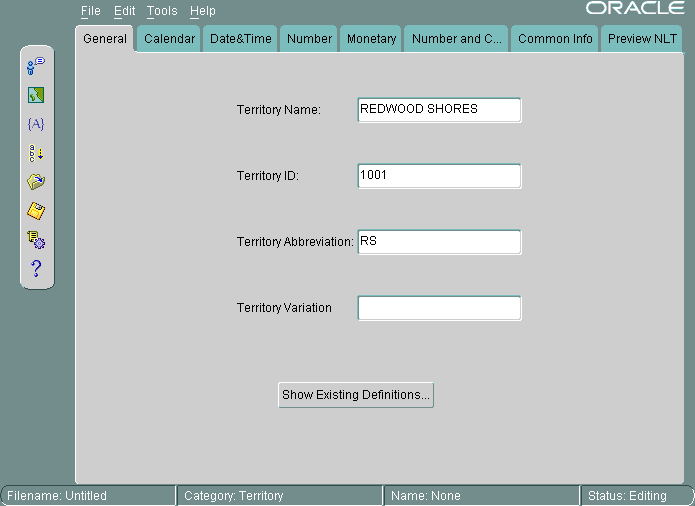
The valid range for Territory ID for a user-defined territory is 1000 to 10000.
Figure 13-11 shows settings for calendar formats in the Calendar tab page.
Monday is set as the first day of the week, and the first week of the calendar year is set as an ISO week. Figure 13-11 displays a sample calendar.
See Also:
"Calendar Formats" for more information about choosing the first day of the week and the first week of the calendar year
"Customizing Calendars with the NLS Calendar Utility" for information about customizing calendars themselves
Figure 13-12 shows the Date&Time tab page.
Figure 13-12 Choosing Date and Time Formats
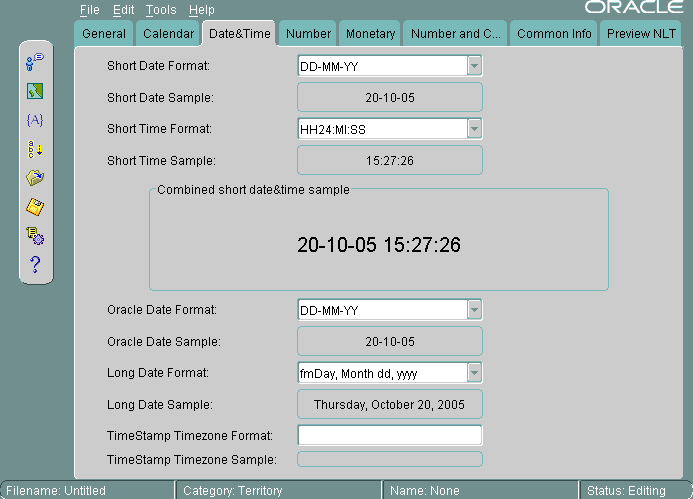
When you choose a format from a list, Oracle Locale Builder displays an example of the format. In this case, the Short Date Format is set to DD-MM-YY. The Short Time Format is set to HH24:MI:SS. The Oracle Date Format is set to DD-MM-YY. The Long Date Format is set to fmDay, Month dd, yyyy. The TimeStamp Timezone Format is not set.
You can also enter your own formats instead of using the selection from the drop-down menus.
Figure 13-13 shows the Number tab page.
A period has been chosen for the Decimal Symbol. The Negative Sign Location is specified to be on the left of the number. The Numeric Group Separator is a comma. The Number Grouping is specified as 3 digits. The List Separator is a comma. The Measurement System is metric. The Rounding Indicator is 4.
You can enter your own values instead of using values in the lists.
When you choose a format from a list, Oracle Locale Builder displays an example of the format.
See Also:
"Numeric Formats"Figure 13-14 shows settings for currency formats in the Monetary tab page.
The Local Currency Symbol is set to $. The Alternative Currency Symbol is the euro symbol. The Currency Presentation shows one of several possible sequences of the local currency symbol, the debit symbol, and the number. The Decimal Symbol is the period. The Group Separator is the comma. The Monetary Number Grouping is 3. The Monetary Precision, or number of digits after the decimal symbol, is 3. The Credit Symbol is +. The Debit Symbol is -. The International Currency Separator is a blank space, so it is not visible in the field. The International Currency Symbol (ISO currency symbol) is USD. Oracle Locale Builder displays examples of the currency formats you have selected.
You can enter your own values instead of using the lists.
See Also:
"Currency Formats"Figure 13-15 shows the Common Info tab page.
You can display the common languages and time zones for the current territory. For example, with a territory of CANADA, the common languages are ENGLISH, CANADIAN FRENCH, and FRENCH. The common time zones are America/Montreal, America/St_Johns, America/Halifax, America/Winnipeg, America/Regina, America/Edmonton, and America/Vancouver.
The rest of this section contains the following topics:
The time zone files contain the valid time zone names. The following information is included for each time zone:
Offset from Coordinated Universal Time (UTC)
Transition times for daylight savings time
Abbreviations for standard time and daylight savings time. The abbreviations are used with the time zone names.
Two time zone files are included in the Oracle home directory. The default file is oracore/zoneinfo/timezlrg.dat. The commonly used and smaller time zones are included in oracore/zoneinfo/timezone.dat.
See Also:
"Choosing a Time Zone File" for more information about the contents of the time zone files and how to install the smaller time zone fileOracle supports several calendars. All of them are defined with data derived from Oracle's globalization support, but some of them may require the addition of ruler eras or deviation days in the future. To add this information without waiting for a new release of the Oracle database server, you can use an external file that is automatically loaded when the calendar functions are executed.
Calendar data is first defined in a text file. The text definition file must be converted into binary format. You can use the NLS Calendar Utility (lxegen) to convert the text definition file into binary format.
The name of the text definition file and its location for the lxegen utility are hard-coded and depend on the platform. On UNIX platforms, the file name is lxecal.nlt. It is located in the $ORACLE_HOME/nls directory. A sample text definition file is included in the $ORACLE_HOME/nls/demo directory.
The lxegen utility produces a binary file from the text definition file. The name of the binary file is also hard-coded and depends on the platform. On UNIX platforms, the name of the binary file is lxecal.nlb. The binary file is generated in the same directory as the text file and overwrites an existing binary file.
After the binary file has been generated, it is automatically loaded during system initialization. Do not move or rename the file.
Invoke the calendar utility from the command line as follows:
% lxegen
See Also:
Operating system documentation for the location of the files on your system
You can display and print the code charts of character sets with the Oracle Locale Builder. From the opening screen for Oracle Locale Builder, choose File > New > Character Set. Figure 13-16 shows the resulting screen.
Figure 13-16 General Tab Page for Character Sets
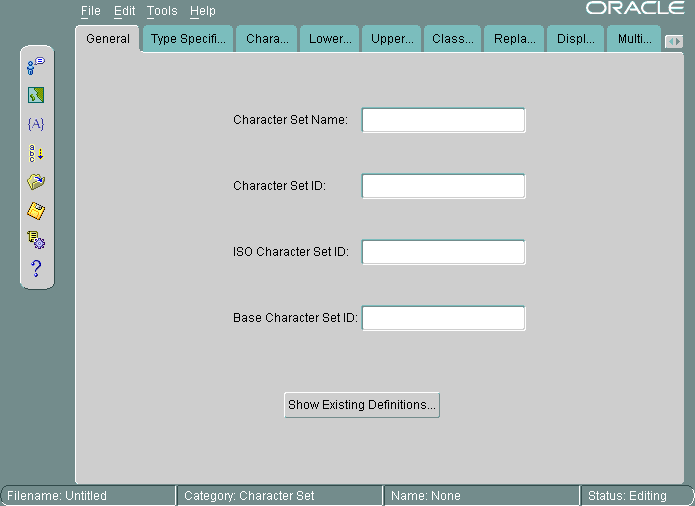
Click Show Existing Definitions. Highlight the character set you wish to display. Figure 13-17 shows the Existing Definitions combo box with US7ASCII highlighted.
Figure 13-17 Choosing US7ASCII in the Existing Definitions Dialog Box
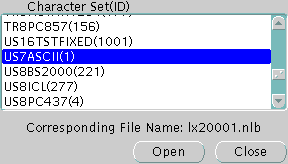
Click Open to choose the character set. Figure 13-18 shows the General tab page when US7ASCII has been chosen.
Figure 13-18 General Tab Page When US7ASCII Has Been Chosen
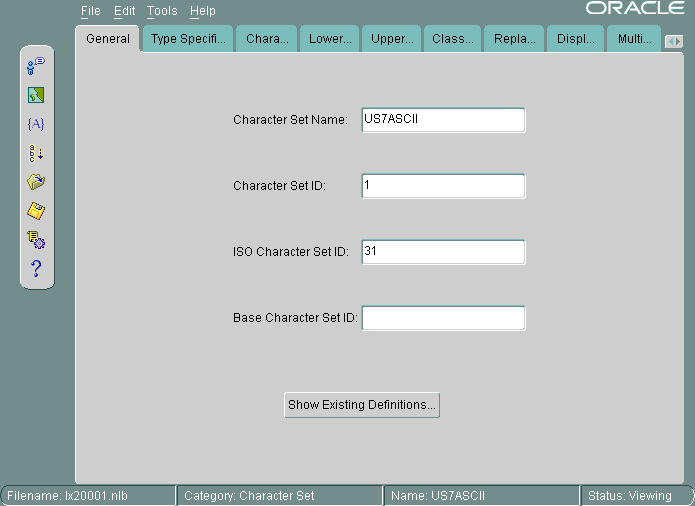
Click the Character Data Mapping tab. Figure 13-19 shows the Character Data Mapping tab page for US7ASCII.
Figure 13-19 Character Data Mapping Tab Page for US7ASCII
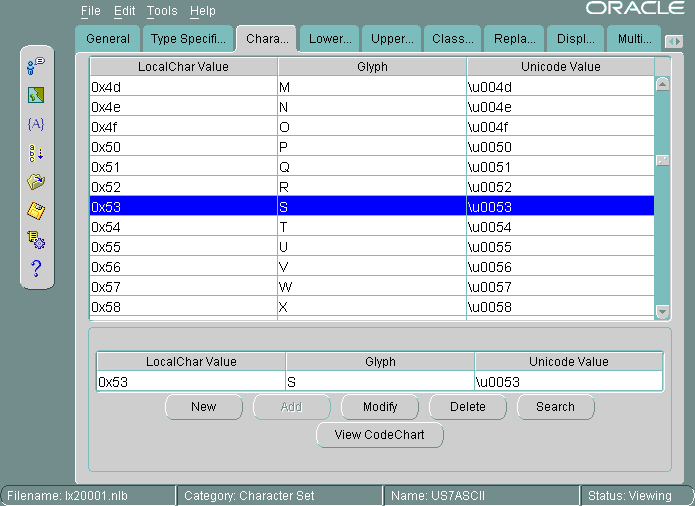
Click View CodeChart. Figure 13-20 shows the code chart for US7ASCII.
It shows the encoded value of each character in the local character set, the glyph associated with each character, and the Unicode value of each character in the local character set.
If you want to print the code chart, then click Print Page.
You can customize a character set to meet specific user needs. You can extend an existing encoded character set definition. User-defined characters are often used to encode special characters that represent the following:
Proper names
Historical Han characters that are not defined in an existing character set standard
Vendor-specific characters
New symbols or characters that you define
This section describes how Oracle supports user-defined characters. It includes the following topics:
User-Defined Character Cross-References Between Character Sets
Guidelines for Creating a New Character Set from an Existing Character Set
Example: Creating a New Character Set Definition with the Oracle Locale Builder
User-defined characters are typically supported within East Asian character sets. These East Asian character sets have at least one range of reserved code points for user-defined characters. For example, Japanese Shift-JIS preserves 1880 code points for user-defined characters. They are shown in Table 13-1.
Table 13-1 Shift JIS User-Defined Character Ranges
| Japanese Shift JIS User-Defined Character Range | Number of Code Points |
|---|---|
|
F040-F07E, F080-F0FC |
188 |
|
F140-F17E, F180-F1FC |
188 |
|
F240-F27E, F280-F2FC |
188 |
|
F340-F37E, F380-F3FC |
188 |
|
F440-F47E, F480-F4FC |
188 |
|
F540-F57E, F580-F5FC |
188 |
|
FF640-F67E, F680-F6FC |
188 |
|
F740-F77E, F780-F7FC |
188 |
|
F840-F87E, F880-F8FC |
188 |
|
F940-F97E, F980-F9FC |
188 |
The Oracle character sets listed in Table 13-2 contain predefined ranges that support user-defined characters.
Table 13-2 Oracle Character Sets with User-Defined Character Ranges
| Character Set Name | Number of Code Points Available for User-Defined Characters |
|---|---|
|
JA16DBCS |
4370 |
|
JA16EBCDIC930 |
4370 |
|
JA16SJIS |
1880 |
|
JA16SJISYEN |
1880 |
|
KO16DBCS |
1880 |
|
KO16MSWIN949 |
1880 |
|
ZHS16DBCS |
1880 |
|
ZHS16GBK |
2149 |
|
ZHT16DBCS |
6204 |
|
ZHT16MSWIN950 |
6217 |
The code point value that represents a particular character can vary among different character sets. A Japanese kanji character is shown in Figure 13-21.
The following table shows how the character is encoded in different character sets.
| Unicode Encoding | JA16SJIS Encoding | JA16EUC Encoding | JA16DBCS Encoding |
|---|---|---|---|
| 4E9C | 889F | B0A1 | 4867 |
In Oracle, all character sets are defined in terms of Unicode 4.0 code points. That is, each character is defined as a Unicode 4.0 code value. Character conversion takes place transparently to users by using Unicode as the intermediate form. For example, when a JA16SJIS client connects to a JA16EUC database, the character shown in Figure 13-21 has the code point value 889F when it is entered from the JA16SJIS client. It is internally converted to Unicode (with code point value 4E9C) and then converted to JA16EUC (code point value B0A1).
Unicode 4.0 reserves the range E000-F8FF for the Private Use Area (PUA). The PUA is intended for private use character definition by end users or vendors.
User-defined characters can be converted between two Oracle character sets by using Unicode 4.0 PUA as the intermediate form, the same as standard characters.
Cross-references between different character sets are required when registering user-defined characters across operating systems. Cross-references ensure that the user-defined characters can be converted correctly across the different character sets.
For example, when registering a user-defined character on both a Japanese Shift-JIS operating system and a Japanese IBM Host operating system, you may want to assign the F040 code point on the Shift-JIS operating system and the 6941 code point on the IBM Host operating system for this character so that Oracle can map this character correctly between the character sets JA16SJIS and JA16DBCS.
User-defined character cross-reference information can be found by viewing the character set definitions using the Oracle Locale Builder. For example, you can determine that both the Shift-JIS UDC value F040 and the IBM Host UDC value 6941 are mapped to the same Unicode PUA value E000.
By default, the Oracle Locale Builder generates the next available character set ID for you. You can also choose your own character set ID. Use the following format for naming character set definition NLT files:
lx2dddd.nlt
dddd is the 4-digit character set ID in hex.
When you modify a character set, observe the following guidelines:
Do not remap existing characters.
All character mappings must be unique.
New characters should be mapped into the Unicode private use range e000 to f4ff. (Note that the actual Unicode 4.0 private use range is e000-f8ff. However, Oracle reserves f500-f8ff for its own private use.)
No line in the character set definition file can be longer than 80 characters.
Note:
When you create a new multibyte character set from an existing character set, use an 8-bit or multibyte character set as the original character set.If you derive a new character set from an existing Oracle character set, then Oracle Corporation recommends using the following character set naming convention:
<Oracle_character_set_name><organization_name>EXT<version>
For example, if a company such as Sun Microsystems adds user-defined characters to the JA16EUC character set, then the following character set name is appropriate:
JA16EUCSUNWEXT1
The character set name contains the following parts:
JA16EUC is the character set name defined by Oracle
SUNW represents the organization name (company stock trading abbreviation for Sun Microsystems)
EXT specifies that this character set is an extension to the JA16EUC character set
1 specifies the version
This section shows how to create a new character set called MYCHARSET with 10001 for its Character Set ID. The example uses the WE8ISO8859P1 character set and adds 10 Chinese characters.
Figure 13-22 shows the General tab page for MYCHARSET.
Figure 13-22 General Tab Page for MYCHARSET
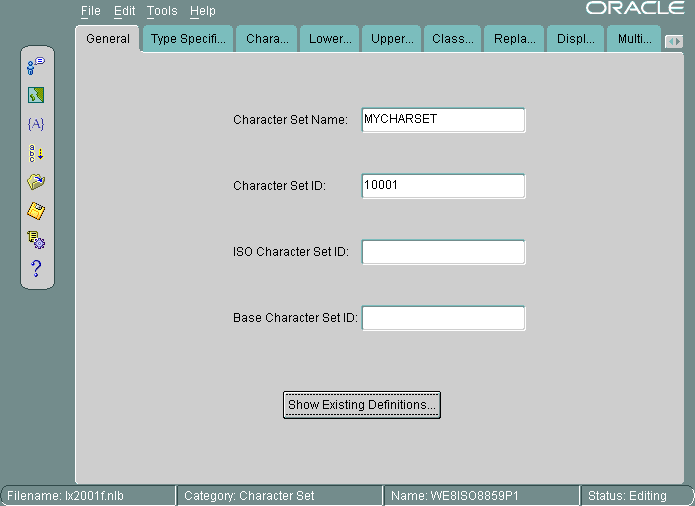
Click Show Existing Definitions and choose the WE8ISO8859P1 character set from the Existing Definitions dialog box.
The ISO Character Set ID and Base Character Set ID fields are optional. The Base Character Set ID is used for inheriting values so that the properties of the base character set are used as a template. The Character Set ID is automatically generated, but you can override it. The valid range for a user-defined character set ID is 8000 to 8999 or 10000 to 20000.
Note:
If you are using Pro*COBOL, then choose a character set ID between 8000 and 8999.The ISO Character Set ID field remains blank for user-defined character sets.
In this example, the Base Character Set ID field remains blank. However, you can specify a character set to use as a template. The settings in the Type Specification tab page must match the type settings of the base character set that you enter in the Base Character Set ID field. If the type settings do not match, then you will receive an error when you generate your custom character set.
Figure 13-23 shows the Type Specification tab page.
The Character Set Category is ASCII_BASED. The BYTE_UNIQUE button is checked.
When you have chosen an existing character set, the fields for the Type Specification tab page should already be set to appropriate values. You should keep these values unless you have a specific reason for changing them. If you need to change the settings, then use the following guidelines:
FIXED_WIDTH is used to identify character sets whose characters have a uniform length.
BYTE_UNIQUE means that the single-byte range of code points is distinct from the multibyte range. The code in the first byte indicates whether the character is single-byte or multibyte. An example is JA16EUC.
DISPLAY identifies character sets that are used only for display on clients and not for storage. Some Arabic, Devanagari, and Hebrew character sets are display character sets.
SHIFT is used for character sets that require extra shift characters to distinguish between single-byte characters and multibyte characters.
See Also:
"Variable-width multibyte encoding schemes" for more information about shift-in and shift-out character setsFigure 13-24 shows how to add user-defined characters.
Figure 13-24 Importing User-Defined Character Data
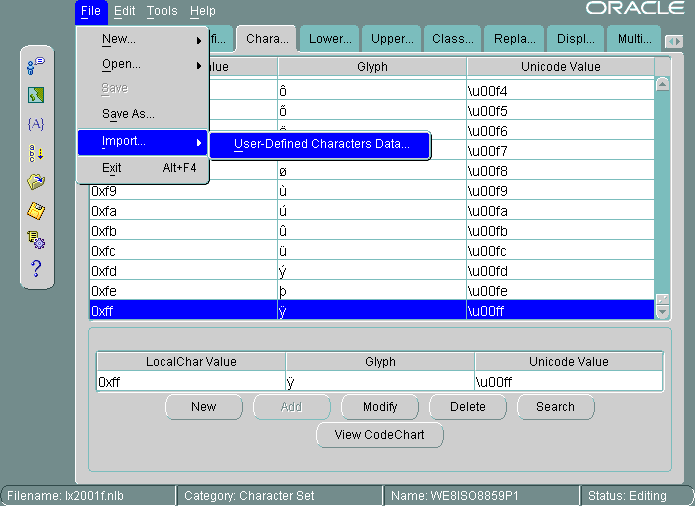
Open the Character Data Mapping tab page. Highlight the character that you want to add characters after in the character set. In this example, the 0xff local character value is highlighted.
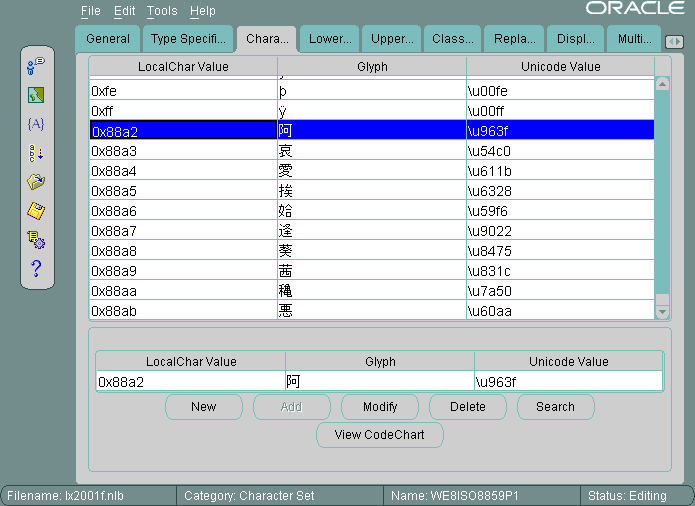
You can add one character at a time or use a text file to import a large number of characters. In this example, a text file is imported. The first column is the local character value. The second column is the Unicode value. The file contains the following character values:
88a2 963f 88a3 54c0 88a4 611b 88a5 6328 88a6 59f6 88a7 9022 88a8 8475 88a9 831c 88aa 7a50 88ab 60aa
Choose File > Import > User-Defined Characters Data.
Figure 13-25 shows that the imported characters are added after 0xff in the character set.
Figure 13-25 New Characters in the Character Set
This section shows how to create a new multilingual linguistic sort called MY_GENERIC_M with a collation ID of 10001. The GENERIC_M linguistic sort is used as the basis for the new linguistic sort. Figure 13-26 shows how to begin.
Figure 13-26 General Tab Page for Collation
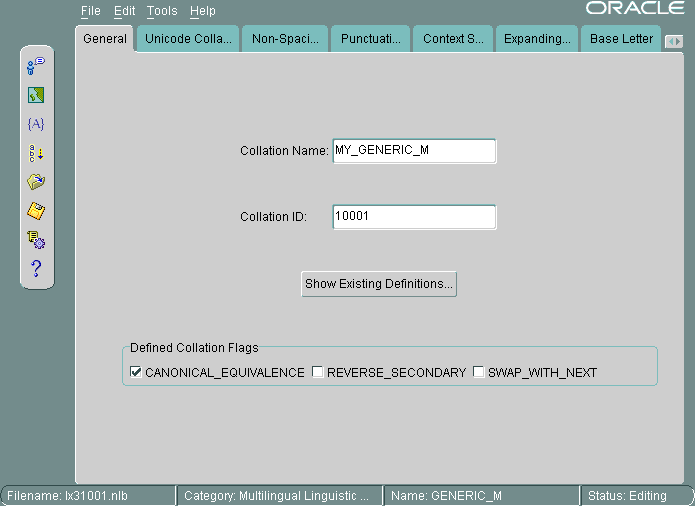
Settings for the flags are automatically derived. SWAP_WITH_NEXT is relevant for Thai and Lao sorts. REVERSE_SECONDARY is for French sorts. CANONICAL_EQUIVALENCE determines whether canonical rules are used. In this example, CANONICAL_EQUIVALENCE is checked.
The valid range for Collation ID (sort ID) for a user-defined sort is 1000 to 2000 for monolingual collation and 10000 to 11000 for multilingual collation.
See Also:
Figure 13-30, "Canonical Rules Dialog Box" for more information about canonical rules
Figure 13-27 shows the Unicode Collation Sequence tab page.
Figure 13-27 Unicode Collation Sequence Tab Page
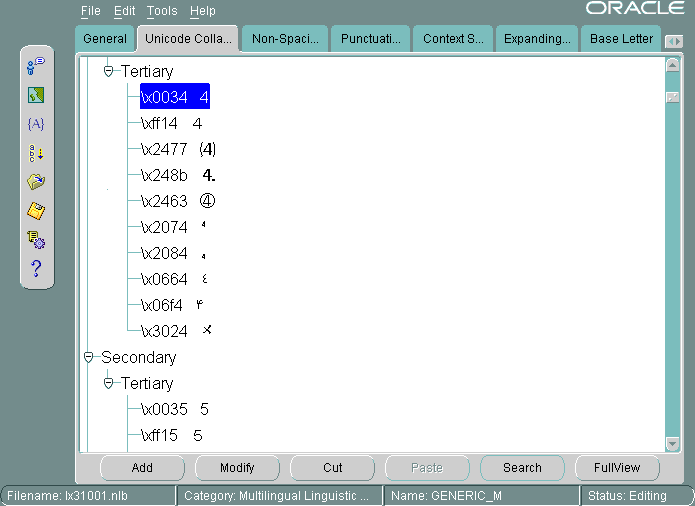
This example customizes the linguistic sort by moving digits so that they sort after letters. Complete the following steps:
Highlight the Unicode value that you want to move. In Figure 13-27, the \x0034 Unicode value is highlighted. Its location in the Unicode Collation Sequence is called a node.
Click Cut. Select the location where you want to move the node.
Click Paste. Clicking Paste opens the Paste Node dialog box, shown in Figure 13-28.
The Paste Node dialog box enables you to choose whether to paste the node after or before the location you have selected. It also enables you to choose the level (Primary, Secondary, or Tertiary) of the node in relation to the node that you want to paste it next to.
Select the position and the level at which you want to paste the node.
In Figure 13-28, the After button and the Primary button are selected.
Click OK to paste the node.
Use similar steps to move other digits to a position after the letters a through z.
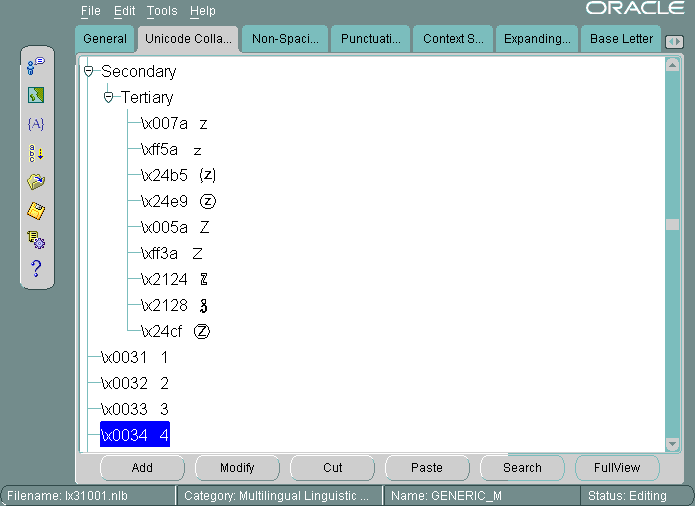
Figure 13-29 shows the resulting Unicode Collation Sequence tab page after the digits 0 through 4 have been moved to a position after the letters a through z.
Figure 13-29 Unicode Collation Sequence After Modification
The rest of this section contains the following topics:
This example shows how to change the sort order for characters with diacritics. You can do this by changing the sort for all characters containing a particular diacritic or by changing one character at a time. This example changes the sort of each character with a circumflex (for example, û) to be after the same character containing a tilde.
Verify the current sort order by choosing Tools > Canonical Rules. This opens the Canonical Rules dialog box, shown in Figure 13-30.
Figure 13-30 shows how characters are decomposed into their canonical equivalents and their current sorting orders. For example, û is represented as u plus ^.
See Also:
Chapter 5, "Linguistic Sorting and String Searching" for more information about canonical rulesIn the Oracle Locale Builder collation window (shown in Figure 13-26), click the Non-Spacing Characters tab. If you use the Non-Spacing Characters tab page, then changes for diacritics apply to all characters. Figure 13-31 shows the Non-Spacing Characters tab page.
Figure 13-31 Changing the Sort Order for All Characters with the Same Diacritic
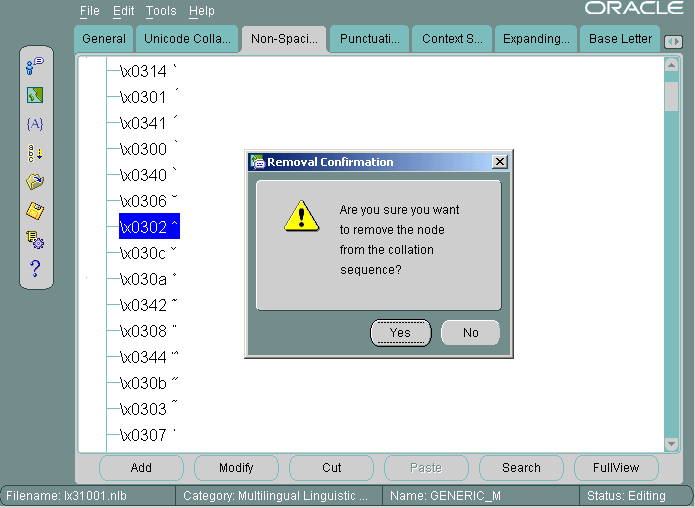
Select the circumflex and click Cut. Click Yes in the Removal Confirmation dialog box. Select the tilde and click Paste. Choose After and Secondary in the Paste Node dialog box and click OK.
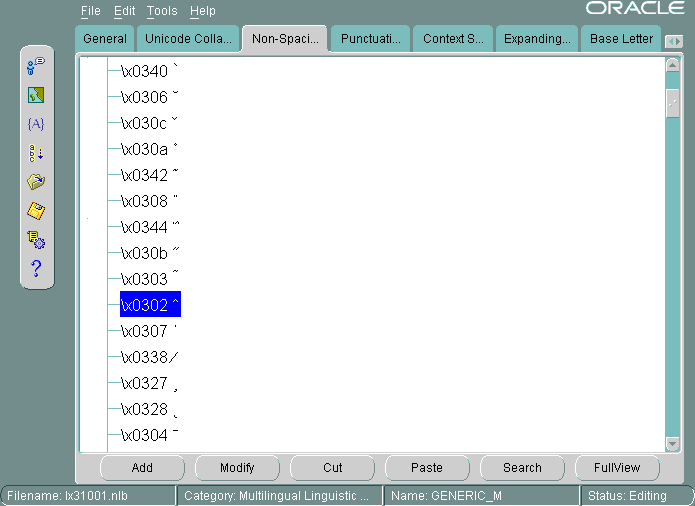
Figure 13-32 illustrates the new sort order.
Figure 13-32 The New Sort Order for Characters with the Same Diacritic
To change the order of a specific character with a diacritic, insert the character directly into the appropriate position. Characters with diacritics do not appear in the Unicode Collation Sequence tab page, so you cannot cut and paste them into the new location.
This example changes the sort order for ä so that it sorts after Z.
Select the Unicode Collation tab. Highlight the character, Z, that you want to put ä next to. Click Add. The Insert New Node dialog box appears, as shown in Figure 13-33.
Figure 13-33 Changing the Sort Order of One Character with a Diacritic
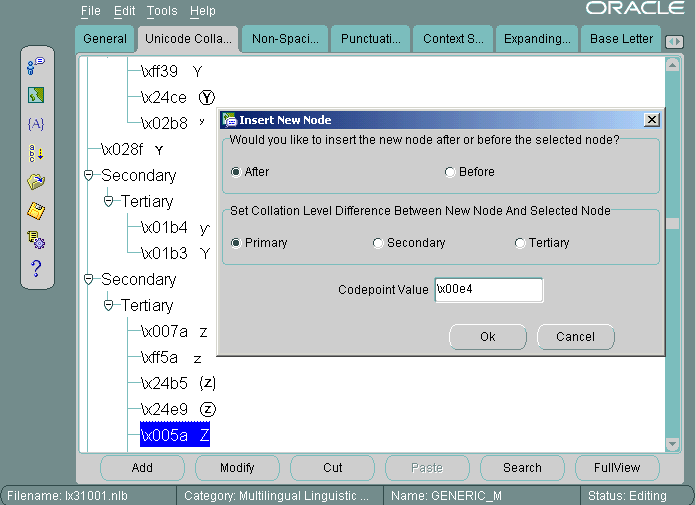
Choose After and Primary in the Insert New Node dialog box. Enter the Unicode code point value of ä. The code point value is \x00e4. Click OK.
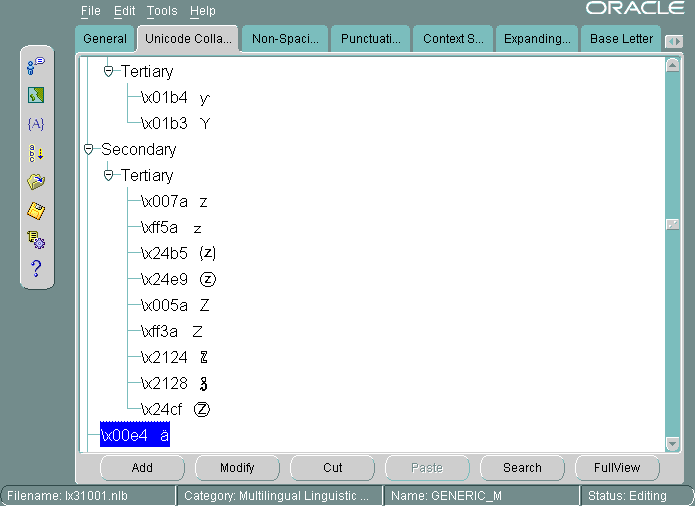
Figure 13-34 shows the resulting sort order.
Figure 13-34 New Sort Order After Changing a Single Character
After you have defined a new language, territory, character set, or linguistic sort, generate new NLB files from the NLT files.
As the user who owns the files (typically user oracle), back up the NLS installation boot file (lx0boot.nlb) and the NLS system boot file (lx1boot.nlb) in the ORA_NLS10 directory. On a UNIX platform, enter commands similar to the following:
% setenv ORA_NLS10 $ORACLE_HOME/nls/data
% cd $ORA_NLS10
% cp -p lx0boot.nlb lx0boot.nlb.orig
% cp -p lx1boot.nlb lx1boot.nlb.orig
Note that the -p option preserves the timestamp of the original file.
In Oracle Locale Builder, choose Tools > Generate NLB or click the Generate NLB icon in the left side bar.
Click Browse to find the directory where the NLT file is located. The location dialog box is shown in Figure 13-35.
Do not try to specify an NLT file. Oracle Locale Builder generates an NLB file for each NLT file.
Click OK to generate the NLB files.
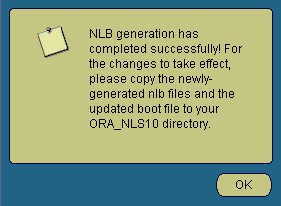
Figure 13-36 illustrates the final notification that you have successfully generated NLB files for all NLT files in the directory.
Figure 13-36 NLB Generation Success Dialog Box
Copy the lx1boot.nlb file into the path that is specified by the ORA_NLS10 environment variable. For example, on a UNIX platform, enter a command similar to the following:
% cp /directory_name/lx1boot.nlb $ORA_NLS10/lx1boot.nlb
Copy the new NLB files into the ORA_NLS10 directory. For example, on a UNIX platform, enter commands similar to the following:
% cp /directory_name/lx22710.nlb $ORA_NLS10
% cp /directory_name/lx52710.nlb $ORA_NLS10
Note:
Oracle Locale Builder generates NLB files in the directory where the NLT files reside.Restart the database to use the newly created locale data.
To use the new locale data on the client side, exit the client and re-invoke the client after installing the NLB files.
When deploying your locale customization files on other Oracle installations, running with the same Oracle release, and under the same operating system platform, you will need to copy all the custom NLB files together with the lx1boot.nlb file over to the target machine. In order to deploy the custom NLB files on a different platform, you will need to copy over the custom .NLT files to your new platform, and then repeat the NLB generation and installation steps as described in the section "Generating and Installing NLB Files".
Locale definition files are database release-dependent. For example, NLB files from Oracle Database 9i and Oracle Database 10g Release 1 are not directly supported on an Oracle Database 10g Release 2 installation. In order to migrate your locale customization files from a previous release of the database to your current release, you will first need to convert the files into the latest NLT format. This is achieved by loading the locale customization files (either NLB or NLT), and saving them individually into NLT files using the current version of the Oracle Locale Builder. Next, you need to repeat the NLB generation and installation steps as described in the section "Generating and Installing NLB Files".
Please note that the Oracle Locale Builder can read and process previous versions of the NLT and NLB files, as well as read and process these files from different platforms. However it will always save NLT and generate NLB files in the latest format.
NLB files that are generated on one platform can be transported to another platform by, for example, FTP. The transported NLB files can be used the same way as the NLB files that were generated on the original platform. This is convenient because locale data can be modified on one platform and copied to other platforms. Note that you must copy all of the NLB files from one platform to another, not just the files that have been modified. Also note that "Generating and Installing NLB Files" is performed the same way as in previous releases. NLB files that are generated on a Solaris platform can be copied by FTP to a Windows platform and provide the same functionality there.
Different binary formats (such as 32-bit, 64-bit, big-endian, little-endian, ASCII, and EBCDIC) are processed during NLB loading in a manner that is transparent to the user.